OPS345 Lab 4
Databases
All computer data is stored as 1s and 0s, but noone has the time to write and read millions and billions of those just to see some pictures. Only people in the Matrix can look at a stream of binary data and see pictures. Real people need a library to convert that stream of data to RGB values for pixels in XY coordinates, and a video card to place those on a screen.
The same applies to apparently simple data like strings of text. You could store text as ASCII values in a plain-text file, but for most use cases data stored that way is not usable. For example the text you're reading here is not stored in a plain text file, it is stored in a relational database. That allows me to edit it via a web browser, adding formatting and images, allows you to view it in a web browser, enables features like the edit history, email notifications, etc.
Databases are not the only means to store user data, but they are the most common way to store organized text. For many years now and still today the most common database on the internet is MariaDB, which was forked into MySQL some years ago.
While you're not expected to become gain strong database skills in this course: as a system administrator you should know how to do basic setup tasks like setting up a server, creating a database and users, and setting up a pre-defined schema to be used by a web application. That's what this lab is about.
AWS RDS
You could install MariaDB in one of your AWS VMs (as you did in Vmware in OPS245) but Amazon provides a service called Relational Database Service (RDS). This service performs better, is more reliable, and is professionally administered by highly qualified AWS employees. So it would make no sense for us to compete with that, especially given how valuable data in a database typically is.
RDS supports many backends including most of popular SQL database engines (RDBMSs). We're going to create a MariaDB DB instance.
- In the AWS Management Console go to Aurora and RDS.
- Under Databases click Create database.
- Pick Standard create, MariaDB, leave the default version
- Pick Sandbox from Templates.
- Call the database ops345db.
- Change the default username to dbroot.
- Put in a long password, make sure it's a password that's only used for the database.
- Choose the minimum 20GB for allocated storage. You will use a tiny fraction of that.
- Under Connectivity pick the vpc-ops345 VPC.
- Create a new security group named ops345dbsg.
- Pick us-east-1a for the availability zone.
- The defaults can be left for other options.
- Click Create database
- You'll get an error like this. Understanding it will take some time:

We don't have time in this course to learn about Availability Zones. The following should be enough for you to understand what the problem is. One of the reasons people choose to use AWS is global availability. You may be working in Toronto building an awesome website, but if your clients are in the southern USA, or europe, or asia - they will experience poor performance simply because of the distance. The earth is big enough that even if your data travelled at the speed of light - it would take it too long to get to the other side of the planet.
Amazon assumes that you're building something to be available in the entire world, and that's why RDS insists that your database be available in at least two availability zones.
Unfortunately for you: that means a lot more setup, but that's ok - it will give you more practice with AWS networking.
Add a second subnet
You need to create another subnet, and make sure that your second subnet is in a different availability zone from subnet-ops345.
- Leave the RDS Management Console and go to the VPC Management Console.
- Under Subnets, create a new one the same way you created subnet-ops345 in Lab 2.
- Pick the VPC vpc-ops345.
- Name it subnet-ops345-db.
- Pick the us-east-1b availability zone so that the new subnet is in a different availability zone from subnet-ops345.
- The CIDR for the new subnet will be a part of your VPC's subnet and not overlapping with subnet-ops345: 10.3.45.128/25

- Go back and repeat the steps to create your database. It should work this time.
It will take some time for your database to be provisioned. While that's happening you can move on to the next steps in the lab.
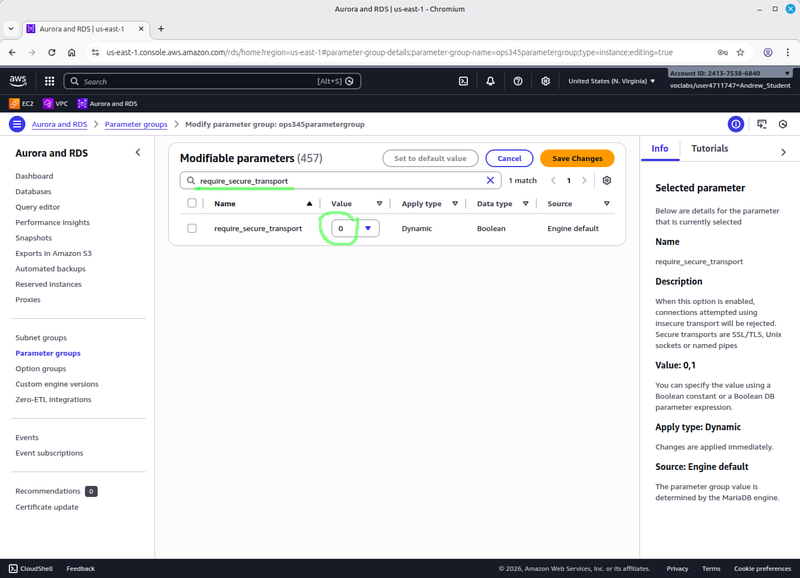
Allow connections without encryption
In the current (january 2026) default configuration of a MariaDB instance in RDS you can only connect to your instance over an encrypted tunnel. That needs to be changed.
- In the RDS interface: go to Parameter Groups:

- And create a new one named ops345parametergroup with the following settings:
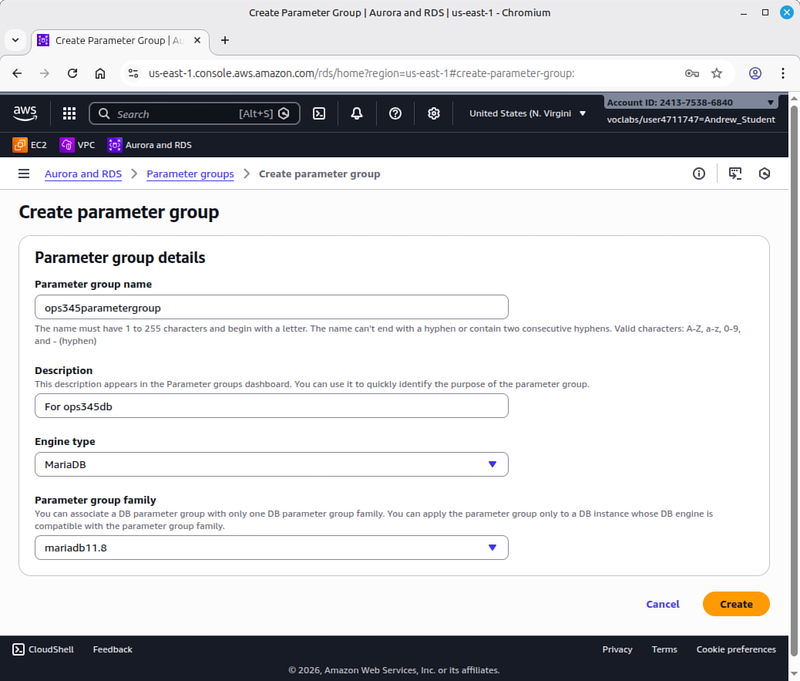
- After ops345parametergroup is creater: edit it, find the require_secure_transport parameter, and change it to 0. Don't forget to save that change.
- Modify ops345db, and change the parameter group to ops345parametergroup:
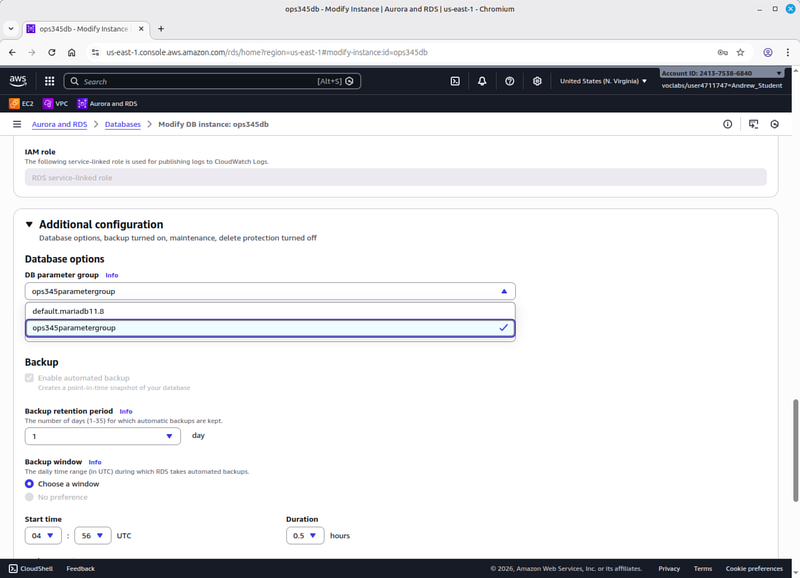
- Apply the changes immediately, but give it a couple of minutes for "immediately" to happen.


Administering an SQL database
The ops345db RDS instance you created is called a database, which is confusing, because inside it you're going to create a database. ops345db is actually more akin to an RDBMS (Relational Database Management System). Like installing MariaDB on a linux box. It would be better called a database server. Inside the RDBMS you create what's more commonly called a database by more technical people. You can have many databases on one database server. But you cannot have any database inside another database - that just doesn't make sense, at least not with SQL databases.
There are graphical applications for managing databases, and sometimes they're quite helpful. But for you it wouldn't be worth learning their interface for the basic things you need to do for the lab. Also the command-line commands you will learn in this lab are good because they will work on almost any MySQL/MariaDB database server.
You'll need some extra software to be able to connect to ops345db from your www server.
- Use ssh to connect to www.
- Install mariadb105. This is the client software for MariaDB. You do not need the server software, the server is already set up in AWS.
- Note that in order to install anything with yum: www needs to connect to the internet. So create a temporary elastic IP and assign it to www, just as you did in the end of the previous lab.
- Disassociate the elastic IP from www after your yum install. You will need it again later, so don't delete it yet.
- As a fundamental security principle: do the rest of the lab as a regular user, don't use root.
- To run the MariaDB client you need to know what to connect to. Find the FQDN ("endpoint") for ops345db in the web interface:

- And connect to it from www:
mysql -u dbroot -pyourdbpassword -h ops345db.cnjsjcelkwzu.us-east-1.rds.amazonaws.com
- It will almost certainly time out. That's because ops345db is behind a firewall, with rules defined in the ops345dbsg security group.
- Find your way to the Inbound rules of ops345dbsg.
- Delete the existing rule.
- Add a new rule for MySQL (TCP port 3306), with the source ops345wwsg. That's the only machine that needs direct access to the database server.
- Try again to connect using the mysql client software. It should work this time.
- If you get an error like this then double-check the master username under RDS/ops345db/Configuration and you can reset the password via the Modify button on the same page (the password change might take a few minutes to complete).
ERROR 1045 (28000): Access denied for user 'root'@'10.3.45.11' (using password: YES)

- See also Troubleshooting for Amazon RDS.
Some basic SQL
Though the SQL console looks a little bit like the Linux commandline: they have almost nothing in common. In the SQL console you can write some MariaDB commands, but most of the time you write SQL statements. You can't execute any shell commands. SQL statements (queries) end with a semicolon, to make it clear that you're not trying to run a multi-line query.
- Out of the box your ops345db has four databases, all of which are used internally by MariaDB. They are not used to store data for your applications. Run this:
MariaDB [(none)]> show databases;
+--------------------+
| Database           |
+--------------------+
| information_schema |
| innodb             |
| mysql              |
| performance_schema |
| sys                |
+--------------------+
5 rows in set (0.001 sec)
- To run SQL queries you need to choose the database you're working with. Let's look at the "mysql" database:
MariaDB [(none)]> use mysql;
Database changed
- Now let's see what tables are inside this database:
MariaDB [mysql]> show tables;
+-------------------------------+
| Tables_in_mysql               |
+-------------------------------+
| column_stats                  |
| columns_priv                  |
| db                            |
| event                         |
...
| transaction_registry          |
| user                          |
+-------------------------------+
38 rows in set (0.001 sec)
An SQL table is made of columns and rows. The columns are part of the definition of the table. The rows are the data that you can insert into the table. You will never look at most of these particular tables, but one of them is interesting.
- Show all the columns (*) in the user table:
SELECT * FROM user;
- This table has many columns, you can limit which columns you want to see for each row by specifying them explicitly. Choose some columns from the previous output that looks interesting and display just those:
MariaDB [mysql]> SELECT User,Password,password_expired FROM user;
+-------------+-------------------------------------------+------------------+
| User        | Password                                  | password_expired |
+-------------+-------------------------------------------+------------------+
| mariadb.sys |                                           | Y                |
| rdsadmin    | *0BC5B85E564E990A9F12E40305716A5E3B2D703E | N                |
| dbroot      | *0463BE0B12D9D44F189C02D447529D16242028CD | N                |
+-------------+-------------------------------------------+------------------+
3 rows in set (0.00 sec)
The mysql dbroot user is not the same as the root user on the Linux machine that's running MariaDB. But it is the administrator of the entire database server, and therefore has access to all the data in all the tables, in all the databases. You should only use the dbroot user for creating other database users, creating and deleting databases, and for assigning permissions.
Create an SQL user
Just as root: regular users in the DBMS are not in any way related to Linux users in /etc/passwd. Typically you will have on SQL user for each web application you have using the database server. SQL users also have SQL permissions, which have nothing to do with Linux permissions - they describe what operations that SQL user can do, on which databases.
- Create a database for testing the SQL queries in this section:
MariaDB [(none)]> CREATE DATABASE firstdb;
- A single command will create a user and assign permissions (they're called "privileges" in SQL) for that user on a certain database. (Note: in the past that didn't work on AWS RDS because your root user didn't have 'ALL PRIVILEGES', so it couldn't grant them to another user. Use your own username and password.
MariaDB [mysql]> GRANT ALL PRIVILEGES ON firstdb.* TO 'asmith15dbuser'@'%' IDENTIFIED BY 'asmith15dbpassword';
Query OK, 0 rows affected (0.00 sec)
- Quit the SQL session where you're logged in as dbroot and log in as your new user instead:
MariaDB [(none)]> quit
Bye
[asmith15@www ~]$ mysql -u asmith15dbuser -pasmith15dbpassword -h ops345db.cnjsjcelkwzu.us-east-1.rds.amazonaws.com
Welcome to the MariaDB monitor.  Commands end with ; or \g.
Your MariaDB connection id is 1375
Server version: 10.5.12-MariaDB-log managed by https://aws.amazon.com/rds/

Copyright (c) 2000, 2018, Oracle, MariaDB Corporation Ab and others.

Type 'help;' or '\h' for help. Type '\c' to clear the current input statement.

MariaDB [(none)]>
- Execute show databases; - note that the list of databases is shorter. That's because your user doesn't have access to all the databases whcih dbroot has access to.
- Execute use firstdb and show tables. You have access to the firstdb databases, but there aren't any tables in it. You need to create your own.
- This MariaDB tutorial is as simple as it gets for creating tables, inserting data into them, and retrieving data. Follow it if you have the time.
Install Nextcloud
We're going to install a handy web application in order to get some real world practice setting up our database. Nextcloud has all kinds of capabilities, the most obvious one is that you can use it to share files (of any size) with specific users or make them public for anyone to access.
- Download the .tar.bz2 tarball of Nextcloud version 31.0.8 from the Nextcloud website.
- Make sure you get the .tar.bz2 file, not the .zip file. The zip format doesn't support permissions.
- Remember you want this file on your web server, not on your workstation. Use wget on www to download it straight on there.
- You might as well download it straight into /var/www/html
- Remember your web server doesn't have direct access to the internet: you'll need to assign it a temporary elastic IP.
- Extract the file in /var/www/html so you end up with a /var/www/html/nextcloud/index.html file (among many others):

We'll be following this Nextcloud documentation page to set it up.
- Since you regular user doesn't have permission to edit the web server configuration: switch to root.
- Create /etc/httpd/conf.d/nextcloud.conf and paste these contents into it:
Alias /nextcloud "/var/www/html/nextcloud/"

<Directory /var/www/html/nextcloud/>
  Require all granted
  AllowOverride All
  Options FollowSymLinks MultiViews

  <IfModule mod_dav.c>
    Dav off
  </IfModule>
</Directory>
- Change the ownership of the entire nextcloud directory so it's owned by the user that runs the web server:
chown -R apache:apache /var/www/html/nextcloud/
- Go to the installer using your web browser to see an error telling you're missing some PHP modules:

This is a relatively common error.
- Install the missing GD module for PHP:
yum install php8.4-gd php8.4-zip
- Now you can go back to the Nextcloud setup in Firefox. But notice that it doesn't give you the option to keep its data in your MariaDB database:

- Install the php8.4-mysqlnd package using yum, and restart Apache.
- Get back to the Nextcloud installer in Firefox.
- Create a Nextcloud administrator account with a good username and password. Remember that your web server is exposed to the entire internet, so don't be cheap with your password complexity.
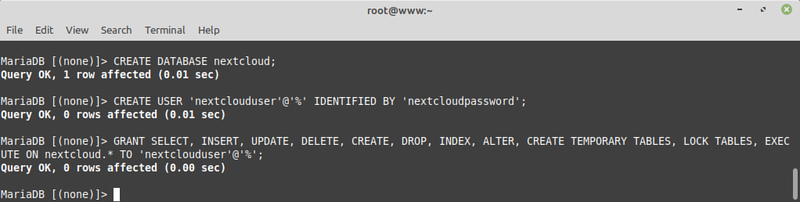
- You need an SQL database, with an SQL user who can access it, and a password. Follow the steps in the previous section to set these up and input them into the Nextcloud setup. For example:
- The database host is not the default localhost, it's your RDS instance's FQDN - the same one you connect to using the mysql command.
- Look around the Nextcloud interface.
- You're currently logged in as the Nextcloud administrator. Create a regular user (choose any username you like) and log in as that user.
- Upload a picture, share a link to it.


- When done with everything, release the elastic ip.
- Confirm that everything still works.
- If you feel like taking on an extra challenge: get rid of the index.php in the URLs. Instructions for that are in the "Pretty URLs" section of the same this Nextcloud installation webpage.
After submission
The database instance you created will cost more than a little bit over time, no matter whether your learner lab is started or not. To save cost: you can stop it temporarily, and start it back up when you need it again.
Find your database in the RDS interface and pick "Stop temporarily" from the actions menu:

This will stop it from costing you money for 7 days. After that you'll have to stop it again.
The next time you'll need your RDS instance for sure will be at the end of lab 5 (3 weeks from the scheduled end of lab 4). I suggest you write some notes for yourself to stop your database instance two or three more times in the meantime.
Also make sure you don't forget to release the temporary IP address you allocated for www.
Submit evidence of your work
For this lab, please submit screenshots that show you've completed the work, unless your professor has given you different instructions. As a minimum that's:
- Your RDS instance in the RDS Management Console
MariaDB [mysql]> SELECT user from user;
MariaDB [mysql]> show databases;
- Firefox showing your installation of Nextcloud.