OPS245 Lab 3
In this lab we'll look at the simplest types of user management on a Linux system.
What's a user
- Look at the contents of the /etc/passwd file:
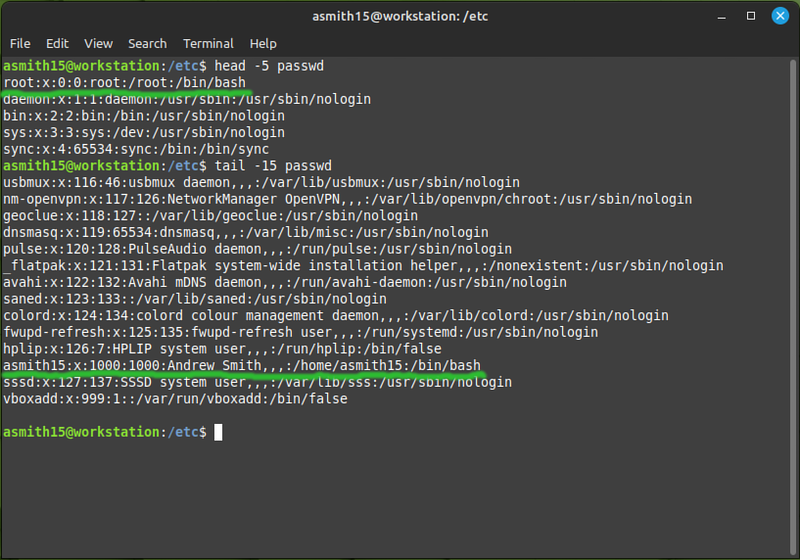
Every line in that file is a user. Two of them you have used explicitly: root and your own username.
Each line is made of several fields, delimited by a colon. The same as a comma-separated value file (CSV) but separated by colons instead of commas. The fields are:
- The username (e.g. asmith15)
- A field that's no longer used, in the distant past it was the user's password
- The UID (user ID) - a unique number identifying the user. The system uses these numbers to determine who owns which files and processes.
- The GID (group ID) - the number identifying the user's primary group. Every user on a Linux system is a member of at least one group. It can be a member of other groups as well, but that membership is specified in the /etc/group file.
- A comment - an unstructured string of text, usually used to store a user's full name.
- The user's home directory. It's a sort of default directory for each user. You'll have noticed that it's the directory your shell is in when you log in, and it's what
~and$HOMEare set to. - The user's login shell. You probably only ever used Bash, but there are several other shells which some people prefer. The differences mostly matter only to advanced users.
The password
Linux users no longer have their hashed password stored in the /etc/passwd file. At one point the available computing power increased so much that the one-way hash could be reversed by brute force, therefore any user on the system could theoretically get any other user's password. To avoid this problem: the password hashes were moved to the /etc/shadow file which regular users don't have access to:
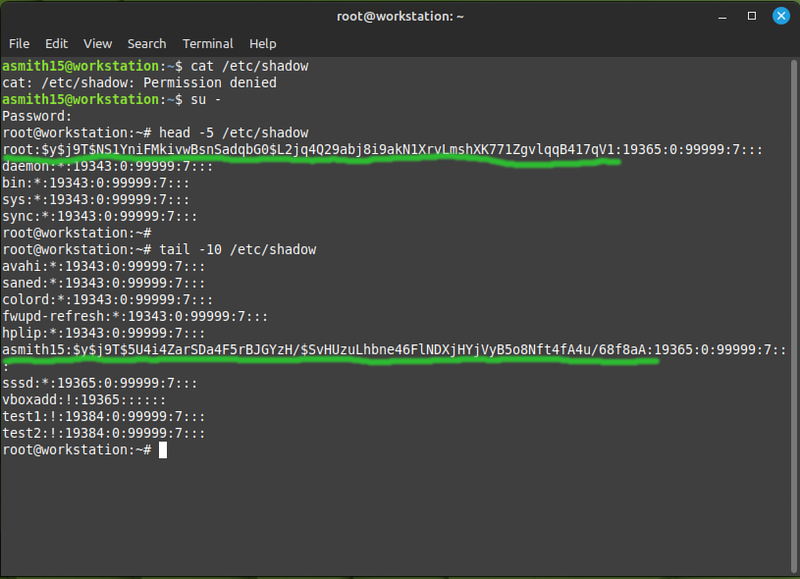
The long string of random-looking characters is not the password, it's a hash of the password. The idea with a hash is that you can convert some plain text into the hash, but you cannot convert the hash back into the plain text. You might think of it as encrypting something with no key to decrypt it, but it's a different process: a hash is a fixed size, and the data can be a million times larger than the hash - so it would be nonsensical to try and reverse the hashing process. That's why these days most services won't let you retrieve a forgotten password: it's simply not there to be retrieved, you have to reset it.
Home directories
- Regular users' home directories are /home/username. That is typical for regular users, but there are other types of user:
- The root user's home directory is /root. This is because traditionally the /home directory was on a storage device which was mounted (i.e. connected) at a later stage of the boot process. And if something went wrong with the boot process: having access to root's files was helpful for fixing booting problems.
- Services often have a home directory set to where they store data by default. For example the www-data user (the Apache web server runs as this user) stores web content in /var/www by default - and that's that user's home directory. For services the default home directory is mostly meaningless, they never use the $HOME environment variable.
Technically a valid user does not need to have any write access to their home directory. You could create a user with / for a home directory - and that user would work just fine, except it couldn't write any files in their home directory.
Users
If you end up administering Linux servers: at some point you're going to create a user. Even if it's a server which only the administrator has access to: the services running on it may need users created for them.
There are two commands available to create a user. They sound the same and accomplish the same goal, but they are used in different circumstances:
- adduser is intended to be run in an interactive session, meaning that you're available to answer questions which it prompts you with.
- useradd can be run from an interactive session, or from a script.
Since I don't manage many users: I prefer the adduser command, it's easier to use for one-off situations. We'll use the useradd command because even though it's more complicated: it can be used in more situations.
- On your workstation: create a new user called test1:
useradd test1
Notice that it didn't ask you for a password. At this point the only way to log in as that user is to first log in as root, and then switch to the new user. Notice also that test1 is missing its home directory, but you can still do most things you would expect to be able to do on the commandline.
The shell environment doesn't look right because by default the useradd command gives users the sh shell instead of bash, you can run bash after your su command, or you can tell the su command to run bash for you:
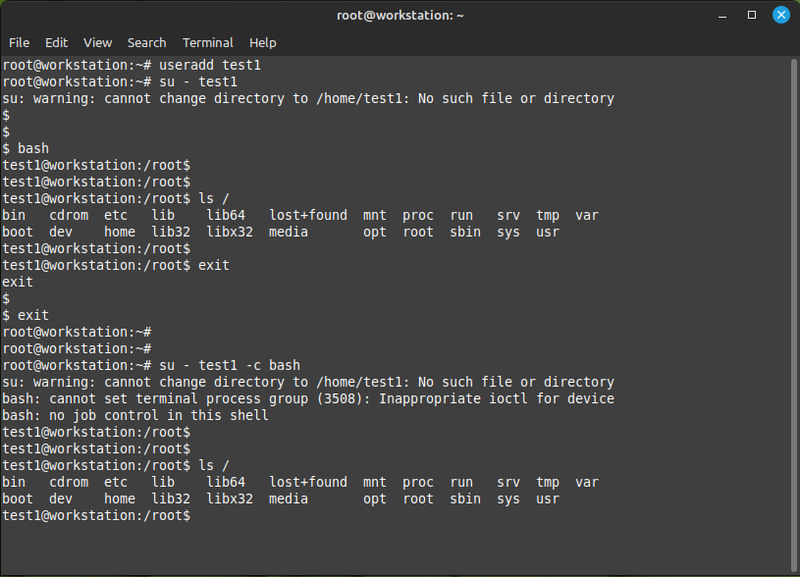
The colours in the prompt are missing because root's prompt doesn't have any colours, and test1 doesn't have any bash configuration files to set them.
- Create a new user called test2, this time make sure a home directory is created for it and it's using the bash shell:
useradd -m -s /bin/bash test2
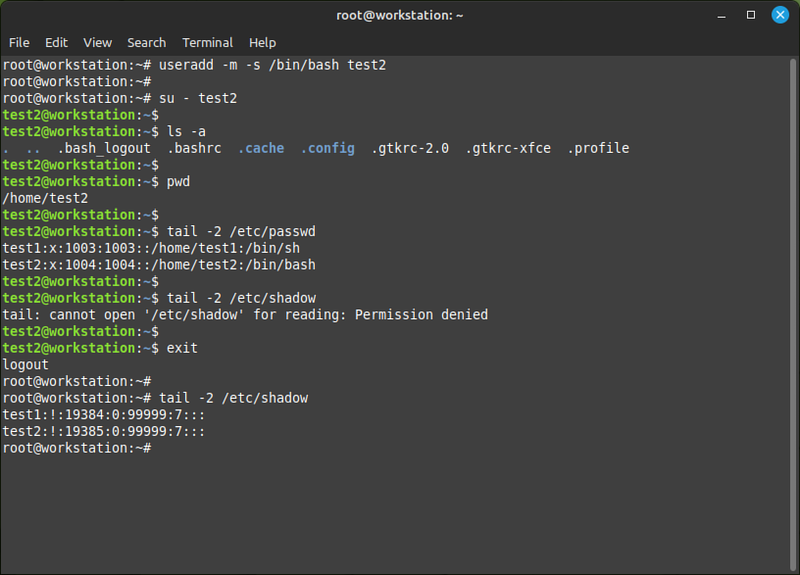
The bash command starts a new shell which loads test2's bash configurations, so the prompt looks normal and the keyboard works properly.
- Look at the bottoms of
/etc/passwdand/etc/shadow. A couple of things are worth noting:- The UIDs are assigned sequentially, starting from 1000. User IDs less than 1000 are usually reserved for system (service) users and root (with UID 0).
- The two new lines in the shadow file have a ! instead of a password hash.
- Set a password for test2:
passwd test2
You are able to set another user's password because you're logged in as the superuser, who has permissions to do anything that's possible to do on the system. Try to run the same command as your regular user to see what happens. As a regular user you can only set your own password, and only if you know your existing password.
- On each of your server VMs: create three users with home directories, and set a password for them. Use the following usernames: alpha, beta, and gamma. You may use either the useradd or the adduser command, try both.
- Confirm that you can log in as those users.
Groups
Groups are used to grant more than one user access to files and directories at the same time. On some Linux distributions all newly created users are members of a "users" group. On other distributions by default when you create a user: a group with the same name is automatically created, and the user is added to that group. Debian is one of the latter. It's slighly confusing when you're learning about this because it's not always immediately obvious whether you're looking at the name of a user or the name of a group.
- Have a look at the contents of the
/etc/groupfile on server1:
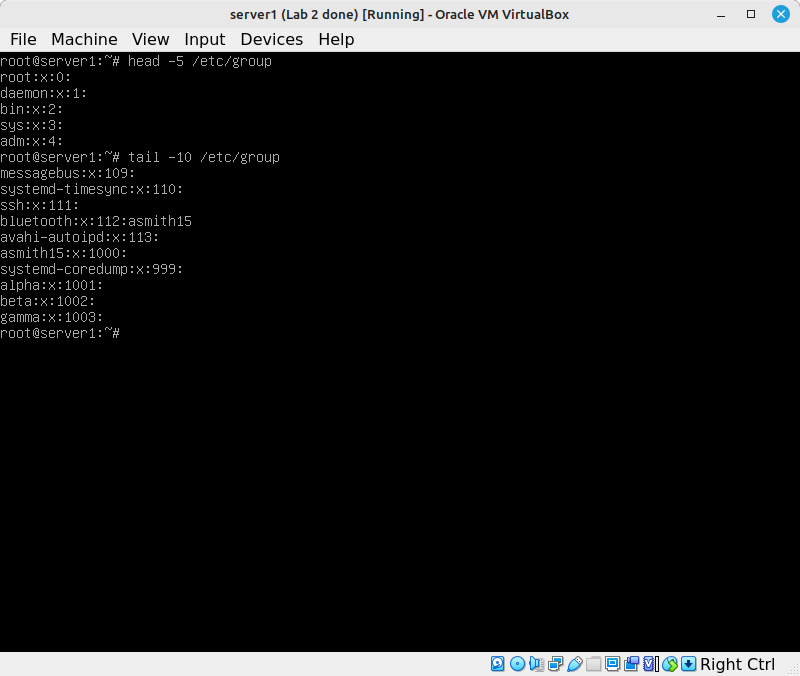
The fields in that file are:
- The group name,
- The GID (group ID) - the same concept as a UID, but used for groups,
- A comma-separated list of group members, not including the users whose primary group this is.
We'll do some simple operations to practice the commands you use to work with groups:
- Create a new group with the name secretfiles:
groupadd secretfiles - Have a look at the passwd file, the group file, and the /home directory. Notice that secretfiles only showed up in the group file.
At this point the group exists but it doesn't have any members.
- Add alpha and beta to the secretfiles group:
usermod -G secretfiles alpha
usermod -G secretfiles beta
- Have another look at the passwd and group files. Note that the primary group for alpha and beta hasn't changed, but they were added to the list of users in the group file.
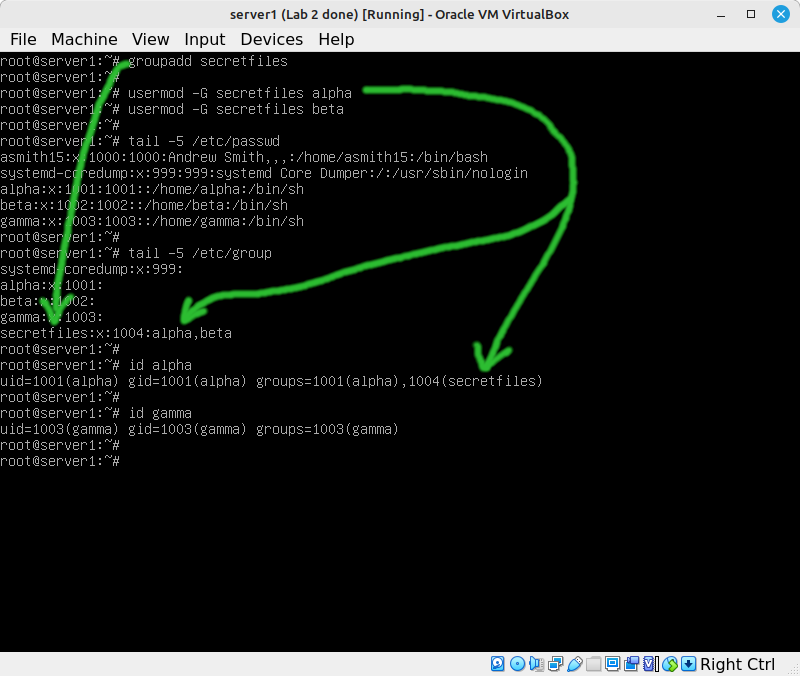
From this point on: the alpha and beta users will be granted any permissions that are given to the secretfiles group.
- For practice: add the secretfiles group with the same members on server2 and server3.
Permissions
You should have learned about file and directory access permissions in ULI101. Those are Read, Write, and Execute for User, Group, and Others. Some quick reminders:
- The octal notation for chmod is not too complicated if you remember that read is 4, write is 2, and execute is 1. That gives you a range of possible combinations from 0 to 7.
- For a directory: read means list the contents of the directory, and execute means traverse the directory (cd into it or access any of its contents in any way).
- Permissions also apply to processes. A process that you run will be owned by your UID.
- As root in the first console on server1 (TTY1): create the directory /srv/private
- Create a file called secret.txt and write some text into it.
Our intention for this exercise is to set it up so that only root, alpha and beta have access to the private files. Noone else should be able to read them.
- Log in as alpha in the second console (TTY2) and check whether you can read the contents of secret.txt
- Log in as beta in TTY3 and check whether you can read the contents of secret.txt
- Log in as gamma in TTY4 and check whether you can read the contents of secret.txt
You should find that every use has access to that file. Looking at the permissions of the /srv/private directory and the secret.txt file should explain to you why that is.
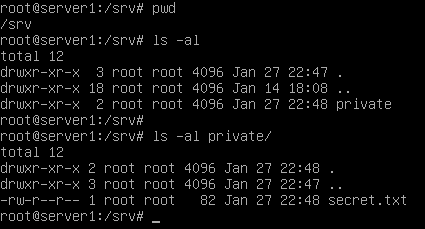
The directory and file are owned by the root user and the root group. But the permissions allow others (everyone else) read access.
Changing the permissions from 755/644 to 750/640 wouldn't work in this case, because that would prevent alpha and beta from accessing the private files.
- Just to try it: change the user owner of private and secret.txt to alpha:
chown -R alpha private
chmod 750 private
chmod 640 private/secret.txt
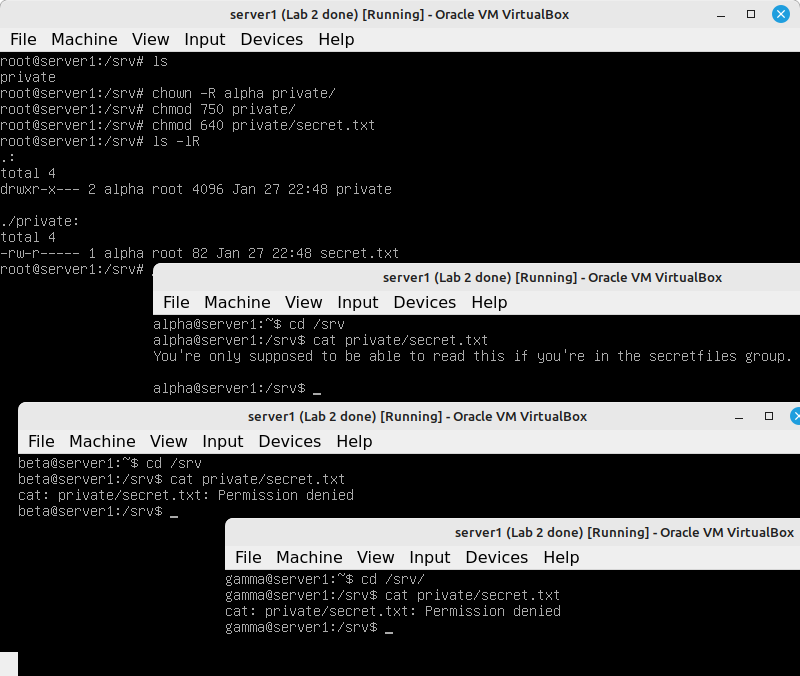
This allows alpha access, but not beta.
- Change the user owner of private and secret.txt back to root (the -R switch does it recursively, meaning it will apply to all the contents of the directory).
- Change the group owner of private and secret.txt to secretfiles:
chgrp -R secretfiles private
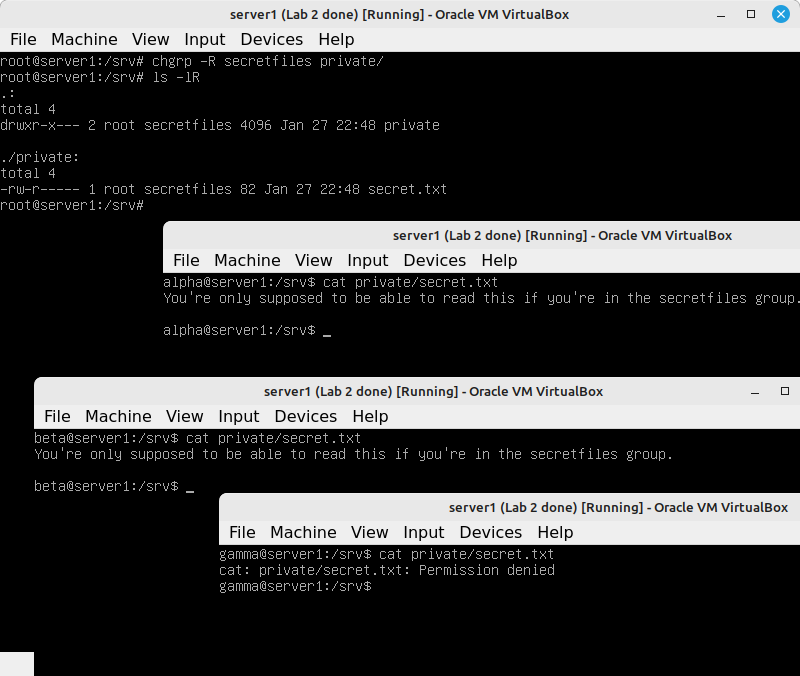
Now the permissions work the way we wanted them to work. The combinations of the three user/group/others permissions, the user/group ownership, and group membership allow for many combinations to satisfy different security requirements. That's why you need to learn how this stuff works.
Processes
- In server2: log in as alpha in TTY1 and TTY2. Log in as beta in TTY3.
- Run
ps axf, you probably want to pipe it toless. This is a good way to find what processes are running. It also shows you which processes started subprocesses - this is helpful when there's more than one process with the same name.
In this screenshot you can see the PID (573) of the bash shell that's running the ps and less commands:
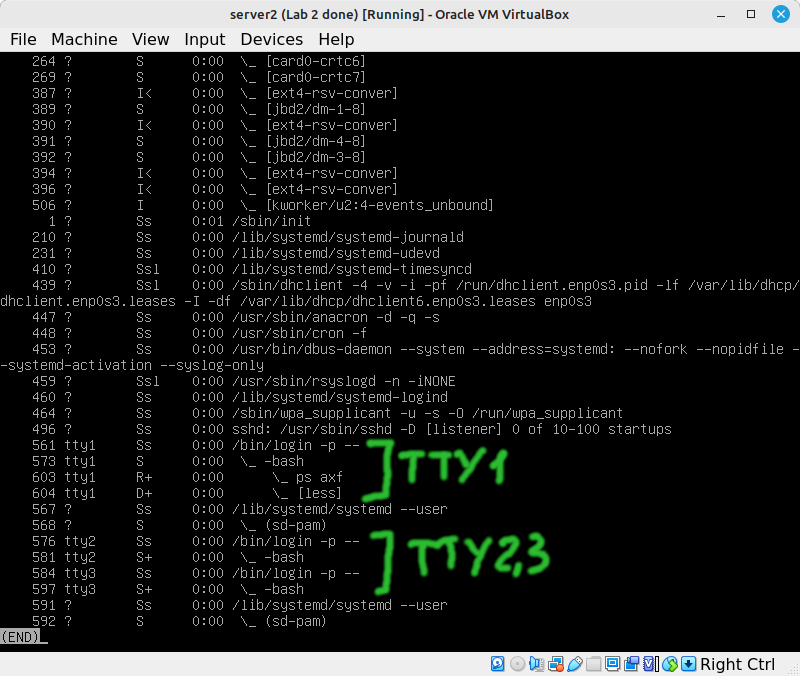
Sometimes you need to kill a process, and you need the PID for the kill command.
- Leave the less command running in TTY1, and switch to TTY3 where you're logged in as beta.
- Run
kill -9 pidofthelesscommand. It should say "Operation not permitted". That makes sense, since beta is not the administrator and the less command doesn't belong to it. - Run the same
killcommand in TTY2 where you're logged in as alpha. - Switch back to TTY1 to see that the less command has been killed.
Most often as an administrator you'll be killing services as root, for example if there's some trouble that the systemctl command can't take care of.
Submit evidence of your work
Submit one or more screenshots to show that you've completed the work:
- Your practice with the test1 and test2 users on the workstation.
- The new users you created on server, server2, and server3.
- Your secretfiles group on server1, and all your users' group membership.
- The ownership and permissions on /srv/private and /srv/private/secret.txt
- Your practice with the kill command.