OPS145 Lab 7
Input and Output
You need to study system programming to fully understand how input and output works, but without being a programmer you can still learn most of what you need to control input and output on the command line.
The introduction in this lab will probably be a little dry, but hopefuly it will start making more sense when you get to apply these concepts later in the lab.
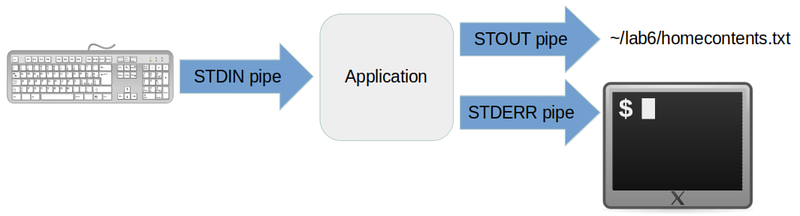
Each application on a POSIX-compatible system (such as Linux) is always started with three data pipes attached to it. These are:
- Standard input (STDIN, file descriptor 0)
- Standard output (STDOUT, file descriptor 1)
- Standard error (STDERR, file descriptor 2)
The file descriptor numbers mostly won't matter to you in this course, but they're good to know for the future. You'll remember them if you just memorize STDIN, STDOUT, STDERR, and recall that the count starts from zero.

STDOUT
Standard output is the most straightforward to understand. Whatever normal output a command-line prints goes out through the standard output pipe.
By default the standard output pipe is connected to the terminal, and anything that goes into that pipe comes out as readable output on the screen.
STDERR
This is where things get complicated. The application can send output into STDOUT or STDERR. Both these pipes are connected to the terminal by default, and both outputs will look the same to the user. But they are different pipes - which means they are controlled separately.
One extra confusing factor is the definition of "error". Sometimes it's obvious what constitutes an error, but often it isn't.
The programmer who wrote the application had to make the decision which sort of output to send to STDOUT and which to send to STDERR. You can try and make an educated guess, but you'll have to confirm by experimenting.
STDIN
Standard input is only tricky until you become familiar with it. STDIN is also a data pipe, but by default instead of the pipe's input coming from the program and the output going to the terminal: the pipe's input comes from the terminal and the output goes into the program.
Up to this point in the course you haven't used STDIN, but it's used all the time and now is the time to learn about it.
Other pipes
A programmer can choose to open as many other pipes as they like in their application, but none of those extra pipes can be controlled using the mechanisms in this lab.
Redirecting output to files
The input/output pipes don't have to be connected to the default input/output (keyboard and terminal display). You can choose to connect one or two or all three of these pipes to something else. The something else can be:
- A file, which is commonly called redirection
- Another program, which is commonly called piping
Redirect STDOUT to a file
When the shell encounters the character > it will interpret that as an instruction to redirect the standard output from the application you're running into a file.
A simple example of when you might use this is to save a listing of all the files you have now, so that you can do something with that list later.
- In a terminal create the directory ~/lab6 but keep your PWD in your home directory.
- Then run ls twice. The first time on its own, the second time redirecting its output to a file:
ls
ls > lab6/homecontents.txt

Note that the second time there is no output on the terminal. That's because you instructed the shell to redirect the standard output from the ls command into the file lab6/homecontents.txt:

The reason why homecontents.txt doesn't have any colours in it is simple: there's no such thing as dark blue or light green in a plain text file. There's just text. The more complicated question is where did the pretty colours come from when the output is in a terminal? That's too complicated a question for this course, and we're just going to ignore it.
Redirect STDERR to a file
- Run an ls command, giving it as an argument a filename for a file which doesn't exist. For example:
ls command.com - The command prints some output: "ls: cannot access 'command.com': No such file or directory". From experience I know that this comes through the STDERR pipe, but we can confirm by redirecting STDOUT to a file:
ls command.com > ~/lab6/lscommandcom.txt
- Note that the output is still printed in the terminal, and the file lscommandcom.txt is empty. There's really no way to see a difference between standard and error output except through experimentation like this.
- You can redirect STDERR to a file using the 2> notation (2 is the number of the pipe):
ls command.com 2> ~/lab6/lscommandcom.txt


Here's what all that looks like:

Because there's no obvious difference between standard and error output in the terminal: this distinction often causes headaches, but that's just a reality we have to deal with.
You can redirect STDOUT to one file and STDERR to another file:

Redirect to /dev/null
/dev/null is a special device file on Linux machines. It's like a black hole: anything that goes into it just disappears for ever. It is frequently used when you want to run a command, but you're sure you don't want to see the output of that command, and you don't want to save that output either. The utility of this will become more obvious when we get to scripting.
For now you can practice with the ls command:

New commands
This is a good time to learn some new commands. They will help you understand the pipes sections later in the lab.
grep
The grep command helps you find specific text in a plain text file. Here's what it does without extra arguments:
- It reads the input one line at a time
- It looks of your search term anywhere on that line
- If it finds it: it prints the entire line
- If it doesn't find it: it doesn't print that line at all
Let's try this:
- Change your PWD to ~/Downloads/SampleFiles
- You might recall we looked for the string "Australia" in the book 1984.txt when you opened it with the less command. Now we'll do the same thing using grep:
grep Australia 1984.txt
The first argument to grep is the search term, the second (optional) argument is the file to read. The second argument is actually optional, because grep can read its input from the STDIN pipe instead.
head
By default the head command will print the first ten lines of whatever plain text input it gets, and discards all the other lines. This and the tail command are frequently used when you just need to see the beginning or the end of a text file.
- Look at the first 10 lines of AnimalFarm.txt:
head AnimalFarm.txt - If you want a number of lines different than the default 10: you can specify that as an argument. This is how you would get the first 11 lines:
head -11 AnimalFarm.txt
The argument specifying the name of the file is optional. Like grep: head can process input from STDIN instead.
tail
If you understand what the head command does: the tail command should be self-explanatory.
wc
wc is short for Word Count, but it's almost never used to count words. It can also count lines, and it's often used for that purpose.
- Count the number of lines in the two books you have in SampleFiles:
wc -l 1984.txt
wc -l AnimalFarm.txt
The wc command can also read input from STDIN.
Redirect input from files

If you want a command to take its STDIN from a file instead of the keyboard: you can redirect it using <
- Try the commands from the previous section, this time using redirection instead of giving the file name as an argument to the command:
grep Australia < 1984.txt
head < 1984.txt
wc -l < 1984.txt
These appear to be almost the same commands, but the principles involved are quite different. The difference will become more apparent in the following piping section.
Piping
Redirecting the output of one command into the input of another is called piping. There are many reasons to do this, we will only look at a few examples.
You establish this kind of redirection using a | symbol (commonly called a pipe, used both as a noun and as a verb). The connection is highlighted in green in this diagram:

- The grep command can find strings inside a text file. The wc command can count lines. You can combine the two commands to count how many lines in a text file contain a particular string. For example:
grep stuff 1984.txt # Will find lines with "stuff" in the book
grep stuff 1984.txt | wc -l # Will count the number of lines containing "stuff" in the book
- Or let's say you wanted to find lines which contain the word Party, and also the word evidence. That would be very hard to do with a single grep command, but very easy to do if you use two of them together:
grep Party 1984.txt # Will find lines with "Party" in the book
grep Party 1984.txt | grep evidence # Will find lines with "Party" and "evidence" in the book
- There is no limit on how many commands you can chain together with pipes. For exaple if you wanted to count how many lines in the book contain "Party" and "member": you could pipe the output of the last grep command to wc:
grep Party 1984.txt # Will find lines with "Party" in the book
grep Party 1984.txt | grep member # Will find lines with "Party" and "member" in the book
grep Party 1984.txt | grep member | wc -l # Will count lines with "Party" and "member" in the book
- Or if you wanted to know how many such lines are in the first 500 lines of the book: you could feed the input to the first grep from the output of head:
head -500 1984.txt | grep Party | grep member | wc -l
The possibilities are endless. Pipes are the reason there are many simple commands in Linux. One simple command can only do so much, but combined with others: it can do some really complicated stuff, which the author of the command could never have predicted.
Some extra work
You need to complete the tasks in this section in order to submit the lab.
When you're building the commands: I recommend you build them one command at a time, and then redirect/pipe the output.
- Create the ~/lab7 directory.
- Save the last 15 lines from /var/log/syslog into ~/lab7/lastlog.txt
- Count the number of users with the "nologin" shell in the /etc/passwd file, and redirect that number to the file ~/lab7/nologinCount.txt
- Save the first line containing "barn" in AnimalFarm.txt into the file ~/lab7/meet.txt
- Save the last line containing "barn" in AnimalFarm.txt into the file ~/lab7/end.txt
Submit evidence of your work
After you finish the lab: run the following commands to submit your work:
cd ~
wget http://ops345.ca/check/ops145-lab7-check.sh # Download the check script
chmod 700 ops145-lab7-check.sh # Make the downloaded file executable
./ops145-lab7-check.sh # Run the check script
If it says "Your lab7 has been submitted": make a screenshot, and you're done. If it gives you any warnings or errors: you have to fix them and try the ./ops145-lab7-check.sh command again.