OPS145 Lab 3
Filesystems
A filesystem is a system of organizing files on a storage device. Such a system consists of:
- A standard specifying the meaning and order of bytes on the storage device, and
- Driver-like software which hides the filesystem implementation details, and allows user-level software to perform generic operations (e.g. copy this file to that directory)
Files and directories are very different things from a human point of view, but on a filesystem they are almost the same thing. Each has a name, permissions, modification date, and the location of its contents. The contents of a file are whatever you'd expect they are, it's different for each type of file. The contents of a directory are the list of its contents.
In this course we're only going to look at the user level of Linux filesystems.
We'll start exploring these ideas by paying attention to the directories and files in the following diagram:

You should have all of these if you finished lab 2.
Absolute paths start at root
In Linux there are no drive letters. All the storage which is accessible is accessible via a path which starts at the root (a single forward slash).
For example your first.txt file is in the Documents directory. The Documents directory is in the asmith15 directory. The asmith15 directory is in the home directory, and the home directory is in the root directory. The root directory does not have a parent directory, technically it is its own parent.
There might be other first.txt files on the system. In order to specify the path to this specific first.txt you use an absolute path: /home/youruserid/Documents/first.txt
The directories in a path are separated by forward slashes (/). This is different from Windows where backslashes are used.
If a path starts with a slash: it's an absolute path.
- Open a terminal and use ls, or ls -l to confirm that first.txt exists and you have the correct path to it:
ls /home/youruserid/Documents/first.txt - Read the contents of first.txt using an absolute path:
cat /home/youruserid/Documents/first.txt
Relative paths start at PWD
In the last lab you used relative paths when you ran your ls and cat commands. All that means is that the path you used (e.g. first.txt), because it didn't start with a slash, was automatically appended to the present working directory in your terminal (e.g. /home/youruserid/Documents/), resulting in an unambiguous path (e.g. /home/youruserid/Documents/first.txt).
A file or directory name on its own is the simplest type of relative path - you used that last week.
This week we can look at slightly more complicated relative paths so you can navigate the filesystem more efficiently.
- Use pwd to confirm you're in /home/youruserid
- Change your PWD to the Documents directory using a relative path, and confirm that worked:
cd Documents
pwd
ls
- Now go back to your home directory (/home/youruserid, not /home):Two dots (..) means "parent directory" in the shell. Since /home/youruserid is the parent directory of /home/youruserid/Documents: that does what you want in this case. .. is also a relative path.
cd ..
pwd
ls
- From your home directory change directly into the SampleFiles directory:This time you had a path with two directories, but it's still a relative path, not an absolute path. It will get appended to the PWD (which was /home/youruserid), resulting in /home/youruserid/Downloads/SampleFiles/
cd Downloads/SampleFiles
pwd
ls
- You can use .. more than once in the same path. It always means "parent directory". Go back to your home directory from where you are now:
cd ../..
pwd
ls
- Here's a screenshot of the commands from this section so far:

Go places, find things
Using the basic knowledge of absolute and relative paths introduced above you can navigate to any directory on your system, open any file, and run any program you have permissions for.
- Go to the directory which has most of the applications on your system (/bin):This is vaguely similar to "C:\Program Files\" on Windows, with one big difference: it only has the executables in it, not the other data files which the programs need. In Linux an application is rarly installed in one directory, an application's files are spread over several system directories (e.g. /usr/bin, and /usr/lib, and /usr/share).
cd /bin
ls
- In this directory look for the programs you've run so far (cat, less, ls, pwd). Notice that they're coloured green. That's because they're executable programs.
- You can also open the /bin directory in your graphical file manager, but only as a curiosity (you don't typically run graphical applications from a file manager in Linux):
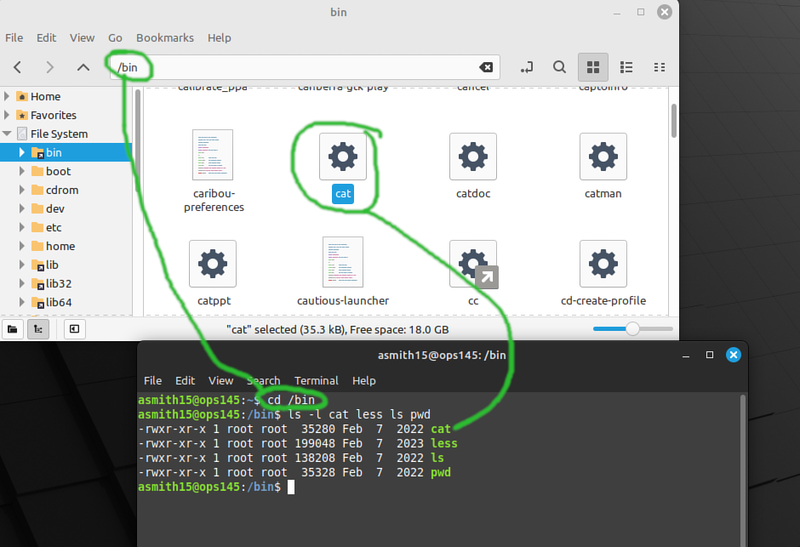
- From /bin in the graphical file manager navigate back to your home directory and keep a mental note of the steps you took to get there:
- Go up one directory
- Go into the "home" directory
- Go into the "yourusername" directory
- Do the equivalent in the terminal:
cd ../home/yourusername
pwd
- Now do the reverse. In the graphical file manager:
- Go up one directory, you'll end up in /home
- Go up one more directory, you'll end up in /
- Go to the "bin" directory
- And do the equivalent in the terminal:
cd ../../bin
pwd
- You'll need a lot of practice to get used to these ideas. Choose some number of random directories in the graphical file manager, and navigate to/between them in the terminal using absolute and relative paths.

Shortcut for your home directory: ~
Your home directory (/home/yourusername) is so frequently used that there's a special character you can use as a shortcut to get to it: the tilde ~ (top left of your keyboard).
No matter what your PWD is in your terminal: ~ will always be automatically converted to /home/yourusername. You can use it alone, or in combination with other path components.
Sometimes it's complicated
As a challenge look at the diagram, and the relative paths, and figure out what the PWD will be after you execute each of the following commands. Then run the commands one at a time to check your mental gymnastics:
cd ~
cd Downloads/../Documents
cd ../Documents/../Downloads
cd ../../../bin
Then write four cd commands using absolute paths instead of relative paths to do exactly the same operations as the four cd commands above.
Create directories with mkdir
For the rest of this lab you'll use the graphical interface to do stuff, and then do the equivalent thing in the command-line.
- Use the graphical file manager to create a lab3 directory in your home directory.
- In a terminal cd to your home directory first, then create the lab3-cmd directory:
cd ~
mkdir lab3-cmd
- You can open multiple file managers and multiple terminals to convince yourself that other than the name there isn't any difference between the two directories you created.
- In the graphical file manager go into your lab3 directory and create a red subdirectory. A subdirectory is just a regular directory, using that word usually implies that it's inside some specific other directory.
- In your terminal create a red subdirectory under lab3-cmd and then cd into it:
mkdir lab3-cmd/red
cd lab3-cmd/red
pwd
- In the graphical file manager create a green directory inside the lab3 directory.
- In your terminal use a relative path to create a green directory inside the lab3 directory and use ls to check that it was created:
mkdir ../green
pwd
ls
ls ..
- In the graphical file manager create a blue directory inside the lab3 directory.
- In your terminal use an absolute path to create a blue subdirectory of the lab3 directory. Check that it got created using an ls command and a relative-to-home path:
mkdir /home/youruserid/lab3-cmd/blue
ls ~/lab3-cmd
- In the graphical file manager try to create another blue directory inside the lab3 directory. You'll get an error message saying that it can't be done because it already exists.
- In your terminal cd to the lab3-cmd directory using an absolute path, then try to create another blue directory there. You'll get a similar error message, though not quite as easy to understand as the message in the graphical interface.
This is a screenshot of me running the commands in this section:

Removing empty directories with rmdir and rm -r
For some reason Linux has a command which can only be used to remove empty directories: rmdir. But it's used often enough that we'll learn it now.
- In the graphical file manager create a new subdirectory of lab3/red: garbage. Inside garbage create two subdirectories called stuff and things.
- Select the garbage directory and press Delete on your keyboard. It will go to your Trash (you might know it as a "recycling bin" on Windows). If you feel like it: you can restore what you deleted by clicking Go/Trash and finding your deleted files there.
- In your terminal create the garbage, stuff, and things directories at the same time by giving mkdir more than one argument:
cd ~/lab3-cmd/red
mkdir garbage garbage/stuff garbage/things
- Try to delete the garbage directory using rmdir:
rmdir garbage - It will fail with an error saying that the directory is not empty. Delete the empty stuff directory using rmdir:
rmdir garbage/stuff - You could also delete the things directory and then the garbage directory when it's empty, but instead you can use the rm command with the -r argument:
rm -r garbage
- If you forget the -r argument: rm will refuse to delete a directory, whether it's empty or not. rm is primarily used to delete files.
- Note that things deleted on the command-line are not moved to anything resembling a recycling bin. For most practical purposes they are deleted permanently and irrecoverably.
ls -R
The -R argument reuqests that the ls command show the contents of the PWD, and the contents of each subdirectory, and the contents of each subdirectory of each subdirectory, etc. until there are no subdirectories left. This common idea in computers is called a recursive operation. Many commands take an argument to do their operation recursively. Sometimes it's an uppercase -R and sometimes a lowecase -r.
- Change to your SampleFiles directory and see the difference between a regular and a recursive ls:
cd ~/Downloads
ls
ls -R
- With deeper and wider directory trees this can be difficult to read, but for simpler structures it's often helpful.
Copying files and directories with cp and cp -r
- In the graphical file manager copy the SampleFiles.tar.xz file to your ~/lab3/red directory. You can either use the copy and paste context menu items, or drag the file while holding the Ctrl key.
- Do the same in the terminal, but copy SampleFiles.tar.xz to ~/lab3-cmd/red:
cd ~
cp Downloads/SampleFiles.tar.xz lab3-cmd/red
- Confirm using ls -l that the file was copied properly.
- In the graphical file manager find the ls program in /bin and copy it to your ~/lab3/green directory.
- In your terminal copy ls from /bin to ~/lab3-cmd/green:
cd ~/lab3-cmd/green
cp /bin/ls .
- That single dot in the end is not a typo, it's another special character. The easiest way to think of it is "present working directory", though technically it's a bit more complicated than that.
- In the graphical file manager copy the SampleFiles directory from ~/Downloads to ~/lab3/blue
- In your terminal attempt to copy the SampleFiles directory from ~/Downloads to ~/lab3-cmd/blue:
cd ~/Downloads
cp SampleFiles ../lab3-cmd/blue
- It dones't work because for some reason by default the cp command only copies files. If you want to copy a directory and all its contents, and all the contents of all the subdirectories you need to use the recursive (-r) argument.
cp -r SampleFiles ../lab3-cmd/blue
- Confirm using ls -R -l or ls -R -l -h that the SampleFiles directory was copied over together with all its contents.
- With two terminal windows open: run ls -R -l ~lab3 in one window, and ls -R -l ~/lab3-cmd in the other window. The contents of both directories should be identical at this point. If they're not: figure out what commands you can use to fill in the missing parts.

Moving and renaming files and directories with mv
Linux doesn't have a "rename" command. It has a "move" command which also renames things: mv. If you think about it a little bit that mostly makes sense. You can move a file from one directory to anothter, and you can move it from one filename to another, or you can do both at the same time.
- In the graphical file manager create the ~/lab3/purple directory and drag the video and the photo from ~/lab3/blue/SampleFiles to ~/lab3/purple. Or use the cut/paste context menu items.
- In the terminal create the ~/lab3-cmd/purple directory and use the mv command to move the photo and video from ~/lab3-cmd/blue/SampleFiles to ~/lab3-cmd/purple:
cd ~/lab3-cmd/blue/SampleFiles
mkdir ../../purple
mv BigBuckBunny.mp4 ../../purple
mv Snow.jpg ~/lab3-cmd/purple
- You could also move more than one file at one time: just make sure that the last argument you give to the mv command is a directory.
Deleting files
By now you might be getting a feeling that there's some consistency between how different commands work. The command used to delete files in Linux (rm) is no exception. It takes one or more arguments, and deletes those files.
For this section don't delete files using the graphical file manager, use the terminal for both the ~/lab3/SampleFiles/ directory contents and the ~/lab3-cmd/SampleFiles/ directory contents.
- In your terminal cd to ~/lab3/blue/SampleFiles.
- Confirm that there are only .txt, .odt, and .pdf files in there.
- Delete the four files one at a time:
ls
rm 1984.txt
rm AnimalFarm.txt
rm NotPlainText.odt
rm NotPlainText.pdf
ls
- Then, still in your terminal, go to ~/lab3-cmd/blue/SampleFiles, confirm there are only four files in there, and delete them all at once:
cd ~/lab3-cmd/blue/SampleFiles
ls
rm *
ls
The star (*) is another special character, a wildcard character. On its own it expands to "all not hidden files and directories". We will look into wildcards in more detail in another lab.
Again, remember that files deleted with rm cannot be undeleted.
Symbolic links
One of the filesystem features Windows is lacking is symbolic links. The closest thing that Windows has is a shortcut.
A symbolic link is a pointer to another file or directory. In most cases you can use that symbolic link exactly the same way that you use the file/directory it's pointing to.
For example the /bin directory you've been using on Linux Mint isn't actually a directory. The directory is /usr/bin; you've been using a symbolic link /bin which points to it.
- You can see this if you run ls -l on the root directory:You can easily make your own symbolic links. The order of the arguments is a bit difficult to remember but the concept is simple.
ls -l /
- Inside your home directory create a symbolic link named lab3-link pointing to lab3:
cd ~
ln -s lab3 lab3-link
ls -l
- In your graphical file manager and/or your terminal browse the contents of ~/lab3-link and note they are identical to what you can find in ~/lab3.
- Create some extra files or directories in ~/lab3-link and see how they show up in ~/lab3. That's because when you try to create something in ~/lab3-link you actually end up creating it in ~/lab3.
- A link is not a copy of the file/directory it's pointing to!
Submit evidence of your work
After you finish the lab: run the following commands to submit your work:
cd ~
wget http://ops345.ca/check/ops145-lab3-check.sh
chmod 700 ops145-lab3-check.sh
./ops145-lab3-check.sh
If it says "Your lab3 has been submitted": make a screenshot, and you're done. If it gives you any warnings or errors: you have to fix them and try the ./ops145-lab3-check.sh command again.