OPS145 Lab 1
By the end of this lab you'll have a Linux machine with a graphical inerface set up. You will use this for the rest of the course.
Virtualization
Normally all the software on your computer will ask the operating system kernel to do things, and the operating system will pass on those requests to the hardware. The kernel has exclusive control of the hardware. That's why you can only have one operating system running at one time.
If you have more than one operating system installed on your computer (e.g. Windows and Linux): you'll have to choose which one you want to use when you boot your computer.
That's fine for workstations: you own your computer, you use it when you want to, and noone else gets to touch it. When your computer gets old enough to be annoying: you look to upgrade it or buy a new one. For servers that's very wasteful. A computer, whether it's used or not:
- Costs money to buy, and it loses its value just because time passes. Computer technology becomes obsolete in just a few years. That's called depreciation, and it means the cost per day of owning a computer is the same whether it's serving customers or gathering dust in a closet.
- Costs money to run. Even when idle (not serving any requests): the CPU, RAM, and other components use electricity. That cost is small enough to ignore for a personal computer, but in a business with hundreds or thousands of servers that adds up to a meaningful expense.
- Costs money to have connected to the internet, either directly or via a local network. Internet connections aren't free, and local networks don't build nor maintan themselves.
Given these realities: it's always been clear in a business environment that computer resources need to be shared. But sharing a computer between people who have different interests presents security concerns. You don't want your competitors to have access to your files, and I don't want you to see what applications I'm running, but if we're both using a computer from a third party provider: those security concerns are difficult to address as long as we're using the same operating system.
To get complete separation between clients A and B: the clients need to use separate operating systems, with the kernel from client A having exlusive access to the hardware allocated to client A, and the kernelf from client B having exlusive access to the hardware allocated to client B.
A relatively new (couple of decades old) development in computers is cheap and efficient virtualization. A virtualized operating system (the guest) mostly doesn't have access to the real hardware of the computer. It only has access to the kernel of the host operating system. So as long as the kernel of the host operating system is secure: none of the guests will have any access to each others' resources.
In other words: the host operating system is acting like the hardware for the guest. As far as the guest operating system knows: it's running on real hardware.
This sort of setup used to be very slow, because every instruction which the guests needs to sent to the CPU had to be sent to the host kernel first, the host sent it to the CPU, and then send it back to the guest. These days this performance bottleneck has been solved with some extra instructions in modern CPUs called hardware virtualization.
Today virtual machines are still slower than real machines, but their performance is comparable. And you can run several virtual machines on one computer, making the setup more cost-efficient overall.
Your workstation setup
The software which manages virtualization is called a hypervisor. The host operating system runs the hypervisor. We're going to use VirtualBox as the hypervisor for this course.
Whether you use your own computer or a school computer: keep your coursework on a USB SSD.
Enable virtualization
If you're doing virtualization for the first time on your own computer: it's likely that its virtualization capabilities are disabled. For some reason that's the case for the majority of new computers sold. To enable it:
- Reboot your machine,
- Press the appropriate key to get to the BIOS settings (technically it's not BIOS any more but let's not argue about that now),
- Find the setting to enable CPU virtualisation and make sure it's enabled.
Unfortunately steps 2 and 3 are done differently on different machines.
The key you need to press might be Delete, F10, F12, Escape, or something different. Usually there's a message as your machine boots that says something like "Press X to enter setup".
The setting you need to change isn't just different between AMD and Intel CPUs: it has different names for different motherboard manufacturers and models. So you'll have to figure out what it is for you. I've done this a hundred times and I still struggle finding it on one of my desktops because of its extra confusing name and location.
Create the virtual machine
All the work for the rest of the semester will be done in this virtual machine. So try to do it right, and redo it if you know you made a mistake.
- Download the latest Cinnamon version of Linux Mint.
- Start VirtualBox and click "New".
- Set ops145 as the name.
- Choose a folder where you'll store the VM's virtual hard drive. If you're using your laptop: you can store it anywhere. If you're using a removable drive: store it in any folder you like on the removable drive.
- Pick the ISO file you downloaded.
- Check Skip Unattended Installation
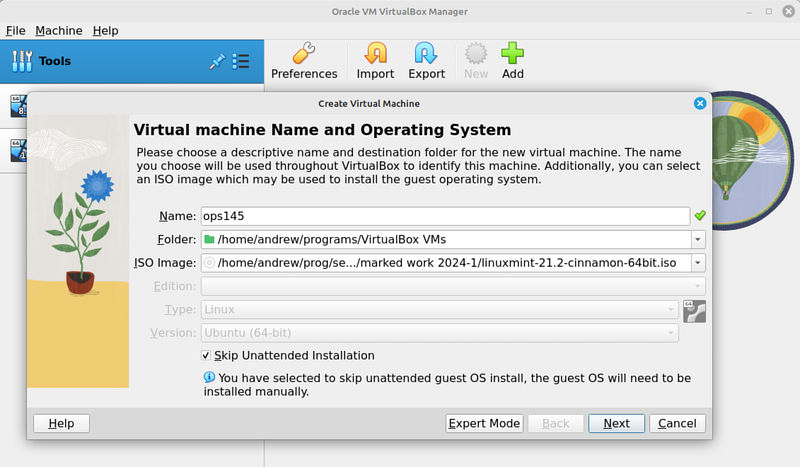
- Give it 8GB (8192MB) of memory. Keep in mind that in later labs you will have more VMs to run at the same time. The host and each VM need its own RAM allocated. The total is limited by the size of your physical memory.
- Give it 2 CPUs, it seems to be required on some hardware.
- Create a virtual hard drive 30GB in size. The default VDI type is fine. A dynamically allocated disk is fantastic and I haven't found it to be any slower than a preallocated ('fixed size') virtual drive.
- You can pick the Linux Mint .iso file to boot from before you start the VM, or right after the first time you start it.
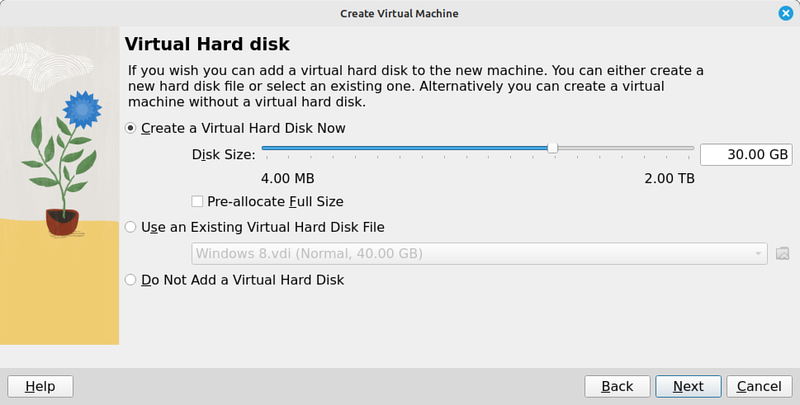
After you click Start: the virtual machine will boot from the virtual DVD disk (the ISO file). When you click inside the window the mouse and keyboard will be captured by the guest operating system. To release it from the VirtualBox window if you need to do something in your host operating system: press the right control key.
Note that the boot menu item says Start Linux Mint, not Install Linux Mint. Once your VM boots from the ISO file: you can use it, but it is not yet installed. At this point it's running purely from RAM, and any files you create or change will be stored in RAM, which is a volatile type of memory. All your changes will be lost as soon as you power off the virtual machine. This is a common Linux installer feature called running live.
Install Linux Mint
- Start the installer. The icon to do that is on the desktop.
- For keyboard layout you almost certainly want English (US) - that's the type of keyboards they sell in Canada. You can add other language input after the installation is complete if you want to.
- Do install the extra multimedia codecs. It's giving you the default option not to install them because the legal status of some of them is not 100% clear. You and I (being nobodys) can install these without any worries about getting sued.
- On the "Installation type" screen (this screen is really about partitioning and installation destination) leave the "Erase disk..." radio button picked. Don't worry, you're not going to erase anything on your host machine. The Virutal Machine doesn't have access to the host's drive.
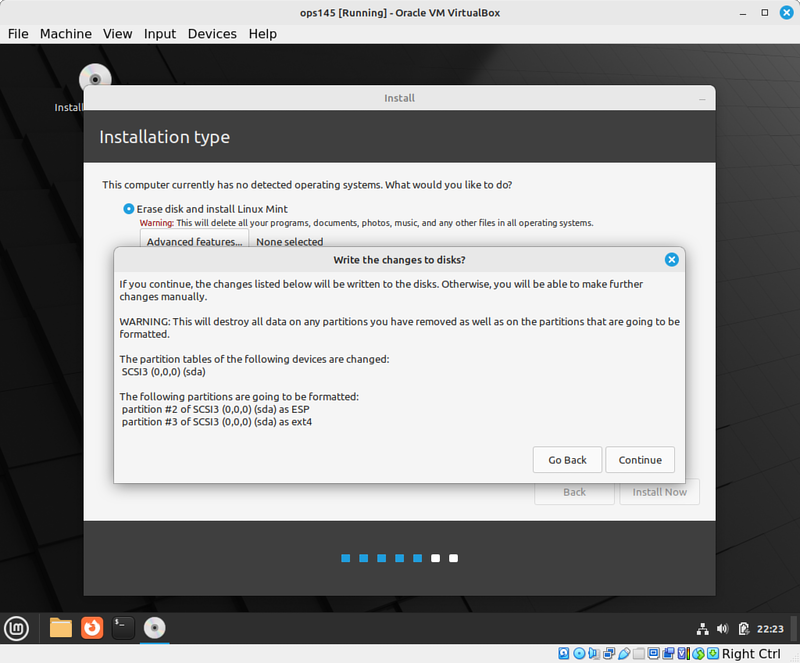
- Create a user with the same username as your school username. That will make some things easier later. Note that "Your name" is not the same as your username. You can set your name to anything you like, but the username needs to be correct.
- Name your computer ops145. This will be configured as your hostname. Note that the hostname doesn't need to be the same as the virtual machine name, but in our case it will be.
- The password can be weak if you're doing the work on your own computer. Your workstation virtual machine won't be accessbile by other people so the password strength won't be an issue in this case. Your host operating system's security settings will protect the virtual machine as well.
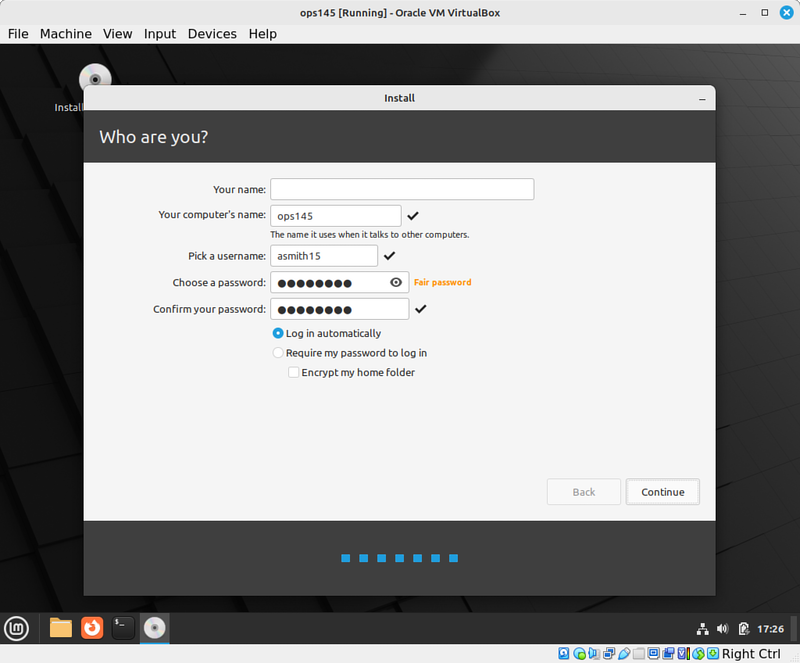
- Wait for the installation to complete.
- When it's done and you reboot - it will ask you to remove the installation media. That's your ISO file which is used as a virtual DVD, and it has already been ejected for you.
That's all it took to install Linux.
Customize your workstation
Guest Additions
Install guest additions to get the screen to resize as the VM window resizes. This is a little tricky but it's worth doing.
- First insert the guest additions ISO file into the VM (it will prompt you do download it automatically if needed):
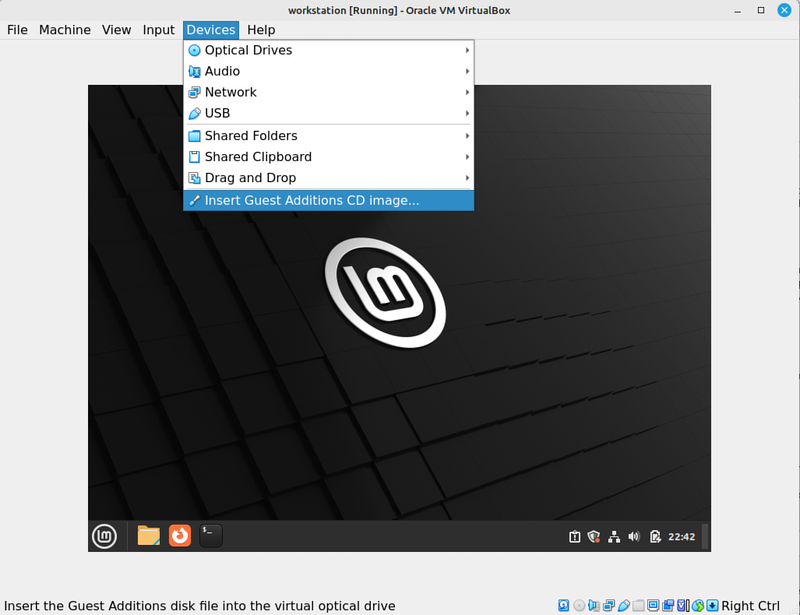
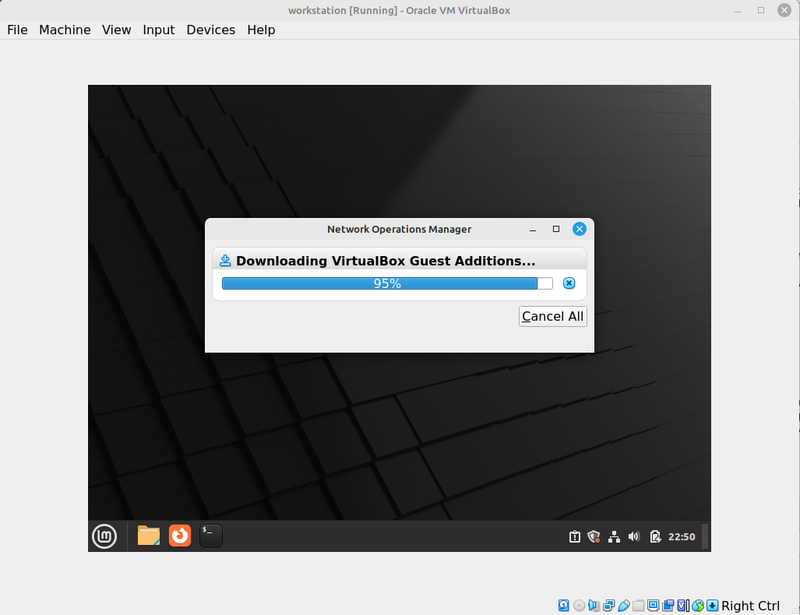
- Run the installer on the ISO, put in your user's password when it asks you.
- Reboot after the installation is complete.
If the above didn't work: at least change your resolution to something more reasonable:
- In the main menu you can find the "Display" settings. Pick the largest resolution that will fit on your screen. For example on my 1920x1080 laptop screen: the workstation VM window fits just fine when it's configured to use 1152x864 pixels.
Other Minor Things
If you're going to use this VM a lot (and you should): make it comfortable for yourself to use. This section has suggestions which might help, you don't need to do any of this if you don't want to. And you might think of your own customisations - which you're welcome to do.
- I don't like having icons showing in my taskbar if those applications aren't running, so I unpin them. Don't need the "Show desktop" button either.
- Right-clicking on the taskbar, "Applets" I change the following for the Grouped window list:
- Don't group windows by application.
- Button label: Window title
- In "System Settings":
- Screensaver:
- Don't start it automatically.
- Don't lock the computer when it goes to sleep or the screensaver starts.
- Startup applications, uncheck:
- Blueman
- Mint welcome screen
- Nvidia Prime support
- Update Manager
- Change the desktop background.
- Under Windows:
- Uncheck "Attach dialog windows to the parent window".
- Under Themes/Settings:
- Do not use overlay scroll bars.
- Under Sound/Sounds:
- Uncheck "Jump to position when clicking in a trough".
- Uncheck at least the starting/leaving sounds.
- Screensaver:
- Click the System reports button in the bottom right system tray, and ignore the two reports there (language packs and system restore utility).
- Change your default terminal window size.
- Set the Firefox homepage to
http://wiki.littlesvr.ca/wiki/OPS145_Weekly_Schedule
Explore
Look around the new-to-you operating system. Run some of the applications which are installed by default, and look through all the system settings. It is very unlikely that you would damage something to such an extent that I couldn't help you fix it in a lab.
Submit evidence of your work
For this first lab: choose whatever screenshots you feel show that you've completed the work, and submit them on Blackboard.