|
|
| Line 1: |
Line 1: |
| =LINKING FILES / MANAGING PROCESSES= | | = Input and Output = |
| <br>
| | You need to study system programming to fully understand how input and output works, but without being a programmer you can still learn most of what you need to control input and output on the command line. |
| ===Main Objectives of this Practice Tutorial===
| |
|
| |
|
| :* Define the term '''i-node''' as it relates to the Unix/Linux File System
| | The introduction in this lab will probably be a little dry, but hopefuly it will start making more sense when you get to apply these concepts later in the lab. |
|
| |
|
| :* Issue the '''ls -i''' command to view '''i-node''' (index) numbers associated with Unix/Linux files
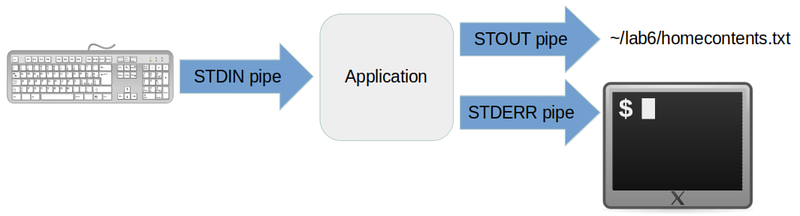
| | Each application on a POSIX-compatible system (such as Linux) is always started with three data pipes attached to it. These are: |
|
| |
|
| :* Define the terms '''Hard''' and '''Symbolic''' Links
| | * Standard input ('''STDIN''', file descriptor 0) |
| | * Standard output ('''STDOUT''', file descriptor 1) |
| | * Standard error ('''STDERR''', file descriptor 2) |
|
| |
|
| :* Issue the '''<span style="font-family:courier">ln</span>''' command to create '''hard''' and '''symbolic''' links
| | The file descriptor numbers mostly won't matter to you in this course, but they're good to know for the future. You'll remember them if you just memorize STDIN, STDOUT, STDERR, and recall that the count starts from zero. |
| | [[File:DefaultSTDIO.png|center|thumb|800x800px|Default standard input/ouput]] |
|
| |
|
| :* Define term '''process''' as it relates to the Unix/ Linux operating system
| | == STDOUT == |
| | Standard output is the most straightforward to understand. Whatever normal output a command-line prints goes out through the standard output pipe. |
|
| |
|
| :* '''Run''' and '''terminate''' processes in the foreground and background
| | By default the standard output pipe is connected to the terminal, and anything that goes into that pipe comes out as readable output on the screen. |
|
| |
|
| :* '''Display''' and '''manipulate''' background and foreground processes
| | == STDERR == |
| | This is where things get complicated. The application can send output into STDOUT or STDERR. Both these pipes are connected to the terminal by default, and both outputs will look the same to the user. But they are different pipes - which means they are controlled separately. |
|
| |
|
| :* Use '''<span style="font-family:courier">alias</span>''' and '''<span style="font-family:courier">history</span>''' commands in Unix/Linux
| | One extra confusing factor is the definition of "error". Sometimes it's obvious what constitutes an error, but often it isn't. |
| <br>
| |
|
| |
|
| ===Tutorial Reference Material===
| | The programmer who wrote the application had to make the decision which sort of output to send to STDOUT and which to send to STDERR. You can try and make an educated guess, but you'll have to confirm by experimenting. |
|
| |
|
| {|width="100%" cellspacing="0" cellpadding="10"
| | == STDIN == |
| | Standard input is only tricky until you become familiar with it. STDIN is also a data pipe, but by default instead of the pipe's input coming from the program and the output going to the terminal: the pipe's input comes from the terminal and the output goes into the program. |
|
| |
|
| |- valign="top"
| | Up to this point in the course you haven't used STDIN, but it's used all the time and now is the time to learn about it. |
|
| |
|
| |colspan="2" style="font-size:16px;font-weight:bold;border-bottom: thin solid black;border-spacing:0px;padding-left:15px;"|Concepts / Commands<br>
| | == Other pipes == |
| | A programmer can choose to open as many other pipes as they like in their application, but none of those extra pipes can be controlled using the mechanisms in this lab. |
|
| |
|
| |- valign="top" style="padding-left:15px;"
| | = Redirecting output to files = |
| | style="padding-left:15px;" |'''Links:'''
| | The input/output pipes don't have to be connected to the default input/output (keyboard and terminal display). You can choose to connect one or two or all three of these pipes to something else. The something else can be: |
| * [http://www.linfo.org/hard_link.html#:~:text=A%20hard%20link%20is%20merely,created%20to%20other%20hard%20links. Hard Links]
| |
| * [https://www.computerhope.com/jargon/s/symblink.htm#:~:text=Alternatively%20referred%20to%20as%20a,or%20directory%20using%20its%20path.&text=In%20Linux%20and%20Unix%20symbolic,created%20using%20the%20mklink%20command. Symbolic Links]<br>
| |
| '''Managing Processes:'''
| |
| * [https://en.wikipedia.org/wiki/Inode inode]
| |
| * [https://opensource.com/article/18/9/linux-commands-process-management Manipulating Processes]
| |
|
| |
|
| | style="padding-left:15px;"|'''Linux Commands:'''
| | * '''A file''', which is commonly called '''redirection''' |
| * [http://man7.org/linux/man-pages/man1/ln.1.html ln] | | * '''Another program''', which is commonly called '''piping''' |
| * [http://man7.org/linux/man-pages/man1/ps.1.html ps]
| |
| * [http://man7.org/linux/man-pages/man1/top.1.html top]
| |
| * [http://man7.org/linux/man-pages/man1/fg.1p.html fg]
| |
| * [http://man7.org/linux/man-pages/man1/bg.1p.html bg]
| |
| * [http://man7.org/linux/man-pages/man1/jobs.1p.html jobs]
| |
| * [http://man7.org/linux/man-pages/man1/kill.1.html kill]
| |
| * [https://man7.org/linux/man-pages/man1/sleep.1.html sleep]
| |
| * [http://linuxcommand.org/lc3_man_pages/aliash.html alias] , [https://man.linuxreviews.org/man1p/unalias.1p.html unalias]
| |
| * [https://mediatemple.net/community/products/dv/204404624/using-the-history-command history]
| |
| |}
| |
|
| |
|
| = KEY CONCEPTS = | | == Redirect STDOUT to a file == |
| | When the shell encounters the character '''>''' it will interpret that as an instruction to redirect the standard output from the application you're running into a file. |
|
| |
|
| <!--
| | A simple example of when you might use this is to save a listing of all the files you have now, so that you can do something with that list later. |
|
| |
|
| <table align="right"><tr valign="top"><td>[[Image:inode-number-1.png|thumb|right|300px|Each inode stores the attributes and disk block locations of the object's data.<br>(Image licensed under [https://creativecommons.org/licenses/by-sa/3.0/ cc])]]</td><td>[[Image:inode-number-2.png|thumb|right|360px|The '''inode number''' is like a '''finger-print''', and is considered to be '''unique''' for each file on the Unix / Linux file system.]]</td></tr></table> | | * In a terminal create the directory '''~/lab6''' but keep your PWD in your home directory. |
| ''The inode (index node) is a data structure in a Unix-style file system that describes a file-system object such as a file or a directory. Each inode stores the attributes and disk block locations of the object's data. File-system object attributes may include metadata (times of last change, access, modification), as well as owner and permission data.''
| | * Then run ls twice. The first time on its own, the second time redirecting its output to a file:<syntaxhighlight lang="bash"> |
| | ls |
| | </syntaxhighlight>[[File:STDOUTtoFile.png|center|800x800px]]<syntaxhighlight lang="bash"> |
| | ls > lab6/homecontents.txt |
| | </syntaxhighlight> |
|
| |
|
| Reference: https://en.wikipedia.org/wiki/Inode
| | Note that the second time there is no output on the terminal. That's because you instructed the shell to redirect the standard output from the ls command into the file lab6/homecontents.txt: |
| | [[File:LsIntoFile.png|center]] |
| | The reason why homecontents.txt doesn't have any colours in it is simple: there's no such thing as dark blue or light green in a plain text file. There's just text. The more complicated question is where did the pretty colours come from when the output is in a terminal? That's too complicated a question for this course, and we're just going to ignore it. |
|
| |
|
| -->
| | == Redirect STDERR to a file == |
|
| |
|
| ===i-node (index) ID Number of a File=== | | * Run an ls command, giving it as an argument a filename for a file which doesn't exist. For example:<syntaxhighlight lang="bash"> |
| | ls command.com |
| | </syntaxhighlight> |
| | * The command prints some output: "ls: cannot access 'command.com': No such file or directory". From experience I know that this comes through the STDERR pipe, but we can confirm by redirecting STDOUT to a file:<syntaxhighlight lang="bash"> |
| | ls command.com > ~/lab6/lscommandcom.txt |
| | </syntaxhighlight> |
| | * Note that the output is still printed in the terminal, and the file lscommandcom.txt is empty. There's really no way to see a difference between standard and error output except through experimentation like this. |
| | * You can redirect STDERR to a file using the '''2>''' notation (2 is the number of the pipe):<syntaxhighlight lang="bash"> |
| | ls command.com 2> ~/lab6/lscommandcom.txt |
| | </syntaxhighlight>[[File:STDERRtoFile.png.png|center|800x800px]] |
|
| |
|
| [[Image:inode-number-3.png|thumb|right|450px|The '''i-node number''' is like a '''finger-print''', and is considered to be '''unique''' for each file on the Unix / Linux file system.]] | | Here's what all that looks like: |
| An '''i-node''' is a '''database''' containing information (e.g. ''file type'', ''owner'', ''permissions'', etc.) for all files that are created on the Unix/Linux filesystem.<br><br>The ''i-node number'' is like a '''finger-print''', and is considered to be '''unique''' for each file on the Unix / Linux file system.<br><br>Referring to the diagram on the far right, issuing the <span style="font-family:courier;font-weight:bold;">ls</span> command with the <span style="font-family:courier;font-weight:bold;">-i</span> option displays the i-node number for each file. You can see that <u>each</u> file (whether it is a directory or regular file) has its own unique<br>i-node number.
| | [[File:RedirectStderr.png|center]] |
| | Because there's no obvious difference between standard and error output in the terminal: this distinction often causes headaches, but that's just a reality we have to deal with. |
|
| |
|
| ===Hard Links===
| | You can redirect STDOUT to one file and STDERR to another file: |
| | [[File:RedirectStdoutAndErr.png|center]] |
|
| |
|
| [[Image:hard-link-1.png|thumb|right|300px|A '''Hard link''' is a file which is created that shares the '''same i-node number''' with the <u>original</u> file<br>(Image licensed under [https://creativecommons.org/licenses/by-sa/3.0/ cc])<br>Image manipulated by author]]
| | == Redirect to /dev/null == |
| A '''Hard link''' is a '''reference''' to the physical data on a file system.<br>It does this by creating a file that shares the '''same i-node number''' with the <u>original</u> file.
| | '''/dev/null''' is a special device file on Linux machines. It's like a black hole: anything that goes into it just disappears for ever. It is frequently used when you want to run a command, but you're sure you don't want to see the output of that command, and you don't want to save that output either. The utility of this will become more obvious when we get to scripting. |
|
| |
|
| | For now you can practice with the ls command: |
| | [[File:RedirectToDevNull.png|center]] |
|
| |
|
| '''Advantages:''' If only one hard link remains (even if original file has been removed), the '''data in that hard linked file is NOT lost'''. The data in hard linked files are '''automatically updated''' when original file are updated.
| | = New commands = |
| | This is a good time to learn some new commands. They will help you understand the pipes sections later in the lab. |
|
| |
|
| '''Disadvantages:''' Hard links '''take-up extra space''', you '''cannot hard link directories''',<br>and you '''cannot hard link files from other Unix/Linux servers''' (since the inode number may already be used by the other Unix/Linux server). | | == grep == |
| | The grep command helps you find specific text in a plain text file. Here's what it does without extra arguments: |
|
| |
|
| | * It reads the input one line at a time |
| | * It looks of your search term anywhere on that line |
| | ** If it finds it: it prints the entire line |
| | ** If it doesn't find it: it doesn't print that line at all |
|
| |
|
| ''Examples:'' | | Let's try this: |
|
| |
|
| <span style="font-family:courier">ln myfile.txt myfile1.hard.lnk<br>ln myfile.txt ~/backups/myfile.hard.lnk<br>'''</span>
| | * Change your PWD to ~/Downloads/SampleFiles |
|
| |
|
| ===Symbolic Links=== | | * You might recall we looked for the string "Australia" in the book 1984.txt when you opened it with the less command. Now we'll do the same thing using grep:<syntaxhighlight lang="bash"> |
| | grep Australia 1984.txt |
| | </syntaxhighlight> |
|
| |
|
| [[Image:symbolic-link-1.png|thumb|right|300px|A '''Symbolic Link''' is an indirect '''pointer''' to a file and are also known as '''soft''' link or '''symlink'''. The symbolic link file contains the pathname to the original file. (Image licensed under [https://creativecommons.org/licenses/by-sa/3.0/ cc])]]
| | The first argument to grep is the search term, the second (optional) argument is the file to read. The second argument is actually optional, because grep can read its input from the STDIN pipe instead. |
| A '''Symbolic Link''' is an indirect '''pointer''' to a file and are also known as '''soft''' link or '''symlink'''. The symbolic link file contains the '''pathname''' to the original file.
| |
|
| |
|
| | == head == |
| | By default the head command will print the first ten lines of whatever plain text input it gets, and discards all the other lines. This and the tail command are frequently used when you just need to see the beginning or the end of a text file. |
|
| |
|
| '''Advantages:''' symbolic links are '''shortcuts''' to other files, where the symbolic link only contains the pathname to the original file, you '''can create symbolic links'''<br>'''on different Unix/Linux servers''', and that you '''can create symbolic links for directories'''.
| | * Look at the first 10 lines of AnimalFarm.txt:<syntaxhighlight lang="bash"> |
| | head AnimalFarm.txt |
| | </syntaxhighlight> |
| | * If you want a number of lines different than the default 10: you can specify that as an argument. This is how you would get the first 11 lines:<syntaxhighlight lang="bash"> |
| | head -11 AnimalFarm.txt |
| | </syntaxhighlight> |
|
| |
|
| '''Disadvantages:''' Symbolic links are NOT good for backup purposes<br>since a symbolic link can point to a nonexistent file (referred to as a "broken link").
| | The argument specifying the name of the file is optional. Like grep: head can process input from STDIN instead. |
|
| |
|
| | == tail == |
| | If you understand what the head command does: the tail command should be self-explanatory. |
|
| |
|
| ''Examples:'' | | == wc == |
| | wc is short for Word Count, but it's almost never used to count words. It can also count lines, and it's often used for that purpose. |
|
| |
|
| <span style="font-family:courier">ln -s otherfile.txt otherfile1.sym.lnk<br>ln -s otherfile.txt ~/backups/otherfile.sym.lnk<br>'''</span> | | * Count the number of lines in the two books you have in SampleFiles:<syntaxhighlight lang="bash"> |
| <br><br>
| | wc -l 1984.txt |
| | wc -l AnimalFarm.txt |
| | </syntaxhighlight> |
| | The wc command can also read input from STDIN. |
|
| |
|
| ===Managing Processes=== | | = Redirecting input from files = |
| | [[File:RedirectSTDIN.png|center|800x800px]] |
| | If you want a command to take its STDIN from a file instead of the keyboard: you can redirect it using '''<''' |
|
| |
|
| All '''commands/programs''' ('''tasks''') that are '''running''' on a Unix/Linux computer system are referred to as '''processes'''.
| | * Try the commands from the previous section, this time using redirection instead of giving the file name as an argument to the command:<syntaxhighlight lang="bash"> |
| <br><br> | | grep Australia < 1984.txt |
| '''Characteristics of Processes:'''
| | head < 1984.txt |
| | wc -l < 1984.txt |
| | </syntaxhighlight> |
|
| |
|
| * Each process has an '''owner'''
| | These appear to be almost the same commands, but the principles involved are quite different. The difference will become more apparent in the following piping section. |
| * Each process has a unique ID ('''PID''')
| |
| * Processes keep their ''PID'' for their '''entire life'''.
| |
| * Usually a parent sleeps (''suspends'') when a child is running (the exception is when the child process is running in the background)
| |
| *UNIX / Linux processes are '''hierarchical'''. The process structure can have '''child processes''', '''great grandchild processes''', etc.
| |
|
| |
|
| | = Piping = |
| | Redirecting the output of one command into the input of another is called piping. There are many reasons to do this, we will only look at a few examples. |
|
| |
|
| Users can '''manage processes''' to become more '''productive''' while working in the Unix / Linux Command-line environment.<br>Processes that run in the terminal are known as '''foreground''' processes. You can run or send processes currently running<br>in the ''foreground'' to the '''background''' to free-up your terminal (e.g. issue other Linux commands).<br><br>Below are a listing of common '''Linux commands''' and '''keyboard shortcuts''' to manage foreground and background processes:
| | You establish this kind of redirection using a '''|''' symbol (commonly called a pipe, used both as a noun and as a verb). The connection is highlighted in green in this diagram: |
| | [[File:PipeApp1toApp2.png|center|800x800px]] |
|
| |
|
| <table cellpadding="5" width="80%"><tr valign="top"><th width="25%" style="border-bottom: 1px solid black;text-align:left;">Linux Command /<br>Key Combination</th><th style="border-bottom: 1px solid black;text-align:left;">Purpose</th></tr><tr valign="top"><td><span style="font-family:courier;font-weight:bold;">ps</span></td><td>Displays snapshot information about processes.<br>''Examples: ''<span style="font-family:courier;font-weight:bold">ps , ps -l , ps -ef , ps -u , ps aux</span><br></td></tr><tr valign="top"><td>'''<span style="font-family:courier;font-weight:bold;">top</span>'''</td><td>The '''top''' command provides a realtime status of running processes.<br>'''NOTE:''' You can press '''ctrl-c''' to exit<br></td></tr><tr valign="top"><td><span style="font-family:courier;">'''ctrl-c'''</span></td><td>'''Terminates''' a process running in the foreground</td></tr><tr valign="top"><td><span style="font-family:courier;">'''ctrl-z'''</span></td><td>Sends a process running in the foreground into the '''background'''.</td></tr><tr valign="top"><td><span style="font-family:courier;font-weight:bold;">fg</span></td><td>Moves a background job from the current environment into the foreground.<br>''Example: ''<span style="font-family:courier;font-weight:bold">fg %job-number</span></td></tr><tr valign="top"><td><span style="font-family:courier;font-weight:bold;">bg</span></td><td>Runs (starts) the most recent process that was placed into the background.<br>''Example: ''<span style="font-family:courier;font-weight:bold">bg %job-number</span></td></tr><tr valign="top"><td><span style="font-family:courier;font-weight:bold;">jobs</span></td><td>The '''jobs''' utility displays the '''status''' of jobs that were started in the current shell environment. ''Example:<br>''<span style="font-family:courier;">jobs<br>[1]+ Stopped vim a <span style="font-size:8pt;"> <-- Job #1 (+ most recent process / background)</span><br>[2] Running sleep 200 & <span style="font-size:8pt;"> <-- Job #2</span><br>[3] Running sleep 300 & <span style="font-size:8pt;"> <-- Job #3</span><br>[4]- Running sleep 400 &<span style="font-size:8pt;"> <-- Job #4 (- second recent process / background)</span><br><br></span></td></tr><tr valign="top"><td><span style="font-family:courier;font-weight:bold;">kill</span></td><td>The kill command sends the specified signal to the specified processes or process groups. If no signal is specified, the '''TERM''' signal is sent. The default action for this signal is to terminate the process.<br>''Examples:''<br><span style="font-family:courier;font-weight:bold;">kill PID , kill -9 PID , kill %job-number , <br>kill -9 %job-number</span></td></tr></table>
| | * The '''grep''' command can find strings inside a text file. The '''wc''' command can count lines. You can combine the two commands to count how many lines in a text file contain a particular string. For example:<syntaxhighlight lang="bash"> |
| | grep stuff 1984.txt # Will find lines with "stuff" in the book |
| | grep stuff 1984.txt | wc -l # Will count the number of lines containing "stuff" in the book |
| | </syntaxhighlight> |
| | * Or let's say you wanted to find lines which contain the word Party, and also the word evidence. That would be very hard to do with a single grep command, but very easy to do if you use two of them together:<syntaxhighlight lang="bash"> |
| | grep Party 1984.txt # Will find lines with "Party" in the book |
| | grep Party 1984.txt | grep evidence # Will find lines with "Party" and "evidence" in the book |
| | </syntaxhighlight> |
| | * There is no limit on how many commands you can chain together with pipes. For exaple if you wanted to count how many lines in the book contain "Party" and "member": you could pipe the output of the last grep command to wc:<syntaxhighlight lang="bash"> |
| | grep Party 1984.txt # Will find lines with "Party" in the book |
| | grep Party 1984.txt | grep member # Will find lines with "Party" and "member" in the book |
| | grep Party 1984.txt | grep member | wc -l # Will count lines with "Party" and "member" in the book |
|
| |
|
| ===Aliases / Command History===
| | </syntaxhighlight> |
| | * Or if you wanted to know how many such lines are in the first 500 lines of the book: you could feed the input to the first grep from the output of head:<syntaxhighlight lang="bash"> |
| | head -500 1984.txt | grep Party | grep member | wc -l |
|
| |
|
| <br> | | </syntaxhighlight> |
| '''Aliases:'''
| |
| <br><br>
| |
| An '''alias''' is a '''nickname''' to an existing command or group of commands.<br><br>An alias existing in '''system memory''' and will be '''lost''' when your current Linux session ends,<br>unless the alias is set in a '''start-up file''' (e.g. <span style="font-family:courier;font-weight:bold;">~/.bashrc</span>. You will learn about using start-up files <u>later</u> in this course.<br><br>
| |
|
| |
|
| ''Examples:''
| | The possibilities are endless. Pipes are the reason there are many simple commands in Linux. One simple command can only do so much, but combined with others: it can do some really complicated stuff, which the author of the command could never have predicted. |
|
| |
|
| <span style="font-family:courier;font-weight:bold;>alias</span> (Alias command without an argument will display all the aliases currently set)
| | = Some extra work = |
| | | You need to complete the tasks in this section in order to submit the lab. |
| <span style="font-family:courier;font-weight:bold;>alias dir=ls<br>alias ls='ls -al'<br>alias clearfile='cat /dev/null >'</span>
| |
| | |
| '''<span style="font-family:courier;font-weight:bold;>unalias alias-name</span>''' (removes alias from memory)
| |
| | |
| | |
| '''Command History:'''
| |
| <br><br>
| |
| The filename <span style="font-family:courier;font-weight:bold;>~/.bash_history</span> stores recently executed command lines
| |
| <br><br>
| |
| ''Examples of commands that use command history:''
| |
| | |
| <table width="80%"><tr valign="top"><td width="30%"><span style="font-family:courier;font-weight:bold;>up arrow</span> or <span style="font-family:courier;font-weight:bold;>down arrow</span> </td><td>move to '''previous''' command or '''next''' command within Bash shell prompt</td></tr><tr><td><span style="font-family:courier;font-weight:bold;>fc -l</span></td><td> display last '''16''' commands</td></tr><tr><td><span style="font-family:courier;font-weight:bold;>history | more</span></td><td>display all stored commands</td></tr><tr><td><span style="font-family:courier;font-weight:bold;>!num</span></td><td>'''re-execute''' an issued command number by command number (determined from ''history'' command)</td></tr><tr><td><span style="font-family:courier;font-weight:bold;>!xxx</span></td><td>'''re-run''' a most recent previously-issued command beginning with string "xxx"</td></tr></table><br><br>
| |
| | |
| =INVESTIGATION 1: LINKING FILES=
| |
| | |
| <span style="color:red;">'''ATTENTION''': This online tutorial will be required to be completed by '''Friday in week 9 by midnight''' to obtain a grade of '''2%''' towards this course</span><br><br>
| |
| | |
| In this investigation, you will learn how to create '''hard links''' and '''symbolic links''' on your Matrix account,<br>and observe the <u>advantages</u> and <u>limitations</u> of using both types of links.
| |
| | |
| | |
| '''Perform the Following Steps:'''
| |
| | |
| # '''Login''' to your matrix account.<br><br>
| |
| # Issue a Linux command to '''confirm''' you are located in your '''home''' directory.<br><br>'''NOTE:''' You will remain in your '''home''' directory to get practice using pathnames.<br><br>
| |
| # Issue the following Linux command to create a directory called '''~/links''':<br><span style="color:blue;font-weight:bold;font-family:courier;">mkdir ~/links</span><br><br>
| |
| # Issue the '''ls -ld''' command to confirm that the directory '''~/links''' exists.<br><br>
| |
| # Use a text editor to create a file called <span style="font-weight:bold;font-family:courier;">~/links/data-file.txt </span><br>(i.e. <u>without</u> changing to the links directory).<br><br>
| |
| # Enter the following text displayed below:<br><br><span style="font-family:courier;font-weight:bold;">This is line 1<br>This is line 2<br>This is line 3<br><br></span>[[Image:hard-link-inode1.png|thumb|right|450px|'''Hard links''' <u>share</u> the same '''i-node''' with regular files on a Unix / Linux filesystem.]]
| |
| # Save your editing session and exit your text editor.<br><br>
| |
| # Issue the following Linux command:<br><span style="color:blue;font-weight:bold;font-family:courier;">ls -li ~/links/data-file.txt</span><br><br>View the '''i-node''' number for this file. What does this ''i-node'' number represent?<br><br>We will now create a '''hard link''' file to demonstrate how creating hard links are useful for '''back-ups'''.<br><br>
| |
| # Issue the following Linux command to create the following '''hard link''' in the same directory: <br><span style="color:blue;font-weight:bold;font-family:courier;">ln ~/links/data-file.txt ~/links/data-file.hard.lnk</span><br><br>
| |
| # Issue the following Linux command to display ''i-node'' ID numbers for <u>both</u> files:<br><span style="color:blue;font-weight:bold;font-family:courier;">ls -li ~/links/data-file.txt ~/links/data-file.hard.lnk</span><br><br>What do you notice about both of those file's ''i-node'' numbers?<br><br>
| |
| # Use a text editor to edit <span style="font-weight:bold;font-family:courier;">~/links/data-file.txt</span><br>and '''add some lines of text''' to the <u>bottom</u> of that file.<br><br>
| |
| # Save your editing session and exit your text editor.<br><br>
| |
| # Issue the following Linux command: <br><span style="color:blue;font-weight:bold;font-family:courier;">cat ~/links/data-file.hard.lnk</span><br><br>You should notice that the hard linked file also contains the additional line(s) that you added to the <u>original</u> file.<br>This is very useful for backing up your files <u>without</u> using the '''cp''' command!<br><br>
| |
| # Use a text editor to edit the hard-linked file <span style="font-weight:bold;font-family:courier;">~/links/data-file.hard.lnk</span><br>and add some lines to the bottom of this file.<br><br>
| |
| # Save your editing session and exit your text editor.<br><br>
| |
| # Issue the following Linux command: <br><span style="color:blue;font-weight:bold;font-family:courier;">cat ~/links/data-file.txt</span><br><br>What happened to this '''original''' file?</u> file?<br>What does this mean in terms of creating hard-linked files for back-ups?<br><br>
| |
| # Issue the following Linux command to create a hard-linked file in your '''home''' directory:<br><span style="color:blue;font-weight:bold;font-family:courier;">ln ~/links/data-file.txt ~/data-file.hard.lnk<br><br>
| |
| # Issue the following Linux command to compare all file's ''i-node'' numbers:<br><span style="color:blue;font-weight:bold;font-family:courier;">ls -li ~/links/data-file.txt ~/links/data-file.hard.lnk ~/data-file.hard.lnk</span><br><br>What do you notice about all of those file's ''i-node'' numbers?<br><br>
| |
| # Issue the following Linux command to check that you created those hard links: <br><span style="color:blue;font-weight:bold;font-family:courier;">~uli101/week8-check-1</span><br><br>If you encounter errors, then view the feedback to make corrections, and then re-run the checking script.<br>If you receive a congratulation message that there are no errors, then proceed with this tutorial.<br><br>
| |
| # Issue the following Linux command to remove the '''~/links''' directory and its contents: <br><span style="color:blue;font-weight:bold;font-family:courier;">rm -rf ~/links</span><br><br>
| |
| # Issue a Linux command to confirm that the '''~/links''' directory has been removed.<br><br>
| |
| # Issue the following Linux command to view the contents of your linked file in your '''home''' directory:<br><span style="color:blue;font-weight:bold;font-family:courier;">cat ~/data-file.hard.lnk</span><br><br>What do you notice? What does this tell you about hard links?<br><br>We will now learn how to create '''symbolic links'''.<br><br>
| |
| # Issue the following Linux command to create a directory called '''~/links2''':<br><span style="color:blue;font-weight:bold;font-family:courier;">mkdir ~/links2</span><br><br>'''NOTE:''' You will remain in your '''home''' directory to get practice using pathnames.<br><br>
| |
| # Issue the <span style="font-weight:bold;font-family:courier;">ls -ld</span> command to confirm that the directory called '''~/links2''' exists.<br><br>
| |
| # Use a text editor to create a file called <span style="font-weight:bold;font-family:courier;">~/links2/text-file.txt</span><br>(i.e. <u>without</u> changing to the '''links2''' directory). <br><br>[[Image:symbolic-link-inode1.png|thumb|right|500px|'''Symbolic links''' are '''pointers''' (i.e. pathnames) to '''regular files''' and '''directories'''.<br>They do '''NOT''' share the same '''i-node'''.]]
| |
| # Enter the following text displayed below:<br><br><span style="font-family:courier;font-weight:bold;">This is line one<br>This is line two<br>This is line three<br><br></span>
| |
| # Save your editing session and exit your text editor.<br><br>
| |
| # Issue the following Linux command to create the following '''symbolic''' link in the same directory: <br><span style="color:blue;font-weight:bold;font-family:courier;">ln -s ~/links2/text-file.txt ~/links2/text-file.sym.lnk</span><br><br>
| |
| # Issue the following Linux command to display ''i-node'' numbers for <u>both</u> files:<br><span style="color:blue;font-weight:bold;font-family:courier;">ls -li ~/links2/text-file.txt ~/links2/text-file.sym.lnk</span><br><br>What do you notice about both of these file's ''i-node'' numbers?<br>What do you notice about the size of the file <span style="font-weight:bold;font-family:courier;">~/links2/text-file.sym.lnk''</span>?<br>What '''pathname''' do you think this ''symbolic-linked'' file represents?<br><br>
| |
| # Issue the following Linux command to create the following '''symbolic link''' in your '''home''' directory: <br><span style="color:blue;font-weight:bold;font-family:courier;">ln -s ~/links2/text-file.txt ~/text-file.sym.lnk</span><br><br>
| |
| # Issue the following Linux command to display ''i-node'' numbers for all of those files:<br><span style="color:blue;font-weight:bold;font-family:courier;">ls -li ~/links2/text-file.txt ~/links2/text-file.sym.lnk ~/text-file.sym.lnk</span><br><br>What do you notice about all of those file's i-node numbers?<br>What is the file size of <span style="font-weight:bold;font-family:courier;">~/text-file.sym.lnk</span>?<br>What '''pathname''' do you think this ''symbolic-linked'' file contains?<br><br>
| |
| # Use a text editor to edit the '''symbolic''' link file called <span style="font-weight:bold;font-family:courier;">~/links2/text-file.sym.lnk</span><br>and add some lines to the bottom of that file.<br><br>
| |
| # Save your editing session and exit your text editor.<br><br>
| |
| # Issue the following Linux command to view the contents of the '''original''' file:<br><span style="color:blue;font-weight:bold;font-family:courier;">cat ~/links2/text-file.txt</span><br><br>What did you notice? This happened because when you edited the symbolic-linked file,<br>you were redirected (via ''pathname'') to the <u>original</u> file.<br><br>
| |
| # Use a text editor to edit the '''original''' file called <span style="font-weight:bold;font-family:courier;">~/links2/text-file.txt</span><br>and add some lines to the bottom of that file.<br><br>
| |
| # Save your editing session and exit your text editor.<br><br>
| |
| # Issue the following Linux command to view the contents of the '''symbolic''' linked file:<br><span style="color:blue;font-weight:bold;font-family:courier;">cat ~/links2/text-file.sym.lnk</span><br><br>What did you notice? Again, when you view the contents of the symbolic-linked file,<br>you are redirected (via ''pathname'') to the <u>original</u> file.<br><br>
| |
| # Issue the following Linux command to check that you created those symbolic links: <br><span style="color:blue;font-weight:bold;font-family:courier;">~uli101/week8-check-2</span><br><br>If you encounter errors, then view the feedback to make corrections, and then re-run the checking script.<br>If you receive a congratulation message that there are no errors, then proceed with this tutorial.<br><br>
| |
| # Issue the following Linux command to remove the '''~/links2''' directory: <br><span style="color:blue;font-weight:bold;font-family:courier;">rm -rf ~/links2</span><br><br>
| |
| # Issue a Linux command to confirm that the '''~/links2''' directory has been removed.<br><br>
| |
| # Issue the following Linux command to view the contents of the<br>'''original''' file called <span style="font-weight:bold;font-family:courier;">~/links2/text-file.txt:</span><br><span style="color:blue;font-weight:bold;font-family:courier;">cat ~/text-file.sym.lnk</span><br><br>What happened? Why did does this happen?<br><br>[[Image:symbolic-link-inode3.png|thumb|right|500px|Example of a '''broken link''' when a symbolic link points to a '''non-existent file'''.]]
| |
| # Issue the following Linux command: <br><span style="color:blue;font-weight:bold;font-family:courier;">ls -l ~/text-file.sym.lnk</span><br><br>This output indicates a "'''broken link'''" and indicates this is not an effective method of backing up files.<br><br>
| |
| # Issue a command to delete the <span style="font-weight:bold;font-family:courier;">~/text-file.sym.lnk</span> file which is a ''broken link''.<br><br>
| |
| # Issue the following Linux command:<br><span style="color:blue;font-weight:bold;font-family:courier;">ln -s ~jason.carman/example t8example</span><br><br>[[Image:symbolic-link-inode2.png|thumb|right|500px|'''Symbolic links''' can be used to point to '''directories''' as well as regular files. Symbolic links can also point to files on '''other''' Unix/Linux filesystems.]]
| |
| # Issue the following Linux command:<br><span style="color:blue;font-weight:bold;font-family:courier;">ls -ld t8example</span><br><br>What do you notice? Symbolic links are good for creating "short-cuts" to <u>both</u> '''regular files''' and '''directories'''.
| |
| | |
| | |
| :In the next investigation, you will learn how to '''manage processes''' on your Matrix server.<br><br>
| |
| | |
| =INVESTIGATION 2: MANAGING PROCESSES =
| |
| | |
| In this investigation, you will learn how to '''manage processes''' on a Unix / Linux server.
| |
| | |
| | |
| '''Perform the Following Steps:'''
| |
| | |
| # Make certain that you are logged into your Matrix account.<br><br>
| |
| # Issue a Linux command to confirm that you are located in your '''home''' directory.<br><br>The '''sleep''' command '''pauses for a specified number of seconds''' before returning to the shell prompt.<br>In this tutorial, we will be using this command to '''simulate''' the management of "long-running" processes.<br><br>
| |
| # Issue the following Linux command: <span style="color:blue;font-family:courier;font-weight:bold">sleep 700</span><br><br>Notice that this process will run for '''700 seconds''', and is forcing the user to '''wait''' until this process finishes.<br>A process that is '''running in the terminal''' is referred to as a '''foreground processes'''.<br><br>The Unix/Linux system is designed to allow users to send '''preemptive signals''' to manage those processes.<br><br>
| |
| # Press the following '''key combination''' to '''terminate''' the command running on the terminal: <span style="color:blue;font-family:courier;font-weight:bold">ctrl-c</span><br><br>You should notice that the process that was running in the foreground has been '''interrupted''' (i.e. terminated).<br>'''NOTE:''' The '''ctrl-c''' key combination sends '''SIGINT''' ('''Signal Interrupt''' - which is signal '''#2''')<br>to ''terminate'' a process that is running on the terminal (i.e. a '''foreground''' process).<br><br>
| |
| # Reissue the Linux command: <span style="color:blue;font-family:courier;font-weight:bold">sleep 700</span><br><br>
| |
| # Press the '''key combination''': <span style="color:blue;font-family:courier;font-weight:bold">ctrl-z</span><br><br>[[Image:process-jobs1.png|thumb|right|300px|Running a command in the terminal, pressing '''ctrl-z''' to place into the background, and issuing the '''jobs''' command to view processes in the background.]]
| |
| # You should now see output similar to what is displayed below:<br><span style="font-family:courier;font-weight:bold">[1]+ Stopped sleep 700</span><br><br>'''NOTE:''' This indicates that this process has been placed into the '''background'''.<br>This is useful in order to "'''free-up'''" the terminal to run other Linux commands.<br><br>
| |
| # Issue the following Linux command: <span style="color:blue;font-family:courier;font-weight:bold">jobs</span><br><br>You should see the following output similar that was displayed above:<br><span style="font-family:courier;font-weight:bold">[1]+ Stopped sleep 700</span><br><br>This display indicates that this process (that is now in the background) has '''stopped'''.<br>In other words, the ''sleep'' command is NOT counting-down to zero to terminate.<br><br>'''NOTE:''' You need to use the '''bg''' command to '''run''' that process that was sent into the '''background'''.<br><br>[[Image:process-jobs2.png|thumb|right|300px|Using the '''bg''' command to '''run recent process''' that was placed into background from using '''ctrl-z''' keys.]]
| |
| # Issue the following Linux command: <span style="color:blue;font-family:courier;font-weight:bold">bg</span><br><br>'''NOTE:''' You can use the bg command WITHOUT arguments to run recent in the background. From the '''jobs''' command, the process that has a plus sign "+" indicates the most recent process placed into the background.<br><br>
| |
| # Issue the following Linux command: <span style="color:blue;font-family:courier;font-weight:bold">jobs</span><br><br>You should see the following output similar that was displayed above:<br><span style="font-family:courier;font-weight:bold">[1]+ sleep 700 &</span><br><br>This display indicates that this process in the background is '''running in the background'''<br>(indicated by the ampersand character "'''&'''"). Now this command has resume pausing until '''700 seconds'''.<br><br>[[Image:process-jobs3.png|thumb|right|300px|Using the '''ampersand''' character '''&''' to run a '''series of processes''' in the background.]]
| |
| # Issue the following Linux command: <span style="color:blue;font-family:courier;font-weight:bold">fg</span><br><br>You should notice that the ''sleep'' command is now running in the '''foreground'''.<br><br>
| |
| # Press the '''key combination''' to '''terminate''' the process running in the '''foreground''':<br><span style="color:blue;font-family:courier;font-weight:bold">ctrl-c</span> <br><br>You can issue Linux commands with ampersand "'''&'''" in your terminal to '''run''' processes automatically in the '''background''' <u>without</u> having to issue ''ctrl-z'' and ''bg'' short-cut keys.<br><br>
| |
| # Issue the following Linux commands:<br><span style="color:blue;font-family:courier;font-weight:bold">sleep 500 & sleep 600 & sleep 700 &</span><br><br>
| |
| # Issue the '''jobs''' command. What do you notice?<br><br>In the jobs command output, jobs that display a plus sign ('''+''') indicates the '''most recent''' process<br>placed in to the background, and a minus sign ('''-''') indicates the '''second most recent''' process<br>placed into the background.<br><br>The '''kill''' command issued to terminate processes that are running in the '''foreground''' or '''background'''.<br>Issuing the kill command <u>without</u> options would send the '''SIGTERM''' signal (eg. ''signal terminate'' - which is signal '''#15''').<br><br>[[Image:process-jobs4.png|thumb|right|300px|Using the '''kill %1''' command to '''terminate''' job #1.]]
| |
| # Issue the following Linux command to '''terminate''' the '''first''' job running in the background:<br><span style="color:blue;font-family:courier;font-weight:bold">kill %1</span><br><br>'''NOTE:''' You can specify job number preceded by percent % with the<br>'''kill''', '''bg''', and '''fg''' commands to specify the processes' job number.<br><br>
| |
| # Issue the '''jobs''' command. What do you notice?<br><br>
| |
| # Issue the following Linux commands:<br><span style="color:blue;font-family:courier;font-weight:bold">kill %2</span><br><span style="color:blue;font-family:courier;font-weight:bold">kill %3</span><br><br>
| |
| # Issue the '''jobs''' command (you may have to issue the ''jobs'' command several times to get final result).<br> What do you notice?<br><br>[[Image:process-jobs5.png|thumb|right|300px|Using round brackets to '''group''' a series of commands to be run as '''one process'''.]]
| |
| # Let's use '''grouping''' to run several commands in sequence within a single process.<br><br>
| |
| # Issue the following Linux command:<br><span style="color:blue;font-family:courier;font-weight:bold">(sleep 400; sleep 500; sleep 600) &</span><br><br>
| |
| # Issue the '''jobs''' command. What do you notice?<br>You should notice all commands are run in a group as just one process.<br><br>
| |
| # Issue the following Linux command to terminate the first job running in the '''background''':<br><span style="color:blue;font-family:courier;font-weight:bold">kill %1</span><br><br>NOTE: If issuing the kill command does not work, then you would need to send a STRONGER signal<br>to "'''kill'''" (not "''SIGTERM'' - which is signal ''#15''") the process. The '''SIGKILL''' signal (signal '''#9''')<br>would be required to do this by issuing the '''kill''' command with the option: '''-9'''.<br><br>
| |
| # Issue the '''jobs''' command and make certain there are no processes that are running in the '''background'''.<br><br>You can also manipulate processes by their '''PID''' ('''process ID'''). Let's terminate our Matrix Bash shell process<br>by using the '''kill''' command using that processes' '''PID'''.<br><br>
| |
| # Issue the following Linux command: <span style="color:blue;font-family:courier;font-weight:bold">ps</span><br><br>
| |
| #Note in the '''ps''' command output the PID of the process called '''bash'''.<br><br>You will be using that PID when issuing the <u>next</u> Linux command.<br><br>
| |
| # Issue the following Linux command (using the bash processes' PID number instead of "PID"):<br><span style="color:blue;font-family:courier;font-weight:bold">kill PID</span><br><br>What did you notice?<br><br>'''FYI:''' If the command did NOT work, issue the following Linux command (using the bash processes' PID number instead of "PID"):<br><span style="color:blue;font-family:courier;font-weight:bold">kill -9 PID</span><br><br>
| |
| | |
| :In the next investigation, you will learn how to '''create aliases''' and '''view command history''' on your Matrix server.<br><br>
| |
| | |
| =INVESTIGATION 3: ALIASES / COMMAND HISTORY=
| |
| | |
| <br>
| |
| In this investigation, you will learn how to '''manage aliases''' and '''Linux command history''' on your Matrix account.
| |
| | |
| | |
| '''Perform the Following Steps:'''
| |
| | |
| # Make certain that you are logged into your Matrix account.<br><br>[[Image:alias-1.png|thumb|right|400px|Issuing the '''alias''' command (<u>without</u> arguments) will display a list of existing aliases on your Unix / Linux system.]]
| |
| # Issue a Linux command to confirm that you are located in your '''home''' directory.<br><br>
| |
| # Issue the following Linux command: <span style="color:blue;font-family:courier;font-weight:bold">alias | more</span><br><br>Observe those <u>existing</u> aliases that have previously been declared. Take a few moments to run those aliases to see what happens.<br><br>
| |
| # Issue the following to create an alias: <span style="color:blue;font-family:courier;font-weight:bold">alias lal='ls -al'</span><br><br>
| |
| # Issue the following alias: <span style="color:blue;font-family:courier;font-weight:bold">lal</span><br><br>What do you notice?<br><br>
| |
| # Issue the following to create another alias (lowercase l and h):<br><span style="color:blue;font-family:courier;font-weight:bold">alias lh='ls --human-readable --size -1 -S --classify'</span><br><br>
| |
| # Issue the following command to confirm that this newly-created alias is stored in memory:<br><br><span style="color:blue;font-family:courier;font-weight:bold">alias | grep "lh"</span><br><br>
| |
| # Issue the following alias: <span style="color:blue;font-family:courier;font-weight:bold">lh</span> <br><br>What do you think this command does?<br><br>
| |
| # '''Logout''' of your Matrix account and then '''login''' to your Matrix account.<br><br>
| |
| # Reissue the '''lal''' alias. What happened?<br><br>
| |
| # Reissue the '''lh''' alias. What happened?<br><br>
| |
| # Issue the '''alias | grep lh''' command without any arguments to see if it is stored in memory.<br><br>
| |
| # Reissue the command to create the '''lh''' alias in '''step #6'''.<br><br>
| |
| # Run the '''lh''' alias to confirm that it is properly set in memory.<br><br>
| |
| # Issue the following Linux command to edit your ~/.bashrc startup file:<br><span style="color:blue;font-family:courier;font-weight:bold">nano ~/.bashrc</span><br><br>
| |
| # Add the following line at the '''bottom''' of this file:<br><span style="font-family:courier;font-weight:bold;>alias lh='ls --human-readable --size -1 -S --classify'</span><br><br>
| |
| # Save your editing changes and exit your text editor.<br><br>
| |
| # '''Logout''' of your Matrix account, then '''login''' to your Matrix account.<br><br>
| |
| # Reissue the '''lh''' alias. What happened?<br><br>
| |
| # Issue the following Linux command: <span style="font-family:courier;font-weight:bold;>unalias lh</span><br><br>
| |
| # Run the '''lh''' alias to see what happens.<br><br>What happenned?<br><br>
| |
| # '''Logout''' of your Matrix account, then '''login''' to your Matrix account.<br><br>
| |
| # Reissue the '''lh''' alias. What happened? Why?<br><br>
| |
| # Reissue the '''lal''' alias. Why '''didn't''' this alias work?<br><br>The checking script below is designed to act as a '''filter''' with a '''pipeline command'''.<br>This will allow to check if your '''lh''' alias exists when it is checked in this program.<br><br>
| |
| # Issue the following Linux pipeline command:<br><span style="color:blue;font-weight:bold;font-family:courier;">alias | ~uli101/week8-check-3</span><br><br>If you encounter errors, then view the feedback to make corrections, and then re-run the checking script.<br>If you receive a congratulation message that there are no errors, then proceed with this tutorial.<br><br>We will complete this investigation by learning to execute p'''reviously issued commands''' by using '''command history'''.<br><br>
| |
| # Issue the following Linux command: <span style="color:blue;font-family:courier;font-weight:bold">history | grep "lh"</span><br><br>What do you notice?<br><br>
| |
| # Type an exclamation mark '''!''' followed by the number by one of those commands<br>listed in the '''history list''' and press <span style="color:blue;font-family:courier;font-weight:bold">ENTER</span><br><br>What happened?<br><br>
| |
| # Type the following: <span style="color:blue;font-family:courier;font-weight:bold">!unalias</span> and press <span style="color:blue;font-family:courier;font-weight:bold">ENTER</span><br><br>What happened?<br><br>
| |
| # Issue the following Linux command: <span style="color:blue;font-family:courier;font-weight:bold">history | grep "lh"</span><br><br>What happened?<br><br>
| |
| | |
| = LINUX PRACTICE QUESTIONS =
| |
| | |
| The purpose of this section is to obtain '''extra practice''' to help with '''quizzes''', your '''midterm''', and your '''final exam'''.
| |
| | |
| Here is a link to the MS Word Document of ALL of the questions displayed below but with extra room to answer on the document to
| |
| simulate a quiz:
| |
| | |
| https://wiki.cdot.senecacollege.ca/uli101/files/uli101_week8_practice.docx
| |
| | |
| Your instructor may take-up these questions during class. It is up to the student to attend classes in order to obtain the answers to the following questions. Your instructor will NOT provide these answers in any other form (eg. e-mail, etc).
| |
| | |
| | |
| '''Review Questions:'''
| |
| | |
| # Hard Links:<ol type="a"><li>What is the purpose of creating a hard-link?</li><li>What is a limitation of a hard link?<li>Write a single Linux command to create a hard link called '''~/backup/myfile.txt.lnk''' for the <u>existing</u> file called '''~/myfile.txt'''</li><li>Write a single Linux command to display the '''i-node''' number for both files. Are the '''i-node''' numbers identical?</li></ol><br>
| |
| # Symbolic (Soft) Links:<ol type="a"><li>What is the purpose of creating a symbolic (soft) link?</li><li>What is a limitation of a symbolic (soft) link?</li><li>Write a single Linux command to create a symbolic link called '''~/shortcuts/murray.saul.lnk'''<br>to the <u>existing</u> directory called '''~murray.saul'''</li><li>Are the i-node numbers identical for both of those files?</li><li>What data is contained in the file called '''~/shortcuts/murray.saul.lnk'''?</li></ol><br>
| |
| # Background / Foreground Processes:<ol type="a"><li>Write a single Linux command to run the program called '''~/clean.sh''' in the '''background'''.</li><li>Write a single Linux command to place the previously issued program in the '''foreground'''.</li><li>Write a single Linux command to '''confirm''' that this program is running in the background.</li><li>What '''key-combination''' would you issue to send that program again into the '''background'''?</li><li>Write a single Linux command to have that process sent into the background to '''continue running'''?</li></ol><br>
| |
| # Managing Background processes:<br><span style="text-indent:120px;">Use the following diagram to answer the accompanying questions.<br>Each of the following questions will use the diagram below and are treated as independent situations.<br><br><span style="font-family:courier;font-weight:bold;">[1] Stopped vim a<br>[2]- Stopped vim b<br>[3]+ Stopped vim c</span></span><ol type="a"><li>Write a single Linux command to bring the second-recently process placed in the background into the '''foreground'''.</li><li>Write a single Linux command to '''terminate job #3'''.</li></ol><br>
| |
| # Write a single Linux command to display running processes in “real-time”.
| |
| # Write a single Linux command to terminate a process that has the following PID: '''22384'''<br><br>
| |
| # Aliases / History:<ol type="a"><li>Write a linux command to create an '''alias''' called '''ld''' that issues the command: '''ls -ld'''</li><li>Write a linux command to unset the '''alias''' created in the previous question.</li><li>Issue a Linux command to list '''history''' of commands that match the pattern called '''touch'''.</li></ol><br>
| |
| # Create a '''table''' listing each Linux command, useful options and command purpose for the following Linux commands:<br>'''ln''' , '''ps''' , '''top''' , '''fg''' , '''bg''' , '''jobs''' , '''kill''' , '''alias''' , '''unalias''' , '''history'''
| |
| | |
| | |
| _________________________________________________________________________________
| |
| | |
| Author: Murray Saul
| |
| | |
| License: LGPL version 3
| |
| Link: https://www.gnu.org/licenses/lgpl.html
| |
| | |
| _________________________________________________________________________________
| |
|
| |
|
| | When you're building the commands: I recommend you build them one command at a time, and then redirect/pipe the output. |
|
| |
|
| | * Create the '''~/lab7''' directory. |
| | * Save the last 15 lines from /var/log/syslog into '''~/lab7/lastlog.txt''' |
| | * Count the number of users with the "nologin" shell in the /etc/passwd file, and redirect that number to the file '''~/lab7/nologinCount.txt''' |
| | * Save the first line containing "barn" in AnimalFarm.txt into the file '''~/lab7/meet.txt''' |
| | * Save the last line containing "barn" in AnimalFarm.txt into the file '''~/lab7/end.txt''' |
|
| |
|
| | =Submit evidence of your work= |
| | After you finish the lab: run the following commands to submit your work:<syntaxhighlight lang="bash"> |
| | cd ~ |
| | wget http://ops345.ca/check/ops145-lab7-check.sh # Download the check script |
| | chmod 700 ops145-lab7-check.sh # Make the downloaded file executable |
| | ./ops145-lab7-check.sh # Run the check script |
| | </syntaxhighlight>If it says "Your lab7 has been submitted": make a screenshot, and you're done. If it gives you any warnings or errors: you have to fix them and try the ./ops145-lab7-check.sh command again. |
| [[Category:OPS145]] | | [[Category:OPS145]] |
Input and Output
You need to study system programming to fully understand how input and output works, but without being a programmer you can still learn most of what you need to control input and output on the command line.
The introduction in this lab will probably be a little dry, but hopefuly it will start making more sense when you get to apply these concepts later in the lab.
Each application on a POSIX-compatible system (such as Linux) is always started with three data pipes attached to it. These are:
- Standard input (STDIN, file descriptor 0)
- Standard output (STDOUT, file descriptor 1)
- Standard error (STDERR, file descriptor 2)
The file descriptor numbers mostly won't matter to you in this course, but they're good to know for the future. You'll remember them if you just memorize STDIN, STDOUT, STDERR, and recall that the count starts from zero.

Default standard input/ouput
STDOUT
Standard output is the most straightforward to understand. Whatever normal output a command-line prints goes out through the standard output pipe.
By default the standard output pipe is connected to the terminal, and anything that goes into that pipe comes out as readable output on the screen.
STDERR
This is where things get complicated. The application can send output into STDOUT or STDERR. Both these pipes are connected to the terminal by default, and both outputs will look the same to the user. But they are different pipes - which means they are controlled separately.
One extra confusing factor is the definition of "error". Sometimes it's obvious what constitutes an error, but often it isn't.
The programmer who wrote the application had to make the decision which sort of output to send to STDOUT and which to send to STDERR. You can try and make an educated guess, but you'll have to confirm by experimenting.
STDIN
Standard input is only tricky until you become familiar with it. STDIN is also a data pipe, but by default instead of the pipe's input coming from the program and the output going to the terminal: the pipe's input comes from the terminal and the output goes into the program.
Up to this point in the course you haven't used STDIN, but it's used all the time and now is the time to learn about it.
Other pipes
A programmer can choose to open as many other pipes as they like in their application, but none of those extra pipes can be controlled using the mechanisms in this lab.
Redirecting output to files
The input/output pipes don't have to be connected to the default input/output (keyboard and terminal display). You can choose to connect one or two or all three of these pipes to something else. The something else can be:
- A file, which is commonly called redirection
- Another program, which is commonly called piping
Redirect STDOUT to a file
When the shell encounters the character > it will interpret that as an instruction to redirect the standard output from the application you're running into a file.
A simple example of when you might use this is to save a listing of all the files you have now, so that you can do something with that list later.
- In a terminal create the directory ~/lab6 but keep your PWD in your home directory.
- Then run ls twice. The first time on its own, the second time redirecting its output to a file:
ls > lab6/homecontents.txt
Note that the second time there is no output on the terminal. That's because you instructed the shell to redirect the standard output from the ls command into the file lab6/homecontents.txt:
The reason why homecontents.txt doesn't have any colours in it is simple: there's no such thing as dark blue or light green in a plain text file. There's just text. The more complicated question is where did the pretty colours come from when the output is in a terminal? That's too complicated a question for this course, and we're just going to ignore it.
Redirect STDERR to a file
- Run an ls command, giving it as an argument a filename for a file which doesn't exist. For example:
- The command prints some output: "ls: cannot access 'command.com': No such file or directory". From experience I know that this comes through the STDERR pipe, but we can confirm by redirecting STDOUT to a file:
ls command.com > ~/lab6/lscommandcom.txt
- Note that the output is still printed in the terminal, and the file lscommandcom.txt is empty. There's really no way to see a difference between standard and error output except through experimentation like this.
- You can redirect STDERR to a file using the 2> notation (2 is the number of the pipe):
ls command.com 2> ~/lab6/lscommandcom.txt
Here's what all that looks like:
Because there's no obvious difference between standard and error output in the terminal: this distinction often causes headaches, but that's just a reality we have to deal with.
You can redirect STDOUT to one file and STDERR to another file:
Redirect to /dev/null
/dev/null is a special device file on Linux machines. It's like a black hole: anything that goes into it just disappears for ever. It is frequently used when you want to run a command, but you're sure you don't want to see the output of that command, and you don't want to save that output either. The utility of this will become more obvious when we get to scripting.
For now you can practice with the ls command:
New commands
This is a good time to learn some new commands. They will help you understand the pipes sections later in the lab.
grep
The grep command helps you find specific text in a plain text file. Here's what it does without extra arguments:
- It reads the input one line at a time
- It looks of your search term anywhere on that line
- If it finds it: it prints the entire line
- If it doesn't find it: it doesn't print that line at all
Let's try this:
- Change your PWD to ~/Downloads/SampleFiles
- You might recall we looked for the string "Australia" in the book 1984.txt when you opened it with the less command. Now we'll do the same thing using grep:
The first argument to grep is the search term, the second (optional) argument is the file to read. The second argument is actually optional, because grep can read its input from the STDIN pipe instead.
head
By default the head command will print the first ten lines of whatever plain text input it gets, and discards all the other lines. This and the tail command are frequently used when you just need to see the beginning or the end of a text file.
- Look at the first 10 lines of AnimalFarm.txt:
- If you want a number of lines different than the default 10: you can specify that as an argument. This is how you would get the first 11 lines:
The argument specifying the name of the file is optional. Like grep: head can process input from STDIN instead.
tail
If you understand what the head command does: the tail command should be self-explanatory.
wc
wc is short for Word Count, but it's almost never used to count words. It can also count lines, and it's often used for that purpose.
- Count the number of lines in the two books you have in SampleFiles:
wc -l 1984.txt
wc -l AnimalFarm.txt
The wc command can also read input from STDIN.
Redirecting input from files
If you want a command to take its STDIN from a file instead of the keyboard: you can redirect it using <
- Try the commands from the previous section, this time using redirection instead of giving the file name as an argument to the command:
grep Australia < 1984.txt
head < 1984.txt
wc -l < 1984.txt
These appear to be almost the same commands, but the principles involved are quite different. The difference will become more apparent in the following piping section.
Piping
Redirecting the output of one command into the input of another is called piping. There are many reasons to do this, we will only look at a few examples.
You establish this kind of redirection using a | symbol (commonly called a pipe, used both as a noun and as a verb). The connection is highlighted in green in this diagram:
- The grep command can find strings inside a text file. The wc command can count lines. You can combine the two commands to count how many lines in a text file contain a particular string. For example:
grep stuff 1984.txt # Will find lines with "stuff" in the book
grep stuff 1984.txt | wc -l # Will count the number of lines containing "stuff" in the book
- Or let's say you wanted to find lines which contain the word Party, and also the word evidence. That would be very hard to do with a single grep command, but very easy to do if you use two of them together:
grep Party 1984.txt # Will find lines with "Party" in the book
grep Party 1984.txt | grep evidence # Will find lines with "Party" and "evidence" in the book
- There is no limit on how many commands you can chain together with pipes. For exaple if you wanted to count how many lines in the book contain "Party" and "member": you could pipe the output of the last grep command to wc:
grep Party 1984.txt # Will find lines with "Party" in the book
grep Party 1984.txt | grep member # Will find lines with "Party" and "member" in the book
grep Party 1984.txt | grep member | wc -l # Will count lines with "Party" and "member" in the book
- Or if you wanted to know how many such lines are in the first 500 lines of the book: you could feed the input to the first grep from the output of head:
head -500 1984.txt | grep Party | grep member | wc -l
The possibilities are endless. Pipes are the reason there are many simple commands in Linux. One simple command can only do so much, but combined with others: it can do some really complicated stuff, which the author of the command could never have predicted.
You need to complete the tasks in this section in order to submit the lab.
When you're building the commands: I recommend you build them one command at a time, and then redirect/pipe the output.
- Create the ~/lab7 directory.
- Save the last 15 lines from /var/log/syslog into ~/lab7/lastlog.txt
- Count the number of users with the "nologin" shell in the /etc/passwd file, and redirect that number to the file ~/lab7/nologinCount.txt
- Save the first line containing "barn" in AnimalFarm.txt into the file ~/lab7/meet.txt
- Save the last line containing "barn" in AnimalFarm.txt into the file ~/lab7/end.txt
Submit evidence of your work
After you finish the lab: run the following commands to submit your work:
cd ~
wget http://ops345.ca/check/ops145-lab7-check.sh # Download the check script
chmod 700 ops145-lab7-check.sh # Make the downloaded file executable
./ops145-lab7-check.sh # Run the check script
If it says "Your lab7 has been submitted": make a screenshot, and you're done. If it gives you any warnings or errors: you have to fix them and try the ./ops145-lab7-check.sh command again.