OPS345 Lab 3: Difference between revisions
| (4 intermediate revisions by the same user not shown) | |||
| Line 3: | Line 3: | ||
* We set up port forwarding for the SSH protocol so that incoming TCP packets to port 2211 on router are forwarded to TCP port 22 on ww. | * We set up port forwarding for the SSH protocol so that incoming TCP packets to port 2211 on router are forwarded to TCP port 22 on ww. | ||
Before you get started with the storage configuration, | Before you get started with the storage configuration, '''install httpd''' on ww. You don't need to start the service at this point. Just install it. | ||
= Storage for the web server = | = Storage for the web server = | ||
| Line 41: | Line 41: | ||
In order to avoid all those problems you use LVM. The storage for your web server will be on a Logical Volume, on a separate EBS device than the operating system. If you run out of space: all you have to do is add another EBS device, and extend the logical volume to use the space on that new device as well. Exactly like you did in OPS245. | In order to avoid all those problems you use LVM. The storage for your web server will be on a Logical Volume, on a separate EBS device than the operating system. If you run out of space: all you have to do is add another EBS device, and extend the logical volume to use the space on that new device as well. Exactly like you did in OPS245. | ||
* Install the LVM tools via the '''lvm2''' package. | |||
* Create a volume group '''vg_www''', and add /dev/xvdf to it as a physical volume. | * Create a volume group '''vg_www''', and add /dev/xvdf to it as a physical volume. | ||
* Then create a logical volume '''lv_www''' and allocate all the space from /dev/xvdf to lv_www. | * Then create a logical volume '''lv_www''' and allocate all the space from /dev/xvdf to lv_www. | ||
| Line 89: | Line 90: | ||
Note that this is a webpage, and it's loaded from localhost which means the web server works, but it's not the webpage you created (you can quit links with the 'q' key): | Note that this is a webpage, and it's loaded from localhost which means the web server works, but it's not the webpage you created (you can quit links with the 'q' key): | ||
[[File:AWSPHPMissing.png|800px|border|center]] | [[File:AWSPHPMissing-2023.png|800px|border|center]] | ||
The problem is that we created an index.php file which will load by default if your web server has the PHP module installed, but we didn't install that. | The problem is that we created an index.php file which will load by default if your web server has the PHP module installed, but we didn't install that. | ||
| Line 141: | Line 142: | ||
<table> | <table> | ||
<tr><th>Configuration</th><th>Value</th></tr> | <tr><th>Configuration</th><th>Value</th></tr> | ||
<?php | |||
$token = exec("curl -s -X PUT 'http://169.254.169.254/latest/api/token' -H 'X-aws-ec2-metadata-token-ttl-seconds: 21600'"); | |||
?> | |||
<tr> | <tr> | ||
<td><p>Private IP</p></td> | <td><p>Private IP</p></td> | ||
<td><?php system("curl http://169.254.169.254/latest/meta-data/local-ipv4"); ?></td> | <td><?php system("curl -H 'X-aws-ec2-metadata-token: $token' http://169.254.169.254/latest/meta-data/local-ipv4"); ?></td> | ||
</tr> | </tr> | ||
<tr> | <tr> | ||
<td><p>Public IP</p></td> | <td><p>Public IP</p></td> | ||
<td><?php system("curl http://169.254.169.254/latest/meta-data/public-ipv4"); ?></td> | <td><?php system("curl -H 'X-aws-ec2-metadata-token: $token' http://169.254.169.254/latest/meta-data/public-ipv4"); ?></td> | ||
</tr> | </tr> | ||
</table> | </table> | ||
| Line 164: | Line 168: | ||
Since your web server is accessible from anywhere on the internet - there's really no reason why it should have a public IP at all. This will be an opportunity for you to learn to plan in advance as much as you can. | Since your web server is accessible from anywhere on the internet - there's really no reason why it should have a public IP at all. This will be an opportunity for you to learn to plan in advance as much as you can. | ||
* In the AWS EC2 web console navigate to the configuration for ww's network interface ww-nic. | * In the AWS EC2 web console navigate to the configuration for ww's network interface (I named mine ww-nic). | ||
* Do click on every option you can find, look for a way to remove ww's public IP address: | * Do click on every option you can find, look for a way to remove ww's public IP address: | ||
[[File:AWSCantRemovePublicIP.png|800px|border|center]] | [[File:AWSCantRemovePublicIP.png|800px|border|center]] | ||
Until recently the option to remove a public IP from an instance which was intitially configured to have a public IP assigned automatically doesn't exist. Now you can do it, but we'll ignore that because you need the practice.. | |||
We'll have to rebuild the ww VM. That's why we called it ww instead of www. Don't get annoyed, keep these two things in mind: | |||
# They say practice makes perfect. Perfection is not expected from you, but practice will make you more comfortable and more able to take on more complex problems. Yes, you'll have to redo some of the work. That's a good thing. It means more practice and you will benefit from it. | # They say practice makes perfect. Perfection is not expected from you, but practice will make you more comfortable and more able to take on more complex problems. Yes, you'll have to redo some of the work. That's a good thing. It means more practice and you will benefit from it. | ||
| Line 192: | Line 196: | ||
* Then create a new VM with the following configuration: | * Then create a new VM with the following configuration: | ||
** Named '''www''' (not ww) | ** Named '''www''' (not ww) | ||
** AMI version '''Amazon Linux | ** AMI version '''Amazon Linux 2023''' | ||
** '''vpc-ops345''' | ** '''vpc-ops345''' | ||
** '''subnet-ops345''' | ** '''subnet-ops345''' | ||
| Line 202: | Line 206: | ||
To install software you'll be in a bit of a bind because yum downloads software from online repositories and www doesn't have internet access. | To install software you'll be in a bit of a bind because yum downloads software from online repositories and www doesn't have internet access. | ||
* You can add a temporary public IP to an instance which does not get a public IP automatically: allocate a new elastic IP named "temporary_ip", and associate it with the www instance. | * You can add a temporary public IP to an instance which does not get a public IP automatically: allocate a new elastic IP named "temporary_ip", and associate it with the www instance. | ||
* Install httpd, php, and any other software you like to use. | * Install lvm2, httpd, php, and any other software you like to use. | ||
== Reconnect www-data == | == Reconnect www-data == | ||
| Line 221: | Line 225: | ||
* Modify your index.php (the part between "<?php" and "?>" in the public IP section) to add a 404 check for this missing ip case: | * Modify your index.php (the part between "<?php" and "?>" in the public IP section) to add a 404 check for this missing ip case: | ||
<syntaxhighlight lang="php"> | <syntaxhighlight lang="php"> | ||
<?php | <?php | ||
system("curl http://169.254.169.254/latest/meta-data/public-ipv4 2>&1| grep -q '404 - Not Found'", $rc); | system("curl -H 'X-aws-ec2-metadata-token: $token' http://169.254.169.254/latest/meta-data/public-ipv4 2>&1| grep -q '404 - Not Found'", $rc); | ||
if ($rc == 0) | if ($rc == 0) | ||
echo "None found"; | echo "None found"; | ||
else | else | ||
system("curl http://169.254.169.254/latest/meta-data/public-ipv4"); | system("curl -H 'X-aws-ec2-metadata-token: $token' http://169.254.169.254/latest/meta-data/public-ipv4"); | ||
?> | ?> | ||
</syntaxhighlight> | </syntaxhighlight> | ||
Latest revision as of 13:01, 30 June 2024
In the last lab we created the ww instance:
- With a static private IP (10.3.45.11)
- We set up port forwarding for the SSH protocol so that incoming TCP packets to port 2211 on router are forwarded to TCP port 22 on ww.
Before you get started with the storage configuration, install httpd on ww. You don't need to start the service at this point. Just install it.
Storage for the web server
In this lab we'll configure ww to function as a web server. The most important piece of learning in this lab is managing one type of storage available on AWS: Elastic Block Storage (EBS).
An EBS volume looks like any other block storage device (e.g. a harddrive partition) to an operating system in an AWS instance. But of course it's not a partition or a harddrive or an LVM logical volume, its actual implementation details are internal to AWS and of no concern to us, the users. The concept should be familiar to you because it's so similar to how in OPS245 you've created a virtual harddrive in VMware and attached it to an existing VM.
Create and attach EBS device
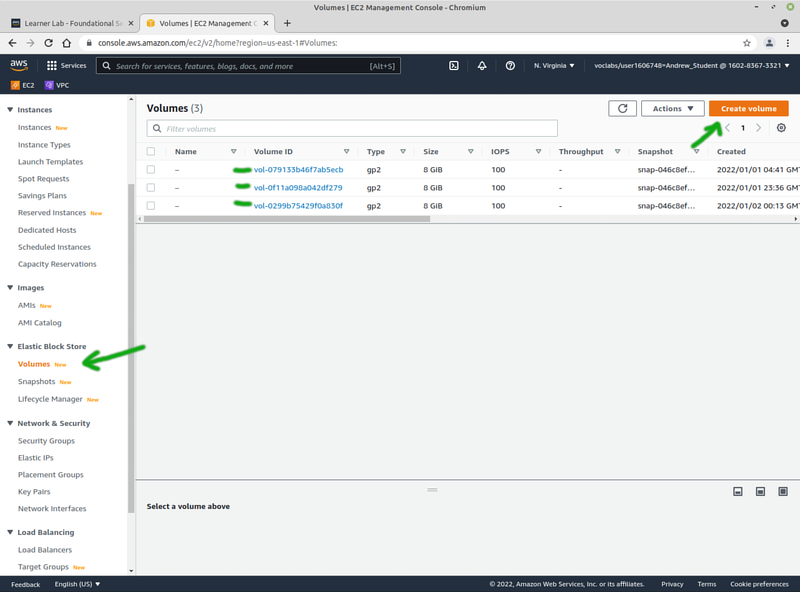
- First go to Volumes under Elastic Block Store. Notice that some volumes are already there. These are the virtual harddrives which your existing VMs have been installed on, where they store all the operating system files, the contents of the home directories, and anything else "on the harddrive".
- Click "Create volume".
- Don't neglect to click the "Info" link on each option. Remember that even though it may sound incomprehensible at first: you will pick up some knowledge every time you read this stuff, and eventually this will become easier to understand.
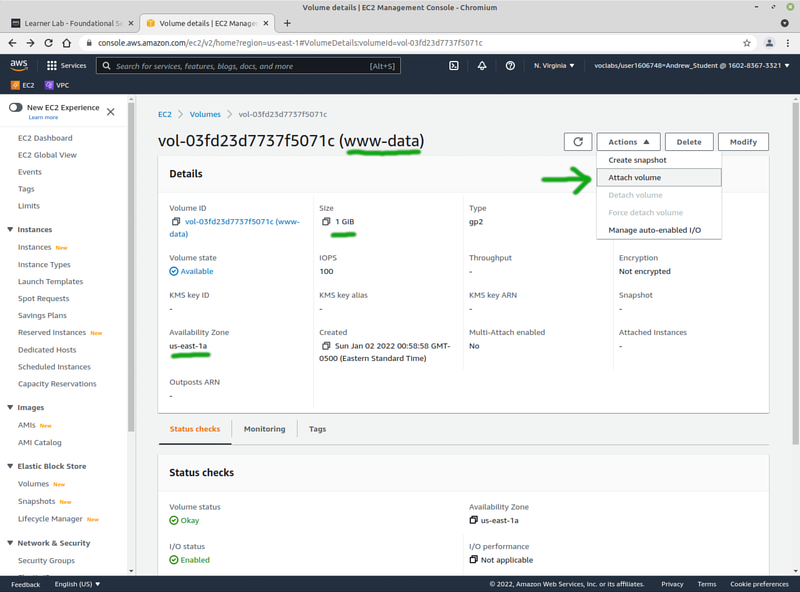
- Set the size to 1GB. This is the minimum allowed and is more than enough for what you need.
- Set its Name to www-data.
- Now you need to attach it to the ww VM.
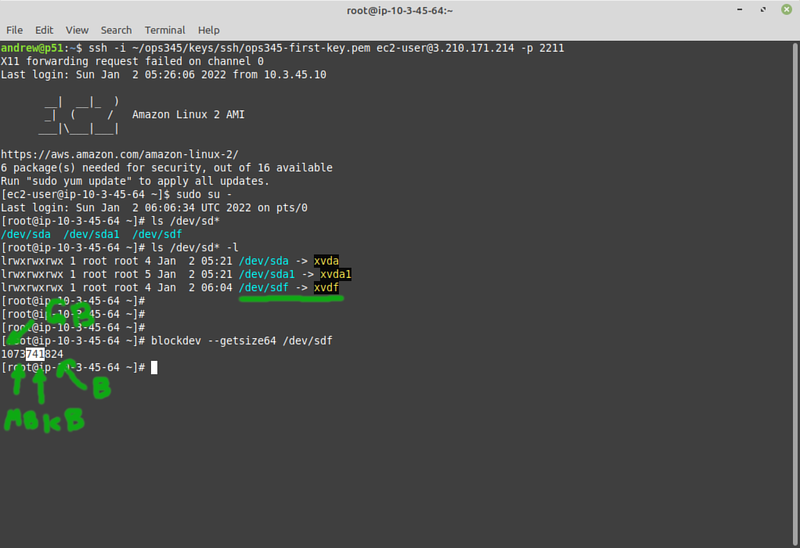
The name of the device doesn't really matter. Mine turned out to be /dev/sdf.
Note that you don't need to shut down your VM nor even reboot it. The action you performed is the equivalent of plugging in a hot-pluggable storage device into a Linux desktop or laptop.
- In your ww terminal check that the new device showed up and is the correct size:
At this point you have a new block storage device of 1GB plugged into your box, but it is not currenty being used. Hopefully you paid attention in the OPS245 LVM labs because this is the same stuff, just in the cloud instead of a local hypervisor.
Use your new EBS device as a LV
It should not be difficult to imagine that your web server might run out of storage space if it only has 1GB available. How much work would it be to recreate the entire machine, reconfigure it, move all the files over, and do that without too much downtime?
In order to avoid all those problems you use LVM. The storage for your web server will be on a Logical Volume, on a separate EBS device than the operating system. If you run out of space: all you have to do is add another EBS device, and extend the logical volume to use the space on that new device as well. Exactly like you did in OPS245.
- Install the LVM tools via the lvm2 package.
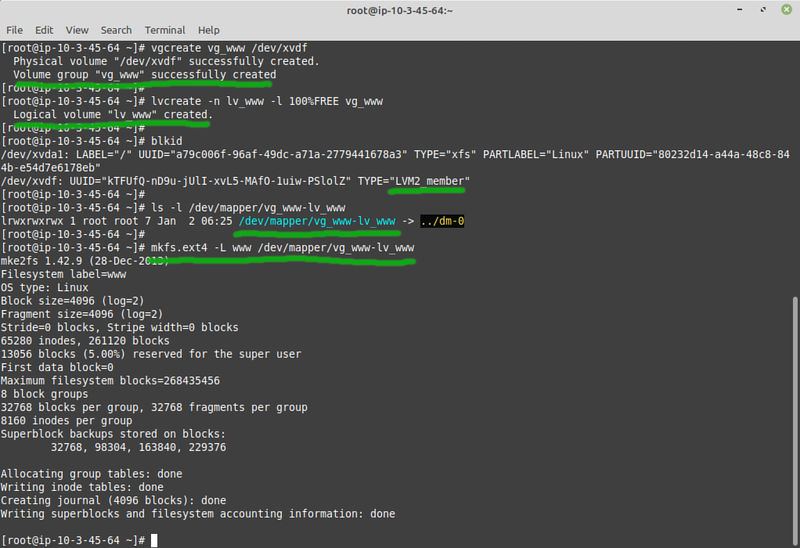
- Create a volume group vg_www, and add /dev/xvdf to it as a physical volume.
- Then create a logical volume lv_www and allocate all the space from /dev/xvdf to lv_www.
- Double-check with blkid and ls that your new logical volume has been created.
- Format that logical volume as ext4.
Mount your new LV on /var/www
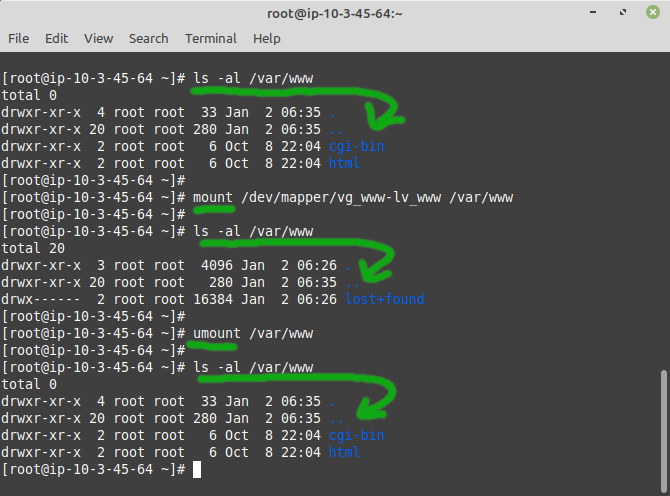
- Mount your new filesystem on /var/www. You should not get any errors or surprises:
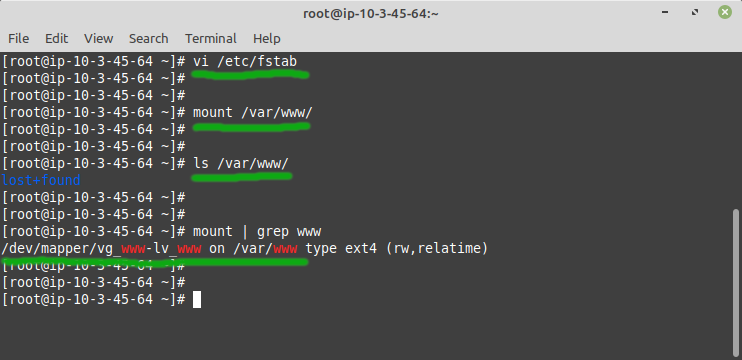
- That looks good in the screenshot. We don't need any of the contents that were originally in /var/www, so we'll set up the /dev/mapper/vg_www-lv_www device to mount automatically onto the /var/www directory every time the machine boots up. Add this to the end of /etc/fstab:
/dev/mapper/vg_www-lv_www /var/www ext4 defaults 0 0
- And test to make sure that it worked:
Don't reboot the machine if the testing above fails. You might end up with an unbootable VM, and you'll have to restart from the end of the previous lab.
- Once you're comfortable that your fstab isn't broken and your logical volume mounts properly: reboot ww and confirm that everything still works.
Set up access to the web server
Now that you have a web server set up with proper storage, it's almost time to test it using a web browser.
Make a simple PHP webpage
First create a simple php webpage.
- Look for the DocumentRoot setting in /etc/httpd/conf/httpd.conf. Note that it's set to /var/www/html
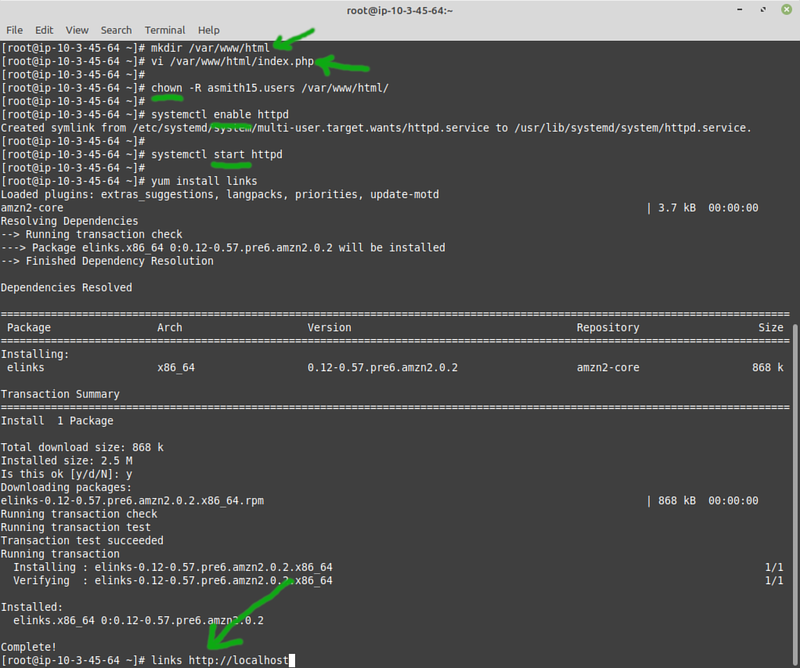
- Create this directory.
- Then create a plain-text file /var/www/html/index.php with the following contents:
Hello. My web server still works.<br />
If this shows the current date and time, PHP works too:<br />
<?php system("date"); ?>
- As a general security practice you should not work on web pages as root. Change the ownership of the html directory and its contents so that your user can have full control of the website stuff.
- Then start Apache and test your webpage by connecting to your server from your server using links as a client:
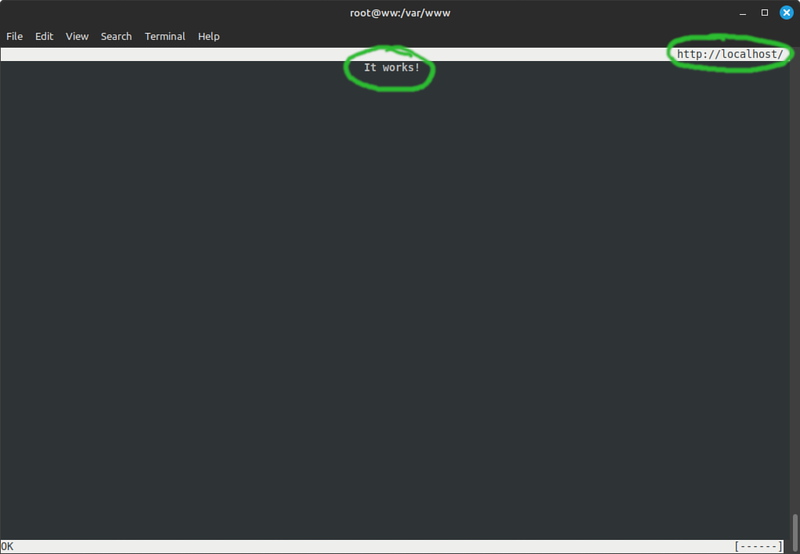
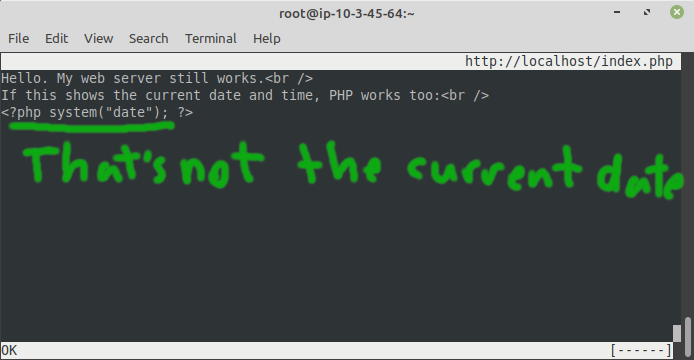
Note that this is a webpage, and it's loaded from localhost which means the web server works, but it's not the webpage you created (you can quit links with the 'q' key):
The problem is that we created an index.php file which will load by default if your web server has the PHP module installed, but we didn't install that.
- You can view your PHP page by specifying the path to it explicitly in the address:
[asmith15@ip-10-3-45-64 ~]$ links http://localhost/index.php
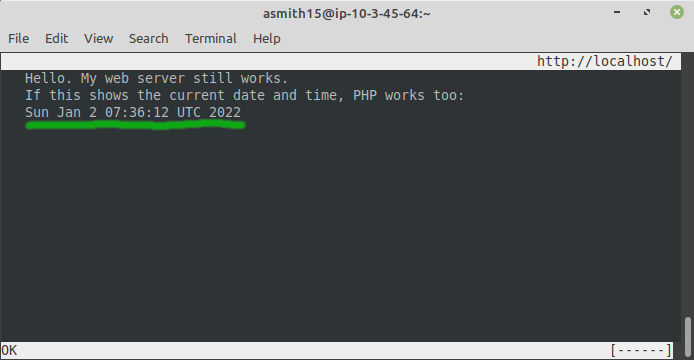
- That's better but still not quite right. Install the missing package (php) and restart Apache. It should finally work:
Port forwarding for HTTP
The links application is useful for basic testing but it's not how you want people to access your websites. You want them to use a proper web browser like Firefox. But in order for that to work: your web server needs to be accessible from the internet, so let's make it accessible via your router's IP address, using port forwarding (same idea as your SSH setup, but for port 80).
- On the router VM add a new iptables rule to forward incomping TCP packets for port 80 to www:
iptables -t nat -I PREROUTING -p tcp --dport 80 -j DNAT --to 10.3.45.11:80
- Don't forget to save the new set of iptables rules.
Remember that there are also security groups with rules that block access to ports.
- Add a rule to ops345routersg to allow incoming access to port 80 from anywhere.
- Add a rule to ops345wwsg to allow incoming access to port 80 from ops345routersg only.
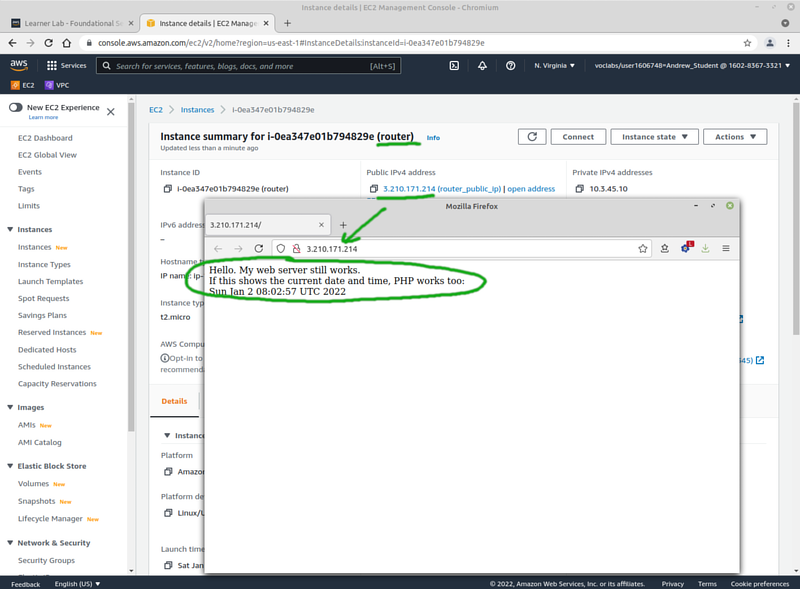
- Test your setup by connecting to your router's public IP address using Firefox on your workstation:
Make a proper PHP webpage
OPS345 is not a web development course, but you should learn a couple of basic things about websites.
- An HTML page (which is what your php file generates) really should follow a basic set of rules, even though technically it doesn't have to. The example below is a correctly structured HTML file.
- While PHP is primarily used by programmers, you can make good use of it too. In the example below it's used to query your instance's metadata that AWS has but the instance itself does not.
- Replace your current contents of /var/www/html/index.php with this:
<html>
<head>
<style>
body  {background-color: powderblue;}
table {border-spacing: 1cm 0cm;}
h2    {color: blue;}
th    {text-align: left;}
p     {color: red; font-weight: bold;}
</style>
</head>
<body>
Hello. My web server still works.<br />
If this shows the current date and time, PHP works too:<br /><br />
<?php system("date"); ?>
<h2>Instance Info</h2>
<table>
<tr><th>Configuration</th><th>Value</th></tr>
<?php
$token = exec("curl -s -X PUT 'http://169.254.169.254/latest/api/token' -H 'X-aws-ec2-metadata-token-ttl-seconds: 21600'");
?>
<tr>
  <td><p>Private IP</p></td>
  <td><?php system("curl -H 'X-aws-ec2-metadata-token: $token' http://169.254.169.254/latest/meta-data/local-ipv4"); ?></td>
</tr>
<tr>
  <td><p>Public IP</p></td>
  <td><?php system("curl -H 'X-aws-ec2-metadata-token: $token' http://169.254.169.254/latest/meta-data/public-ipv4"); ?></td>
</tr>
</table>
</body>
</html>
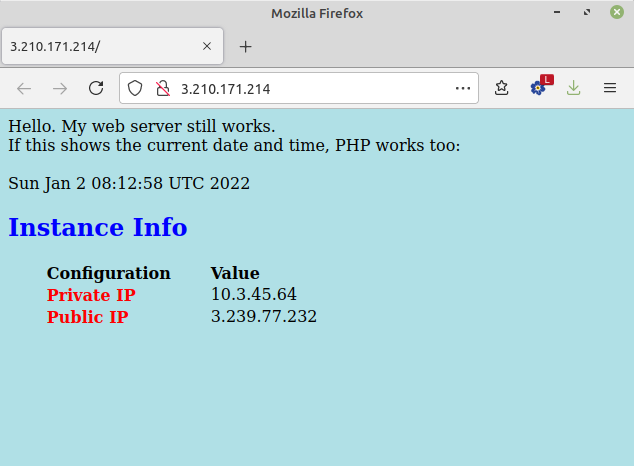
- No need to restart anything after you modify a webpage. Just reload it in Firefox. It should look like this:
- Try to see if you can find the public IP address you see in the webpage in the ww terminal. The ip address command won't help.
- If you feel curious you can see what other metadata you can get via http://169.254.169.254 here
Remove public IP from the web server
Since your web server is accessible from anywhere on the internet - there's really no reason why it should have a public IP at all. This will be an opportunity for you to learn to plan in advance as much as you can.
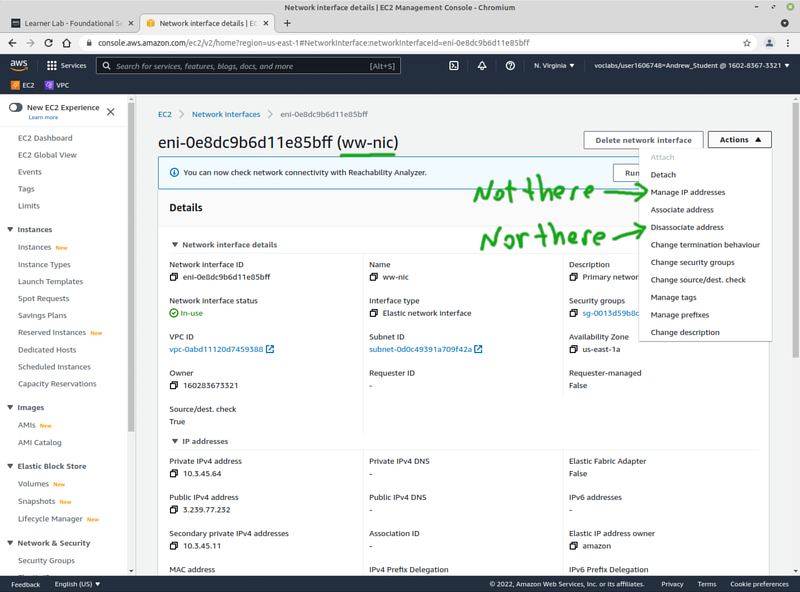
- In the AWS EC2 web console navigate to the configuration for ww's network interface (I named mine ww-nic).
- Do click on every option you can find, look for a way to remove ww's public IP address:
Until recently the option to remove a public IP from an instance which was intitially configured to have a public IP assigned automatically doesn't exist. Now you can do it, but we'll ignore that because you need the practice..
We'll have to rebuild the ww VM. That's why we called it ww instead of www. Don't get annoyed, keep these two things in mind:
- They say practice makes perfect. Perfection is not expected from you, but practice will make you more comfortable and more able to take on more complex problems. Yes, you'll have to redo some of the work. That's a good thing. It means more practice and you will benefit from it.
- You won't need to redo everything. You'll find that you can keep much of the work you completed because your website was stored on a logical volume on an extra EBS device, separate from the main ww storage device.
Rebuild ww into www
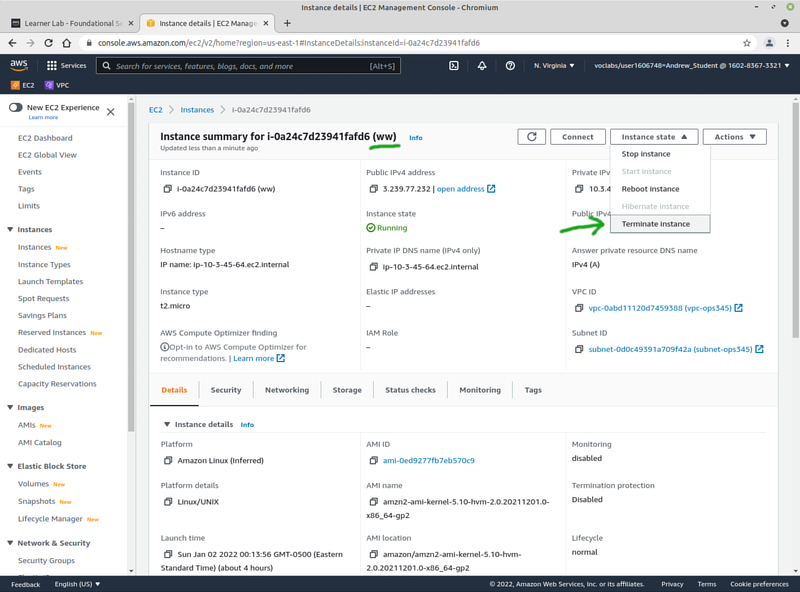
- Delete your ww VM. In AWS terminology that's Terminate:
The VM will be shut down and then deleted. But not immediately. It will still show up in the list for some time, with the state "Terminated". Eventually it will dissapear without any further action from you.
When you delete an instance on AWS: the virtual disk used by that instance will also be deleted. But any extra EBS devices you added to it will not be deleted automatically. That's going to be very useful in this case. After you terminate ww: go to Elastic Block Store, Volumes and note that www-data is still there.
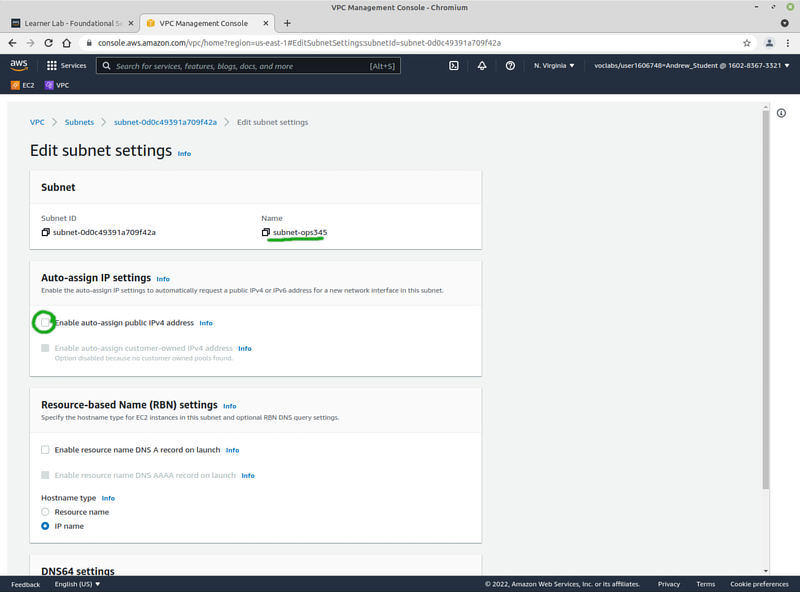
- Navigate to Subnets in the VPC Management Console and modify subnet-ops345 to not Auto-assign public IP addresses:
- Then create a new VM with the following configuration:
- Named www (not ww)
- AMI version Amazon Linux 2023
- vpc-ops345
- subnet-ops345
- Reuse the ops345wwsg security group (it was not deleted with ww)
- Primary IP 10.3.45.11
After the machine starts you can SSH to it exactly as you SSHed to ww (via port 2211 on router).
- Create a user with your username and sudo privileges, delete ec2-user
- Set the hostname to be www.youruserid.ops345.ca permanently
To install software you'll be in a bit of a bind because yum downloads software from online repositories and www doesn't have internet access.
- You can add a temporary public IP to an instance which does not get a public IP automatically: allocate a new elastic IP named "temporary_ip", and associate it with the www instance.
- Install lvm2, httpd, php, and any other software you like to use.
Reconnect www-data
- Attach the existing www-data volume to the www instance.
All the data you created on the logical volume is still there but your fstab modifications are gone.
- Follow the steps in the Mount your new LV on /var/www section above to permanently mount /dev/mapper/vg_www-lv_www on /var/www
- Start httpd, everything should be back to as it was with the ww VM.
Disasociate the public ip from www
- Navigate to temporary_ip under Network Security, Elastic IPs. Disassociate it from www. This should have no effect on the accessibility of your web page.
- Release temporary_ip. If you forget to do this it's not a big deal, but it will keep using your credits until it's deleted.
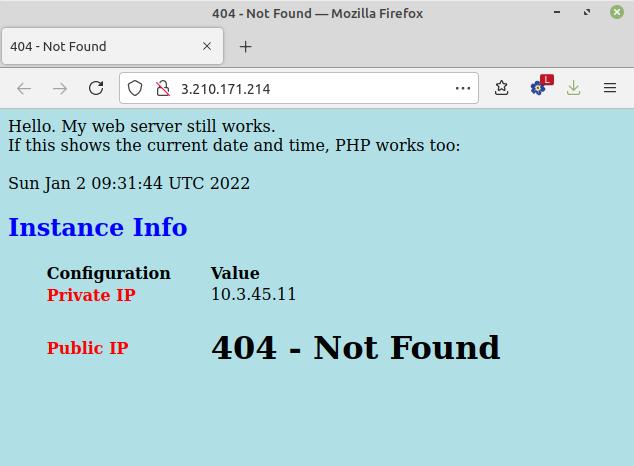
- After you disassociate the public IP from www, you webpage will look a little uglier than normal:
- Modify your index.php (the part between "<?php" and "?>" in the public IP section) to add a 404 check for this missing ip case:
<?php
system("curl -H 'X-aws-ec2-metadata-token: $token' http://169.254.169.254/latest/meta-data/public-ipv4 2>&1| grep -q '404 - Not Found'", $rc);
if ($rc == 0)
  echo "None found";
else
  system("curl -H 'X-aws-ec2-metadata-token: $token' http://169.254.169.254/latest/meta-data/public-ipv4");
?>
- Check that your webpage looks better.
Submit evidence of your work
For this lab, please submit screenshots that show you've completed the work, unless your professor has given you different instructions. As a minimum that's:
- Your www-data EBS device in the AWS console.
- Your www instance configured correctly.
- Firefox on your workstation accessing the web page on www via router's IP address.
