SenecaNET: Difference between revisions
Jump to navigation
Jump to search
No edit summary |
No edit summary |
||
| Line 1: | Line 1: | ||
[[File:SenecaNET.png | This is how I've set up my Linux Mint 21 laptop to connect to SenecaNET. The process is actually the same as the older SeneNET-Extreme network. SenecaNET is not a hidden network but you clicking on it doesn't seem to do anything. | ||
Steps to set it up: | |||
#Left-click on the NetoworkManager icon and pick SenecaNET. | |||
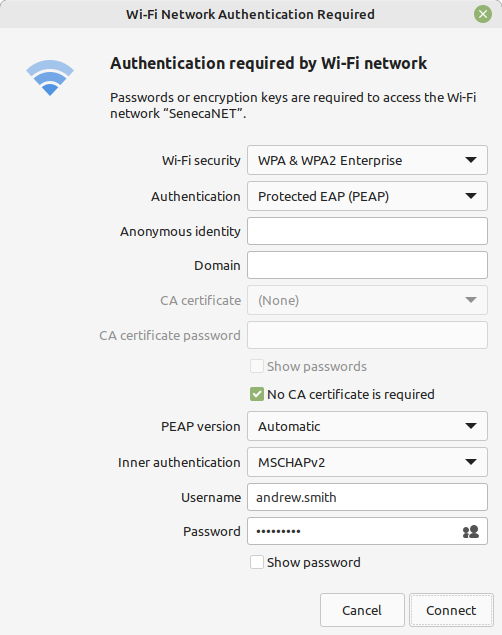
#A popup will appear (see screenshot below). Fill it in like so: | |||
##Wi-Fi security: '''WPA & WPA2 Enterprise''' | |||
##Authentication: '''Protected EAP (PEAP)''' | |||
##Anonymous identity: leave this empty | |||
##CA certificate: none | |||
##Check "'''No CA certificate is required'''" | |||
##PEAP version: '''automatic''' | |||
##Internal authentication: '''MSCHAPv2''' | |||
##Username/password: your seneca credentials | |||
[[File:SenecaNET.png]] | |||
Enjoy! | |||
Revision as of 19:46, 8 September 2022
This is how I've set up my Linux Mint 21 laptop to connect to SenecaNET. The process is actually the same as the older SeneNET-Extreme network. SenecaNET is not a hidden network but you clicking on it doesn't seem to do anything.
Steps to set it up:
- Left-click on the NetoworkManager icon and pick SenecaNET.
- A popup will appear (see screenshot below). Fill it in like so:
- Wi-Fi security: WPA & WPA2 Enterprise
- Authentication: Protected EAP (PEAP)
- Anonymous identity: leave this empty
- CA certificate: none
- Check "No CA certificate is required"
- PEAP version: automatic
- Internal authentication: MSCHAPv2
- Username/password: your seneca credentials
Enjoy!
