OPS345 Lab 7: Difference between revisions
No edit summary |
|||
| (29 intermediate revisions by the same user not shown) | |||
| Line 1: | Line 1: | ||
= | = Email services components = | ||
Originally there was only one "email" protocol: SMTP. It was designed to address, route, and receive messages for a destination user on a destination server. Later an extra couple of protocols (POP3 and IMAP) were developed so that people wouldn't have to read their email on the command-line on the SMTP server. Now there are many components, making a powerful, reliable, but complex system. Here's a simplified diagram of what typically happens when you send an email to someone else: | |||
= SMTP | [[File:Email-servers.png|800px|border|center]] | ||
By the end of this course you should be familiar enough with all these components to be able to speak about them comfortably. | |||
We'll set up an SMTP server in this lab and an IMAP server in the next lab. | |||
= New VM: email = | |||
* Create a new VM, similar to the www VM you created earlier. Make sure that it: | |||
** Named '''email''' | |||
** AMI version '''Amazon Linux 2023''' | |||
** Is in '''vpc-ops345''' (where no public IP address should be assigned by default). | |||
** In the subnet '''subnet-ops345''' | |||
** Is in a new security group named '''ops345emailsg''', which will allow SSH acccess from the router only and SMTP access from anywhere. | |||
** Has the IP address '''10.3.45.12''' | |||
** Gets an extra '''4GB EBS''' volume. | |||
* After it starts: do some configuration you should be very comfortable with by now: | |||
** Set up port forwarding on the router so you can SSH to email via port 2212 on the router. The email server is going to have its own public IP, but remember we're pretending that we're monitoring all SSH traffic using special software on the router machine. | |||
** Create a new user and delete ec2-user. | |||
** Set the hostname to '''email.yoursenecaid.ops345.ca''' | |||
** Allocate a new, permanent static IP named '''email_public_ip''' and associate it with your email server. | |||
== DNS records == | |||
Email used as you're used to it requires a couple of DNS entries. One A record for the server, and on MX record for your domain. | |||
* Log in to your [http://ops345.ca Bindistrar]. | |||
* Create an A record for email.yoursenecaid.ops345.ca with the static IP you assigned to your email server. This is just a typical A record. | |||
* Create an MX record with the value email.yoursenecaid.ops345.ca. | |||
** This record is for other people's email servers who want to send email to anyone@yoursenecaid.ops345.ca | |||
** It specifies that the receiving SMTP server for yoursenecaid.ops345.ca is email.yoursenecaid.ops345.ca | |||
** The priority is there for when you have one or more backup email servers. You would if this email server were important, but in this course you don't so you can pick any number for the priority. | |||
Remember that DNS records are cached, so if you make a mistake: you'll need for the TTL to expire before you can test your updated records. One way too give yourself two chances to get it right is to first test your MX record on the router. Then if it's wrong: you can test your second attempt on your workstation before the TTL expires on the router's caching DNS server. | |||
* Test your MX record on the router: | |||
[[File:AWSDigEmail.png|border|center]] | |||
== Storage == | |||
[[File: | For the www VM we set up an external storage device so that we wouldn't lose our website if the server was damaged or deleted. We'll do the same for the email VM. You can look back at lab 3 if you need a reminder for how to do the following steps. | ||
* Create a volume group '''vg_email''' with the second drive as the only physical volume. | |||
* Create a logical volume '''lv_email''' | |||
{{Admon/important|Don't get locked out|With the setup we're building all the emails will be stored in each user's home directory. That means '''lv_email''' will need to be mounted on '''/home'''. That makes it tricky because other important things (like your SSH keys) are stored under /home as well, so be careful with the following steps, you may end up locking yourself out of your VM, and you'll have to rebuild it.}} | |||
* Create a temporary directory /tmp/home and mount lv_email there. | |||
* Move all the contents of /home to /tmp/home | |||
* Edit your fstab to make sure lv_email gets mounted automatically on /home when your system boots. | |||
* Hold your breath and reboot. If you did it right: you should be able to ssh back in and everything will look the same, except now there's a lost+found directory in /home, which tells you that there's a filesystem mounted on there. | |||
== SMTP server: Postfix == | |||
There are many SMTP server software on Linux to choose from. Postfix is the most used commonly used so that's the one we're going to use. It can be configured to do all sorts of advanced and interesting things, but we'll keep it simple. Once you feel less overwhelmed with all the exotic configuration options: it will help you to read the description of what those options do, over time the meaning of those comments will become more and more clear. | |||
* Postfix is not installed by default on Amazon Linux 2023, install it using yum. | |||
* Then start it and make sure it starts automatically on boot. | |||
In the default configuration Postfix only listens on localhost, it will not accept inbound connections to port 25 even if the firewall allows access to that port. | |||
* Use the '''ss''' command to see what ports are open (i.e. there is a service listening on that port): | |||
[[File:AWSssSMTPlocalhost.png|800px|border|center]] | |||
* Edit '''/etc/postfix/main.cf''' and change four of the options: | |||
** Set '''mydomain''' to yoursenecaid.ops345.ca | |||
** Set '''myorigin''' to $mydomain. This is appended to your username when you send email directly from the server. It doesn't have to be the same as $mydomain, but it makes sense for it to be the same in most cases. | |||
** Set '''inet_interfaces''' to all. This will configure Postfix to listen for external incomming connections, rather than just connections from localhost. | |||
** Change '''mydestination''' to include $mydomain. This will tell postfix that when it sees an email for anyone@yoursenecaid.ops345.ca: it should deliver it rather than forward it to a different SMTP server. | |||
* Restart the Postfix service. Check the service status, /var/log/messages, and /var/log/maillog to confirm that it restarted successfully. | |||
* Run '''ss''' again, learn to see the difference between a service that listens on localhost and a service that listens on all interfaces: | |||
[[File:AWSSsSMTPOpen.png|800px|border|center]] | |||
=== Test receiving email === | |||
People often think of SMTP servers as "sending" servers, but they are responsible for receiving email too. Since setting up a full email client involves many steps, and at least two services: we'll test access to the SMTP server manually. | |||
* See if you can connect from your workstation to your SMTP server using telnet. If the connection is successful: run a single SMTP protocol command just because you can: | |||
{{Admon/important|Lame ISPs|I only know one ISP lame enough to block outgoing connections to port 25 for their customers (Rogers). But there may be others. If you're having a problem establishing the following connection: try connecting to Seneca's SMTP server first. If that doesn't work: just skip this test.}} | |||
[[File:AWSTelnet25-2023.png|border|center]] | |||
* You can use the '''quit''' command or the escape sequence ^] to get out of that session. | |||
* Now use whatever email service you want (e.g. myseneca, or your personal account) to send an email to yourusername@yourusername.ops345.ca. Note that you don't need any special configuration on the sender's email client or server. All someone needs to know to send email to you is in your server's MX record. | |||
** Before you send it: run '''journalctl -u postfix -f''' in a terminal so you can see what happens when a message arrives. You can press enter a few times to insert some blank lines so you can more easily separate unrelated messages.[[File:AWSMaillogReceivedMail-2023.png|800px|border|center]] | |||
** There's a lot of log for a single email. I typically look for '''from''', '''to''', and '''status=sent'''. If the status is something different: I start looking at other information. | |||
* "Delivered to mailbox" means that Postfix decided it is the destination for this particular message and saves it where it was configured to save it. | |||
=== Use Maildir and dovecot-lda === | |||
By default Postfix saves emails in the file '''/var/mail/username''' in the MBOX format. That means all the emails you get will be appended to this file. That works fine under normal circumstances but most people don't use MBOX for serious email servers. We'll configure Postfix to save messages in the Maildir format, under each user's home directory. | |||
We'll use dovecot-lda as a LDA. It's an application that comes with the Dovecot package. | |||
* Install dovecot, but don't start or enable the service. Leave the Dovecot configuration for the next lab. | |||
* Edit /etc/postfix/main.cf and add the following mailbox_command, to tell Postfix to deliver using dovecot-lda:<pre>mailbox_command = /usr/libexec/dovecot/dovecot-lda -f "$SENDER" -a "$RECIPIENT"</pre> | |||
* Restart postfix. | |||
* Edit /etc/dovecot/conf.d/10-mail.conf and add the following mail_location parameter, to tell dovecot-lda where to store emails it is asked to store and in which format:<pre>mail_location = maildir:~/Maildir</pre> | |||
* No need to restart any service after changing that, dovecot-lda is executed as an application for every email that Postfix wants delivered. | |||
* Send yourself another email and find where it ended up. The maildir format isn't meant for reading on the command-line, but you should be able to find a newly received message so that you can troubleshoot when it's not working properly. | |||
=== Aliases === | |||
Sometimes you want to receive emails which are sent to different addressed. For example the system administrator typically receives emails sent to postmaster, webmaster, hostmaster, and root. Also dovecot-lda will not deliver email to root at all as a security measure. | |||
Create an alias to deliver emails meant for root to andrew instead: | |||
* Edit /etc/aliases (it's a text file). | |||
* Uncomment the bottom line and change "mark" to your username. | |||
* Run "newaliases". | |||
* Send an email to root@yourusername.ops345.ca and make sure it ends up in your user's Maildir | |||
= Submit evidence of your work = | |||
For this lab, please submit screenshots that show you've completed the work, unless your professor has given you different instructions. As a minimum that's: | |||
* Your email VM details in the AWS console. | |||
* A dig query for your two new DNS records. | |||
* The output of the mount command. | |||
* The received emails in your Maildir. | |||
[[Category:OPS345]] | [[Category:OPS345]] | ||
Latest revision as of 14:11, 21 August 2023
Email services components
Originally there was only one "email" protocol: SMTP. It was designed to address, route, and receive messages for a destination user on a destination server. Later an extra couple of protocols (POP3 and IMAP) were developed so that people wouldn't have to read their email on the command-line on the SMTP server. Now there are many components, making a powerful, reliable, but complex system. Here's a simplified diagram of what typically happens when you send an email to someone else:

By the end of this course you should be familiar enough with all these components to be able to speak about them comfortably.
We'll set up an SMTP server in this lab and an IMAP server in the next lab.
New VM: email
- Create a new VM, similar to the www VM you created earlier. Make sure that it:
- Named email
- AMI version Amazon Linux 2023
- Is in vpc-ops345 (where no public IP address should be assigned by default).
- In the subnet subnet-ops345
- Is in a new security group named ops345emailsg, which will allow SSH acccess from the router only and SMTP access from anywhere.
- Has the IP address 10.3.45.12
- Gets an extra 4GB EBS volume.
- After it starts: do some configuration you should be very comfortable with by now:
- Set up port forwarding on the router so you can SSH to email via port 2212 on the router. The email server is going to have its own public IP, but remember we're pretending that we're monitoring all SSH traffic using special software on the router machine.
- Create a new user and delete ec2-user.
- Set the hostname to email.yoursenecaid.ops345.ca
- Allocate a new, permanent static IP named email_public_ip and associate it with your email server.
DNS records
Email used as you're used to it requires a couple of DNS entries. One A record for the server, and on MX record for your domain.
- Log in to your Bindistrar.
- Create an A record for email.yoursenecaid.ops345.ca with the static IP you assigned to your email server. This is just a typical A record.
- Create an MX record with the value email.yoursenecaid.ops345.ca.
- This record is for other people's email servers who want to send email to anyone@yoursenecaid.ops345.ca
- It specifies that the receiving SMTP server for yoursenecaid.ops345.ca is email.yoursenecaid.ops345.ca
- The priority is there for when you have one or more backup email servers. You would if this email server were important, but in this course you don't so you can pick any number for the priority.
Remember that DNS records are cached, so if you make a mistake: you'll need for the TTL to expire before you can test your updated records. One way too give yourself two chances to get it right is to first test your MX record on the router. Then if it's wrong: you can test your second attempt on your workstation before the TTL expires on the router's caching DNS server.
- Test your MX record on the router:

Storage
For the www VM we set up an external storage device so that we wouldn't lose our website if the server was damaged or deleted. We'll do the same for the email VM. You can look back at lab 3 if you need a reminder for how to do the following steps.
- Create a volume group vg_email with the second drive as the only physical volume.
- Create a logical volume lv_email
- Create a temporary directory /tmp/home and mount lv_email there.
- Move all the contents of /home to /tmp/home
- Edit your fstab to make sure lv_email gets mounted automatically on /home when your system boots.
- Hold your breath and reboot. If you did it right: you should be able to ssh back in and everything will look the same, except now there's a lost+found directory in /home, which tells you that there's a filesystem mounted on there.
SMTP server: Postfix
There are many SMTP server software on Linux to choose from. Postfix is the most used commonly used so that's the one we're going to use. It can be configured to do all sorts of advanced and interesting things, but we'll keep it simple. Once you feel less overwhelmed with all the exotic configuration options: it will help you to read the description of what those options do, over time the meaning of those comments will become more and more clear.
- Postfix is not installed by default on Amazon Linux 2023, install it using yum.
- Then start it and make sure it starts automatically on boot.
In the default configuration Postfix only listens on localhost, it will not accept inbound connections to port 25 even if the firewall allows access to that port.
- Use the ss command to see what ports are open (i.e. there is a service listening on that port):

- Edit /etc/postfix/main.cf and change four of the options:
- Set mydomain to yoursenecaid.ops345.ca
- Set myorigin to $mydomain. This is appended to your username when you send email directly from the server. It doesn't have to be the same as $mydomain, but it makes sense for it to be the same in most cases.
- Set inet_interfaces to all. This will configure Postfix to listen for external incomming connections, rather than just connections from localhost.
- Change mydestination to include $mydomain. This will tell postfix that when it sees an email for anyone@yoursenecaid.ops345.ca: it should deliver it rather than forward it to a different SMTP server.
- Restart the Postfix service. Check the service status, /var/log/messages, and /var/log/maillog to confirm that it restarted successfully.
- Run ss again, learn to see the difference between a service that listens on localhost and a service that listens on all interfaces:

Test receiving email
People often think of SMTP servers as "sending" servers, but they are responsible for receiving email too. Since setting up a full email client involves many steps, and at least two services: we'll test access to the SMTP server manually.
- See if you can connect from your workstation to your SMTP server using telnet. If the connection is successful: run a single SMTP protocol command just because you can:

- You can use the quit command or the escape sequence ^] to get out of that session.
- Now use whatever email service you want (e.g. myseneca, or your personal account) to send an email to yourusername@yourusername.ops345.ca. Note that you don't need any special configuration on the sender's email client or server. All someone needs to know to send email to you is in your server's MX record.
- Before you send it: run journalctl -u postfix -f in a terminal so you can see what happens when a message arrives. You can press enter a few times to insert some blank lines so you can more easily separate unrelated messages.
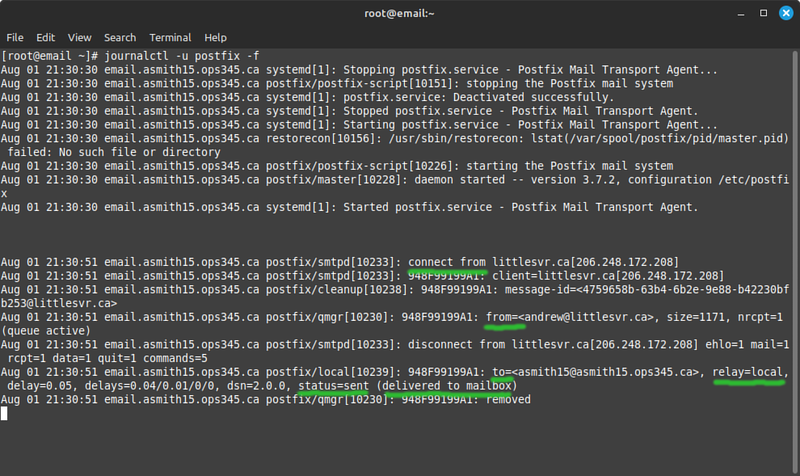
- There's a lot of log for a single email. I typically look for from, to, and status=sent. If the status is something different: I start looking at other information.
- Before you send it: run journalctl -u postfix -f in a terminal so you can see what happens when a message arrives. You can press enter a few times to insert some blank lines so you can more easily separate unrelated messages.
- "Delivered to mailbox" means that Postfix decided it is the destination for this particular message and saves it where it was configured to save it.

Use Maildir and dovecot-lda
By default Postfix saves emails in the file /var/mail/username in the MBOX format. That means all the emails you get will be appended to this file. That works fine under normal circumstances but most people don't use MBOX for serious email servers. We'll configure Postfix to save messages in the Maildir format, under each user's home directory.
We'll use dovecot-lda as a LDA. It's an application that comes with the Dovecot package.
- Install dovecot, but don't start or enable the service. Leave the Dovecot configuration for the next lab.
- Edit /etc/postfix/main.cf and add the following mailbox_command, to tell Postfix to deliver using dovecot-lda:
mailbox_command = /usr/libexec/dovecot/dovecot-lda -f "$SENDER" -a "$RECIPIENT"
- Restart postfix.
- Edit /etc/dovecot/conf.d/10-mail.conf and add the following mail_location parameter, to tell dovecot-lda where to store emails it is asked to store and in which format:
mail_location = maildir:~/Maildir
- No need to restart any service after changing that, dovecot-lda is executed as an application for every email that Postfix wants delivered.
- Send yourself another email and find where it ended up. The maildir format isn't meant for reading on the command-line, but you should be able to find a newly received message so that you can troubleshoot when it's not working properly.
Aliases
Sometimes you want to receive emails which are sent to different addressed. For example the system administrator typically receives emails sent to postmaster, webmaster, hostmaster, and root. Also dovecot-lda will not deliver email to root at all as a security measure.
Create an alias to deliver emails meant for root to andrew instead:
- Edit /etc/aliases (it's a text file).
- Uncomment the bottom line and change "mark" to your username.
- Run "newaliases".
- Send an email to root@yourusername.ops345.ca and make sure it ends up in your user's Maildir
Submit evidence of your work
For this lab, please submit screenshots that show you've completed the work, unless your professor has given you different instructions. As a minimum that's:
- Your email VM details in the AWS console.
- A dig query for your two new DNS records.
- The output of the mount command.
- The received emails in your Maildir.