OPS245 Lab 6
The default networking setup in VirtualBox works fine for accessing the internet from guests, but it's not very good for communicating between the guests and the host.
In this lab we'll set up a new virtual network, and a very basic name resolution mechanism.
Basic concepts
Your machine needs these four things configured correctly in order to be able to connect to the internet. Nearly all networking problems you'll run into in this course are due to one of these things being misconfigured:
- IP address. This address is used to connect to anything else on the local network. You'll be using an address on a private subnet, which means that your IP address cannot be used outside your subnet. All communication protocols on the internet work over IP.
- Subnet Mask. No matter which notation you use: the subnet mask does the same thing. It specifies and implies some important technical details about the network you're connected to. Any machines in the same subnet can communicate directly with each other using broadcasts.
- Default gateway. As soon as you want to connect to anything outside your own subnet: you need to go through a gateway. In this course you'll only have one gateway. The gateway is a router which must be inside your subnet.
- DNS server. Provides a service which translates domain names into IP addresses. Though all communication on the internet is done with IP addresses: people are very bad at remembering numbers, so everything is built with the assumption that DNS works.
Basic commands
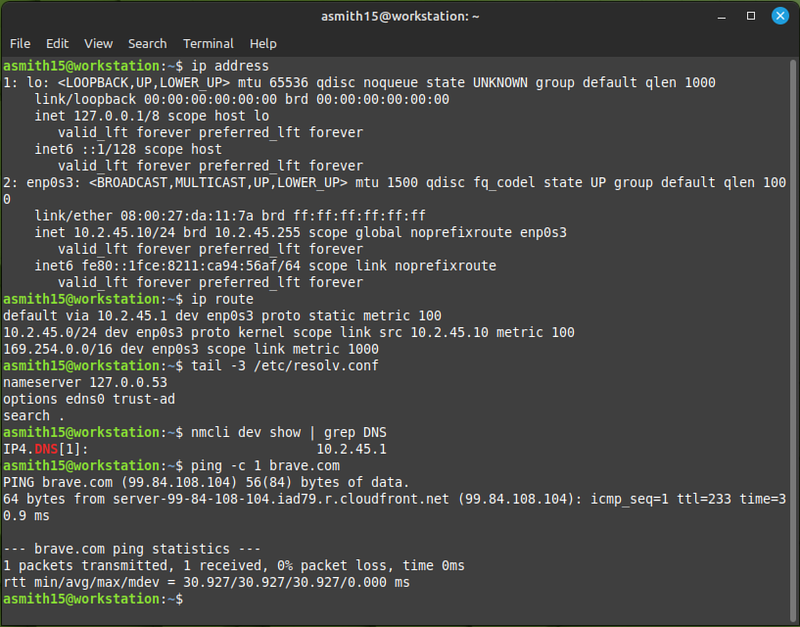
ip addresswill show you all the network interfaces on your system, including their MAC address, IP address, and subnet mask.ip routewill show you your routing table. In this course you'll only ever care about the first line (the default gateway).- The
/etc/resolv.conffile contains anameserverline which specifies which DNS server your machine will use.- If the resolv.conf isn't helpful: you can use
nmcli dev show | grep DNSinstead.
- If the resolv.conf isn't helpful: you can use
pingwill send ICMP packets to a machine you specify. It's usually the first troubleshooting tool an administrator uses.
Network troubleshooting steps
Several things need to all be configured correctly for your network to work properly. If your network isn't working properly: It's not always obvious which of those configurations is at fault. You might find it useful to follow these troubleshooting steps:
- Check that your IP address and subnet mask match the subnet you're trying to be on.
- IP addresses must be unique on a subnet. Duplicates cause all sorts of weird behaviour.
- Check that you can ping other machines inside the subnet. If you can't: you might be physically connected to the wrong network.
- Check that your default gateway is the router which can connect to things outside your subnet. In this course your router is your host machine.
- Check that you can ping your default gateway.
- Check that you can ping 1.1.1.1. This is a real public IP address on the internet. If you can't ping it: confirm that your host has access to the internet.
- Ping a host on the internet by name (make sure you know in advance that host is pingable). If that doesn't work:
- Check that you're configured to use a working DNS server.
- Ping your DNS server.
The steps above are certainly not exhaustive but they will help you determine what's wrong in the majority of cases.
New network: ops245net
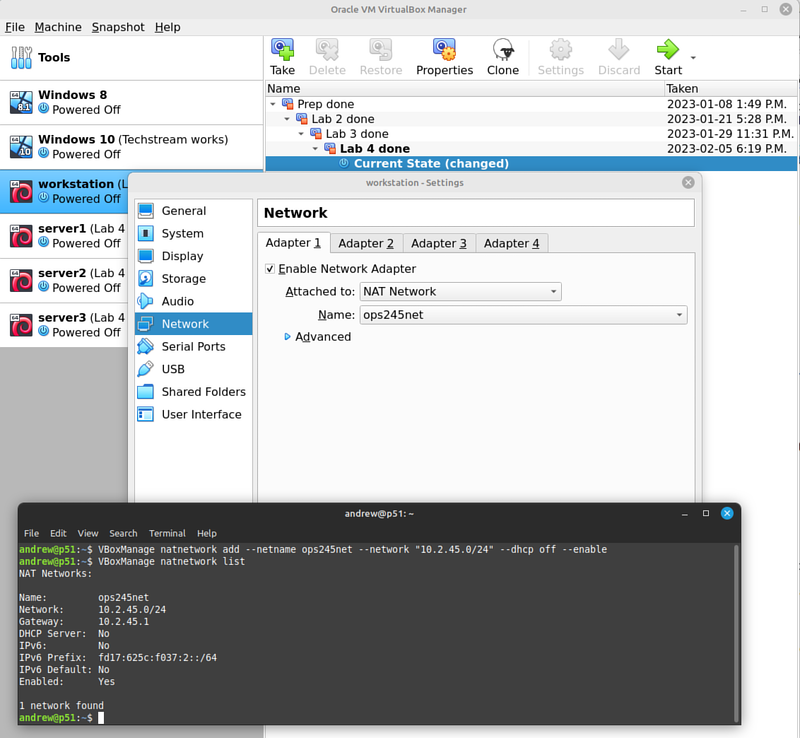
- Use a terminal in your host machine to run this command:If your host is Linux: run that as a regular user, not as root.
VBoxManage natnetwork add --netname ops245net --network "10.2.45.0/24" --dhcp off --enable - Run
VBoxManage natnetwork listto check that it worked.
- For each of your 4 virtual machines: change their network settings for Adapter 1 from NAT to NAT Network (ops245net).
- On your workstation open the graphical Network Connections tool via the network icon in the system tray.
- You can read more about the various virtual network types available in VirtualBox in the VirtualBox manual.
Graphical network configuration
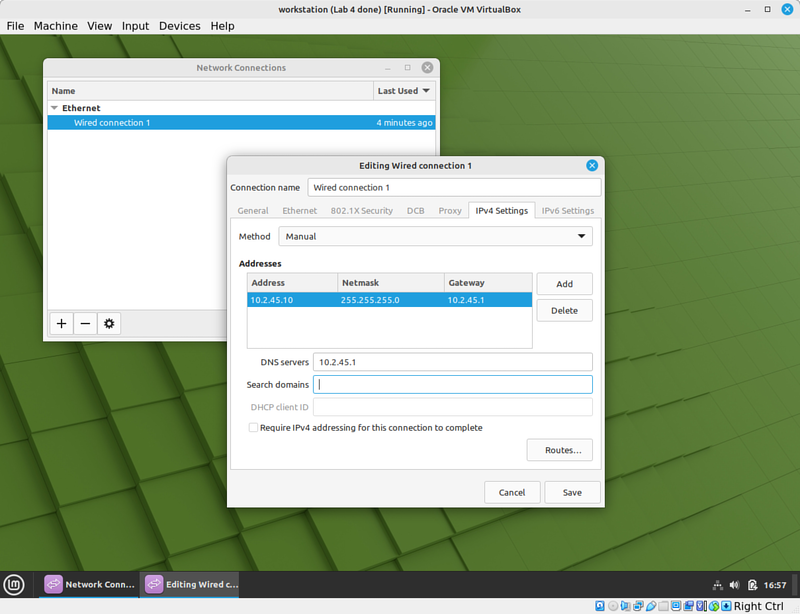
- On your workstation: modify the IPv4 settings for the existing wired connection from DHCP to Manual, with the following settings:
- IP address 10.2.45.10
- Netmask 255.255.255.0
- Gateway 10.2.45.1
- DNS server 10.2.45.1
- Confirm that all the settings were set correctly and that your internet connection works again:
- After you configure your networking successfully: install openssh-server and confirm that the sshd service is running and enabled.
Command-line network configuration
Configuring the networking on a server is tricky, especially if the server is not physically accessible and you can only administer it via SSH. In this course you have access to the console (the equivalent of the physical machine) so you can tolerate making a mistake, but in the real world you will rarely be able to remotely fix a networking problem you've created, since you need a working network connection to connect to that remote server.
Unfortunately in Linux there is more than one way to give network interfaces a permanent configuration. Even though we're using the files and services for Debian: the concepts will apply to other distributions, you'll just need to figure out the equivalents for those other distributions.
- The ip and route commands work on all modern Linux machines. Use the
ip addresscommand to find the name of your wired interface (it's virtual but it's simulating a wired interface). In the screenshots the interface is named enp0s3 but it could be different on your machine.
IP, Subnet mask, Gateway
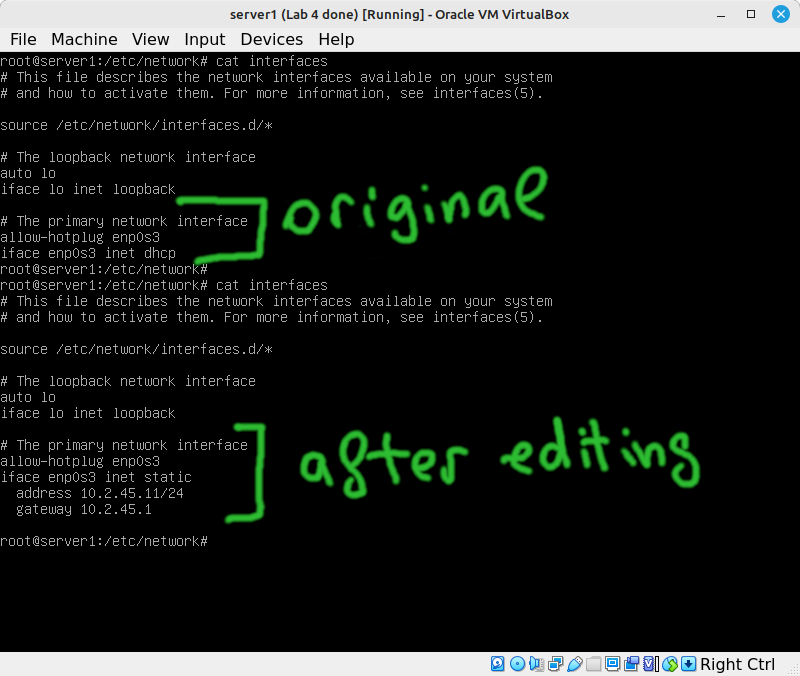
These three settings are set in the /etc/network/interfaces file.
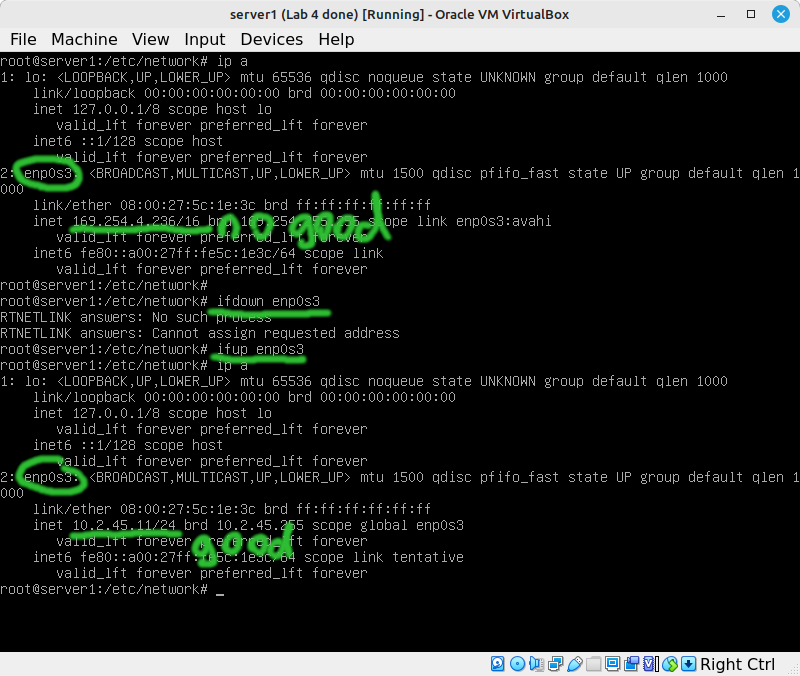
By default the enp0s3 interface is configured to use a DHCP server to get its network configuration (meaning it will get the IP addres, subnet mask, default gateway, and DNS server from a DHCP server.
- On server1: Modify
/etc/network/interfacesto change:- The configuration to static,
- The IP address to 10.2.45.11
- The subnet mask to 255.255.255.0 (that's /24)
- The default gateway to 10.2.45.1 (your host)
- The DNS server isn't set in the interfaces file. in simple installations you change it by editing the /etc/resolv.conf file. Edit it and change the contents to have just
nameserver 10.2.45.1in it (again, that's the IP of your host).
- Check with ip address to see that no configuration has changed yet. You'll need to bring your network interface down and back up to reconfigure it. Use the
ifdownandifupcommands to do that.
- Give some thought to what would happen if you used the
ifdowncommand when you're connected to the server you're configuring via ssh. - Test the network connectivity on server1 to make sure it still works.
- Configure the network interface for server2 and server3 as well:
- server2 should have the IP address 10.2.45.12
- server3 should have the IP address 10.2.45.13
SSH between VMs
You now have a static network configuration on your workstation and server1.
- Test that you can ping server1/2/3 from the workstation, and ping the workstation from the servers.
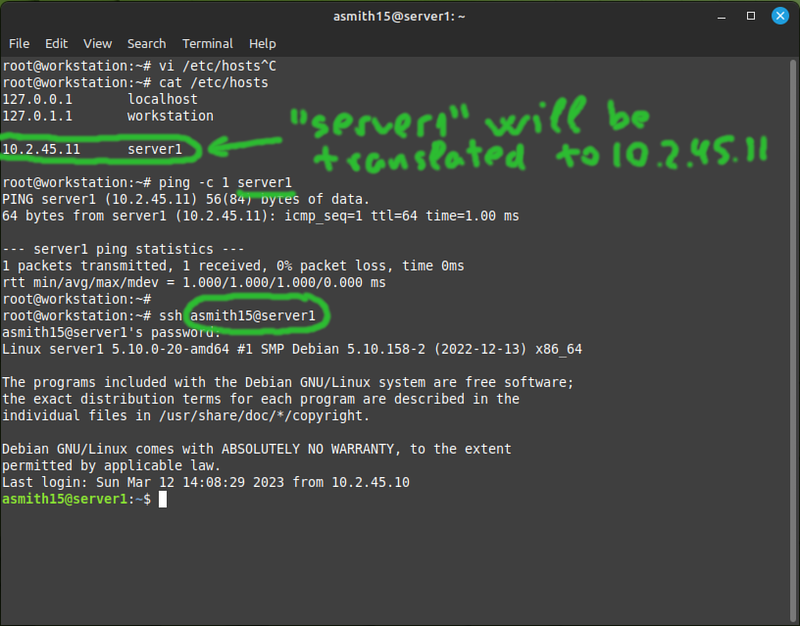
- Test that you can use ssh to connect from the workstation to server1, and from server1 to the workstation, for example:
ssh yourusername@10.2.45.11
Note that by default in these operating systems the ssh server does not allow remote login as root. This makes brute-force SSH attacks much more difficult.
Once you can ssh from the workstation to the servers: you might find it's much easier to do that than to log into the servers on their console. The terminal in Linux Mint is a graphical application where you can use the mouse to scroll, select text, and copy-paste.
Trivial name resolution
DNS is used almost exclusively for translating human-readable hostnames to IP addresses. But DNS is a little too complicated for us for now, so we'll use a much simpler technique: the /etc/hosts file.
The file is simply a mapping of names and the IP addresses which those names are translated to.
- Modify your hosts file on the workstation to include your three servers, here's an example for server1:
- Do the same on server1, server2, and server3.
As you're doing it: imagine that you had more than four machines, and at some point in the future one of their IP addresses changes. Keeping hosts files updated on all your machines quickly becomes an impossible amount of work, which is why it isn't used very much. A central name authority is needed: that's what a DNS server is.
Submit evidence of your work
Submit the following screenshots to show that you've completed the work:
- On your host:
VBoxManage natnetwork list - On all four VMs:
ip address && ping -c 1 brave.com - On your workstation: ssh to each server VM using its hostname.
