OPS245 Lab 4
In this lab we're going to look at how storaged is accessed and managed in Linux, and GPT partitioning setups.
Storage devices
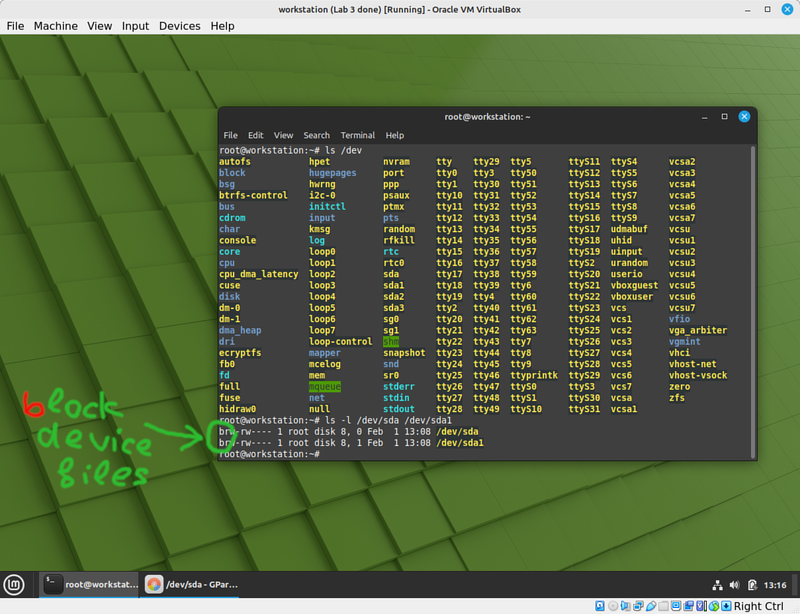
In Linix every block storage device (a hard drive, optical drive, USB stick, etc.) is assigned a device file. This is not the type of file you're used to, it's not saved somewhere. It looks like a file in a directory, but in fact it's just a means for you (the administrator) to control the device.
You will find such device files in /dev:
Usually:
- SATA drives and USB sticks have device files that start with /dev/sd, and the last letter is the number of the drive. So /dev/sda is the first one, /dev/sdb is the second one, etc.
- SSD drives usually have more complicated device names that start with /dev/nvme0n, with a number in the end. So /dev/nvme0n1 is the first drive, /dev/nvme0n2 is the second drive, etc.
- SD cards have different complicated device names that start with /dev/mmcblk, with a number in the end. So /dev/mmcblk0 is the first drive, /dev/mmcblk1 is the second drive, etc.
- Old IDE drives' device names start with /dev/hd. You don't see these much any more.
Luckily for you: VirtualBox emulates a SATA interface by default, so you'll see the /dev/sd* type of device names for your drives.
When you add a new drive to a running system (if the drive is hot-pluggable): it will be assigned the next unused number/letter. On a cold boot the device file name is not completely reliable, because the order of the drives is determined by which port they're plugged into, rather than anything unique to the drive itself.
You can't expect to know what your storage device name is without looking in the /dev directory to see what's there, especially on a virtualized system where you don't have either a physical controller nor a physical storage device (both are emulated by your hypervisor).
Partitions
You might already be familiar with the concept of a partition: it's a region of a storage device that's treated independently of other partitions.
Partitions are also assigned device files, since the things you can do with a partition are nearly identical to the things you can do with a storage device. So for example:
- If your SATA drive /dev/sda has two partitions: the first one is /dev/sda1 and the second is /dev/sda2. We'll ignore extended partitions and logical drives since they're nearly obsolete already and the complicate this numbering.
- If your SSD drive /dev/nvme0n1 has two partitions: the first one is /dev/nvme0n1p1 and the second is nvme0n1p2.
- SD cards sometimes don't have any partitions, but if /dev/mmcblk0 has one: its device name will be /dev/mmcblk0p1
Other than the kernel: everything in a Linux system can use a block storage device the same way no matter what it is. You can put a filesystem on a partition on a SATA drive, or on an entire SSD drive. After you configure it: the user will never be aware what sort of device is used to store their files.
There are several tools available to work with partitions on Linux. Gparted is a graphical tool that's very comfortable to use, and it also lets you format your partitons (put a filesystem on them). In command-line mode there are cfdisk, parted, fdisk, and a bunch of other command-line-only tools. Other than cfdisk they are all pretty horrible to use.
Filesystems
Block devices only store blocks of bytes, indifferent to what you believe the meaning of those bytes is. They are too stupid to store interesting things like filenames, directories, permissions, or even the size of a file. To save all that information: a filesystem is used.
There are many filesystem types available, and Linux supports just about all of them. But in this course we'll work primarily with ext4 filesystems. You can see which filesystems you can use on a default installation of Linux Mint by running ls /sbin/mkfs.*
While Linux can read and write DOS/Windows filesystems: they are rarely used (except for USB sticks and SD cards) because those filesystems don't store all the information a Linux system would like to have (for example there are no permissions of any kind available on a FAT32 filesystem).
Putting a filesystem on a storage device is usually called formatting.
Mounting
After you have a storage device connected to your Linux box, and you set up the partition(s) on it, and you formatted those partitions: you need to do one more step to be able to save files on that device and read them back. You need to connect the device to your Linux filesystem tree: that's called mounting.
Linux doesn't use drive letters. Every storage device is accessed by a directory path that always starts with / (root). That root has nothing to do with the user root, it's unfortunate that the same word is used for completely different concepts on the same system. It's sometimes called the filesystem root, though that's not completely technically correct.
That's relatively straight-forward when you only have one storage device. It takes some understanding to get used to what happens when you're using multiple storage devices at the same time while you system only have one root.
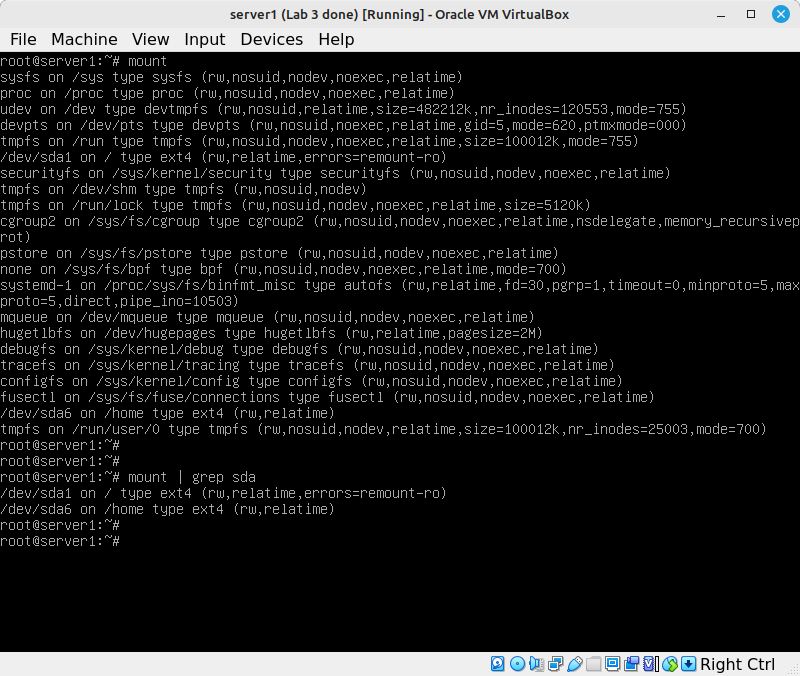
- For a quick demonstration of this concept: in your server1 run
mount | grep sda
In the setup above I have two partitions from my first drive mounted:
- /dev/sda1 (formatted with an ext4 filesystem) is mounted on /
- /dev/sda6 (also formatted as ext4) is mounted on /home
That means that any files I save anywhere inside /home (e.g. /home/asmith15/test.txt) end up saved on the /dev/sda6 partition.
Files and directories outside of /home (e.g. /etc/passwd, /usr, /root/test.log) are stored on the /dev/sda1 partition, unless they are in a subdirectory that has something else mounted (/sys, /proc, /dev, etc.)
New disk on the worstation
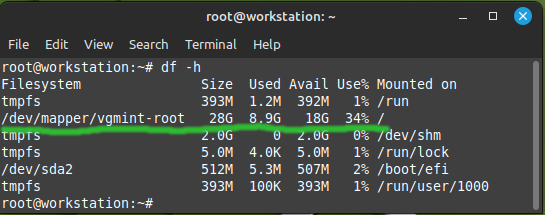
- Run
df -hon your workstation and make a note of the usable disk space. Most of your harddrive will be allocated to a logical volume, which we'll talk about in the next lab:
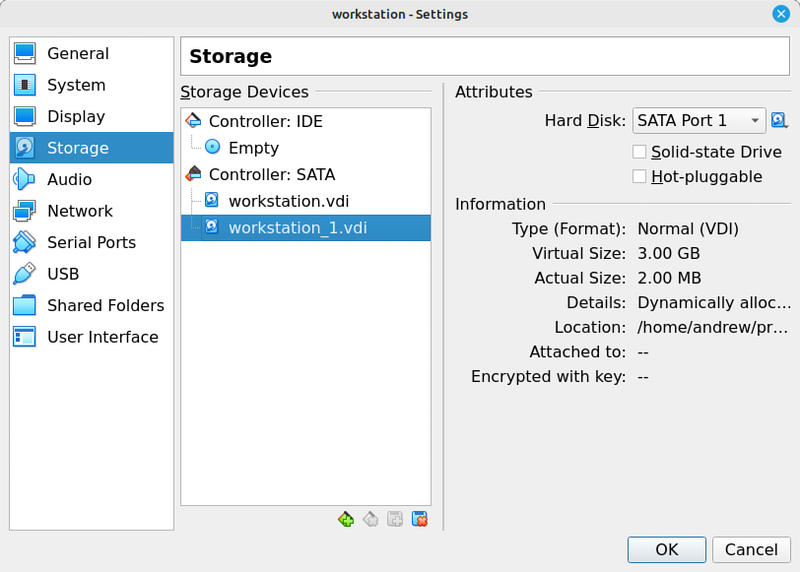
- Shut down your workstation, and go to Settings>Storage>Add New Harddisk
- Create a new VDI disk 3GB in size and add it to your VM.
- Run
df -hagain, and note that nothing has changed.
There is a new 4GB drive attached to your machine but it's not used yet. You can see it by looking in the /dev directory:
ls -l /dev/sd*
You can interact with your new drive by working with the /dev/sdb file.
- Install gparted from the official Linux Mint repositories (these are actually Debian repositories). We'll take advantage of the graphical interface to learn the basics of working with partitions.
- Run gparted and pick /dev/sdb from the list of disks. You'll see that the space is "unallocated", which means it's not used by any partition or filesystem.
- Create a GPT partition table.
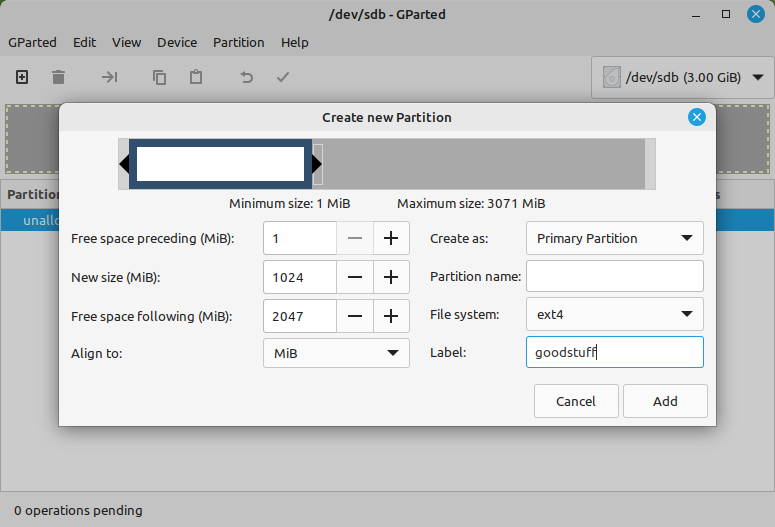
- Create a new primary partiton:
- 1024MiB in size,
- With the filesystem type ext4,
- With the label goodstuff
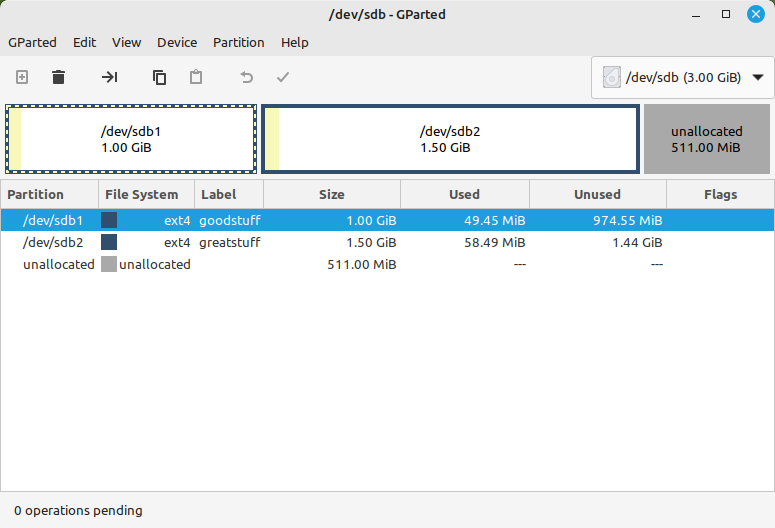
- Add another primary partition 1536MB in size with the label greatstuff. About half a gigabyte will be left unallocated.
- Click Apply all operations. Gparted will both create the partitions and format them (on the command-line you'd have to do these steps separately).
- Look for new device files that were created in /dev after you created your partitions. You should now have a /dev/sdb1 and /dev/sdb2. Note that the size of the device file has nothing to do with the size of the partiton.
- Run
blkid. That will show you that both sdb1 and sdb2 are usable partitions with filesystems on them.
Use the new partitions
You have added a disk, partitioned it, and formatted the partitions. There's still one more step you need to take before you can save files on those: mount them.
- Create the directories
/srv/goodstuffand/srv/greatstuff - Mount the goodstuff partition onto the /srv/goodstuff directory temporarily:
mount /dev/sdb1 /srv/goodstuff
- Mount the greatstuff partition onto the /srv/greatstuff directory.
- Run the
mountcommand without any arguments to list everything that's currently mounted. You should see sdb1 and sdb2 in the list. - Look inside those directories. The only thing in there should be a "lost+found" directory, which is useless except it hints that some version of an ext filesystem is mounted there.
- Run
df -hagain. You should see both new partitions with the correct sizes listed. You can now finally use them. - Create some files or directories in /srv/goodstuff and /srv/greatstuff.
- Make sure you don't have any files from /srv/goodstuff open and unmount that storage device:
umount /srv/goodstuff
- Have a look in /srv/goodstuff. It should be empty. Your files are not lost, they are still on the storage device, but the storage device is no longer connected to your filesystem tree (it was disconnected by the umount command). The /srv/greatstuff directory should still have your files visible.
- Reboot the workstation with the reboot command.
- Check the output of
ls /srv/goodstuff;mount;df -h; andls /dev/sd*
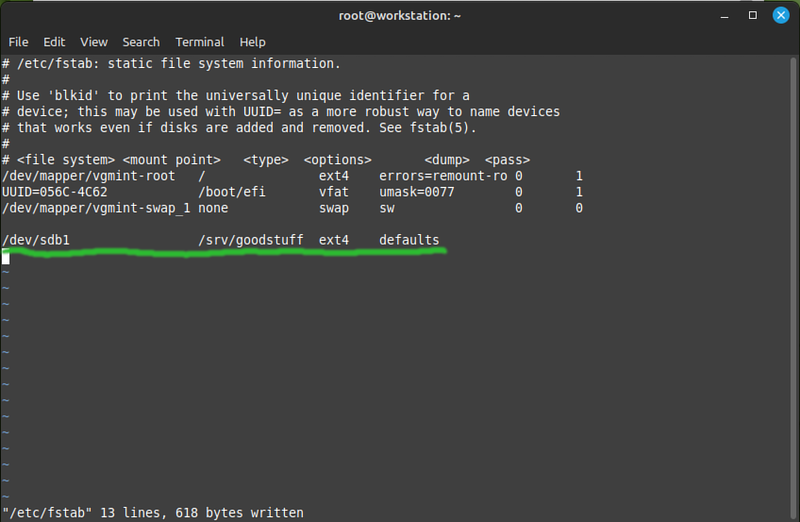
Your two new storage devices are not mounted automatically when the machine boots. The mount command only makes changes to the running system, not to the boot configuration. The list of filesystem to be mounted on boot is in the /etc/fstab file. The fstab has a whitespace-separated list of fields including:
- The device to mount, specified by device file path or UUID
- The directory to mount that device onto
- The filesystem type
- Any special options (or the keyword defaults)
- You can ignore the last two fields. They are optional anyway.
- Add a new line to the end of the fstab, to look like this (I cleaned up the existing lines a bit, to align them more nicely):
- Add another line to automatically mount /dev/sdb2 on /srv/greatstuff when the machine boots.
- Save the file and in another terminal run the following commands:
mount /srv/goodstuff
mount /srv/greatstuff
- Make sure there aren't any errors. If there are errors: fix them in the fstab. If you can't fix them: delete or comment out the lines with the mistakes, or else your VM won't boot.
- Check that the files/directories you created are in /srv/goodstuff and /srv/greatstuff
- Reboot and confirm that the two partitions are mounted automatically.
Run out of disk space
At some point for one reason or another your server will run out of disk space. In this part of the lab we'll simulate that.
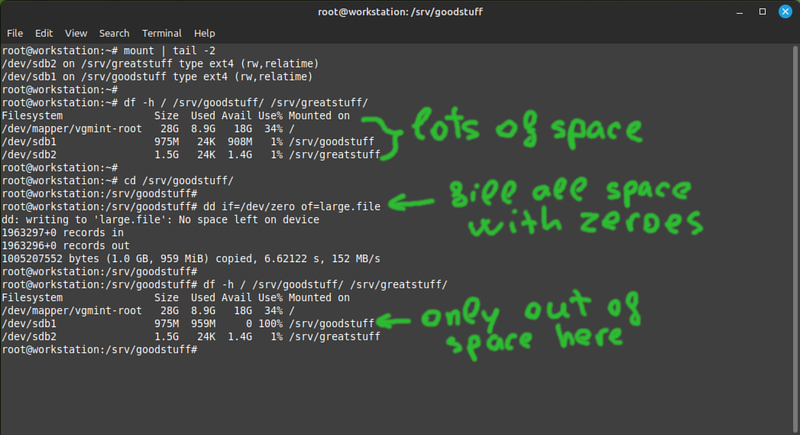
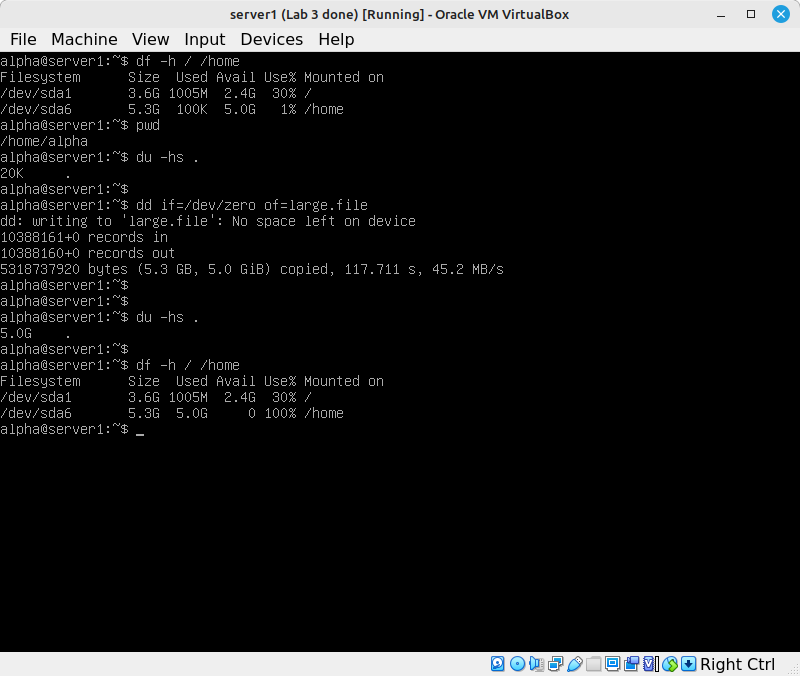
- Follow the steps in the screenshot:
The dd command just copies bytes from a source to a destination. It does it forever unless you tell it to stop at a number, or there are no bytes left to copy, or there's no space left on the destination. /dev/zero a character device file (similar to a block device file) created by the kernel. It will always give you zeroes for as long as you read it. The dd command in the screenshot stopped because it used up all the available disk space.
- Try to create some files with vi, or copy some files into /srv/goodstuff. You won't be able to.
- Try to create some files in /root or /home or /srv/greatstuff. You should be able to - they all still have plenty of space.
- Start gparted again and look at /dev/sdb. Your disk is more than half empty, yet you're out of space for goodstuff. To make use of your unallocated space you need to do the next steps. Go ahead and follow them:
- Back up the files from the greatstuff partition.
- Unmount and delete the greatstuff partition.
- Change the size of the goodstuff partition to 1536MiB.
- Recreate the greatstuff partition.
- Restore your files.
(in Gparted you have the option of moving a partition without recreating it, but this feature is not available without a graphical interface, so we'll ignore it)
This process is slow and error prone. And if you're working with user data: a mistake here can cost you your job. This is the sort of use case that LVM handles much better - we'll try it in the next lab.
New disk on server1
Complicated as the previous section may seem: Gparted actually made the process of managing your partitions quite easy. In this section we'll work with the command-line. We'll use cfdisk, which is the easiest available command-line tool for managing partitions.
In this example we're going to run out of space on the existing partition used for /home, and use one possible solution to solve that problem.
- On server1: follow these steps to simulate the alpha user using up all available disk space:
The dd command will take some time to write 5GB to a virtual disk.
- Verify that:
- alpha cannot write to its home directory
- beta and gamma also cannot write to their home directories
- root can write to its home directory
- everyone can write to /tmp
- There's no realistic way to reallocate space from the root partition to the home partition, so add a new 10GB disk connected to your SATA controller, just as we did for the workstation in this lab.
- Confirm that your new disk's device file is /dev/sdb and run
cfdisk /dev/sdb- Create a GPT partition table
- Create one new 10GB partition
- Save the changes using "Write" and quit out of cfdisk
- Confirm that /dev/sdb1 now exists. That device file is for the new partition you created.
- cfdisk does not put a filesystem on the partitions it creates. Use the following command to format it as ext4:
mkfs.ext4 -L alphahome /dev/sdb1
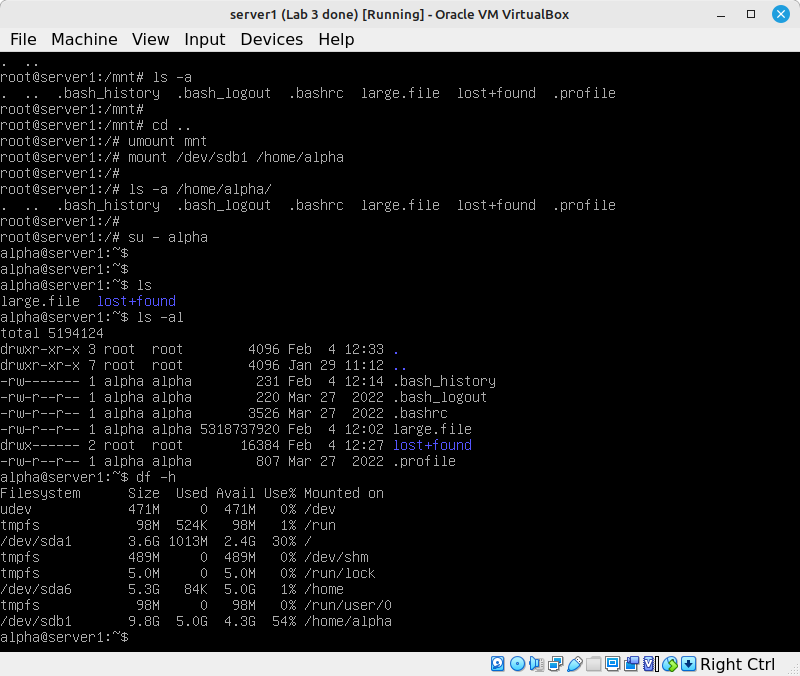
- You have a new storage device, with a partition on it, and a filesystem on that partition. Mount it in a temporary place and move the contents of alpha's home directory to it:
mount /dev/sdb1 /mnt cd /home/alpha mv * .??* /mnt - Ultimately we want /dev/sdb1 to be used exclusively for alpha's home directory. Unmount it from the temporary mountpoint (/mnt) and mount it to /home/alpha:
Now every user can write to their home directory, and next time alpha decides to use up all the space: no other user will be affected.
Make sure the new mount configuration is permanent by adding a line to the fstab:
/dev/sdb1 /home/alpha ext4 defaults
Submit evidence of your work
Submit the following screenshots to show that you've completed the work:
- Your two new partitons on the workstation (either before or after resizing/moving them)
- Show that your fstab configuration on the workstation works
df -hon server1
