OPS245 Lab 2
Most of the software you'll ever install on a Linux server is open source (free to distribute and modify). In just about every Linux distribution you can use a package manager application to download the software from the internet and install it with a single command. Debian's package management system is caled Apt. Linux Mint uses the same system, since the distribution is built on top of Debian.
One reason a package manager makes it easy to install software is its dependency tracking and resolution ability. Most software requires some other software to run, and the other software probably requires some other software itself, etc. When you ask a package manager to install a piece of software - it will also install all the required dependencies.
Graphical Installer
Linux Mint comes with a graphical application called Software Manager, and another called Synaptic. Synaptic is also available on graphicall installations of Debian. We'll use Synaptic.
- Look through the Menu (in the bottom left corner) on your workstation. Notice that the only browser you have installed is Firefox.
- Start Synaptic from the Menu.
- Put in your regular user's password. You need to be root to install software on the system, but your regular user has sudo privileges, and Synaptic will use that to install the package.
- Click Reload. This will download the latest list of available software.
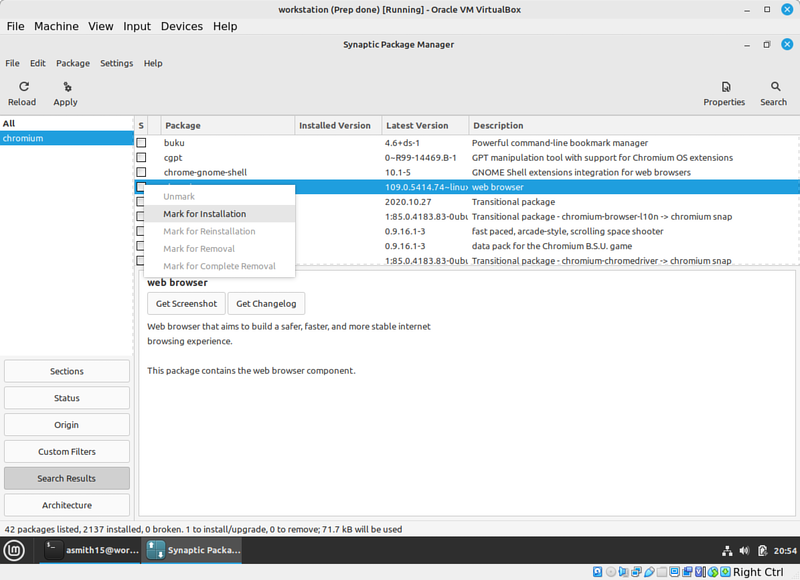
- Look for Chromium and mark it for installation.
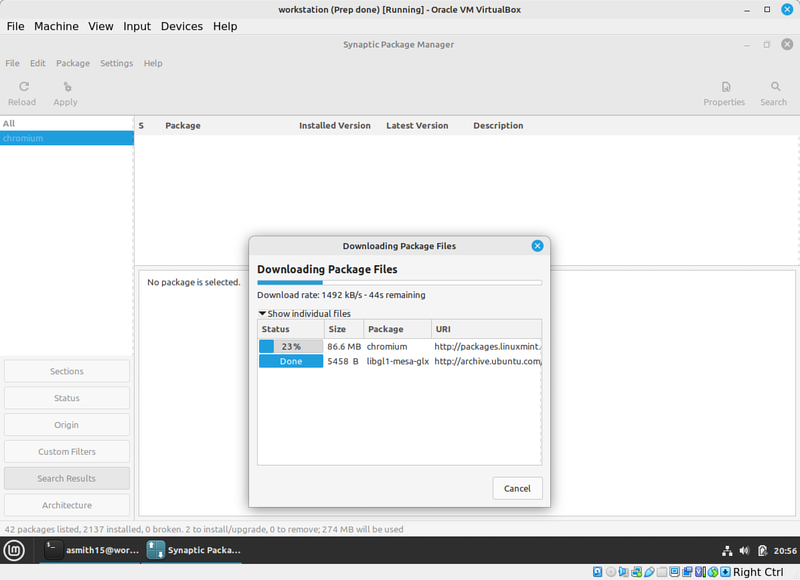
Notice that it will tell you that an extra package needs to be installed. Chromium actually has many more dependencies, but the rest of them were already installed (you'll see the list during the next step). libgl1-mesa-glx is the only dependency missing.
- Click Apply, and Apply in the window that pops up.
Synaptic will use the Apt system to figure out the names of the files to be downloaded and their locations on the servers, will download them, and install them.
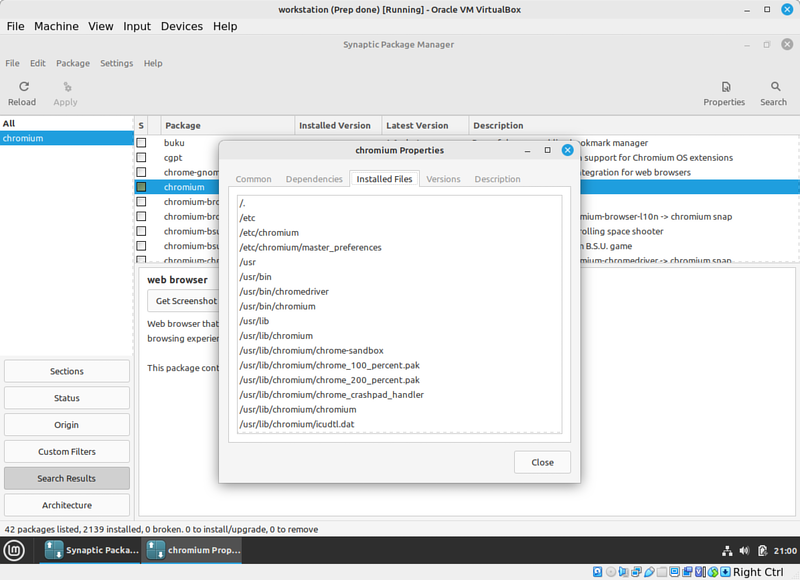
- After it's installed: right-click on the same chromium package in Synaptic, pick Properties, and Installed Files. Look through the list.
Notice that this is quite different from Windows. In Windows typically all the files that are part of the application go into a folder in C:\Program Files\Whatever. In Linux the location of each file depends primarily not on the application it's part of but on the type of file it is.
System Directories
The system directory structure on Linux has a very long history on Linux, and it's based on Unix, which itself has a long history. Which means that it's a bit of a mess. We'll look at the most common directories.
Executables
An application is almost always made of many files, but often only one or a handful of them are executables (the equivalent of an .exe file on Windows).
- Run
ls -lin your/directory in a terminal. Note that /bin is a symbolic link pointing to /usr/bin; and /sbin points to /usr/sbin. Historically the bin directory contained binaries that anyone could execute; and sbin was only for the administrator. These days with the common use of sudo: all users have both directories in their path. - Run
echo $PATHto see which directories are checked when you run a command. - Use
ls -lto see what files are in the /usr/bin and the /usr/sbin directories. Combine that with thewc -lcommand to count how many files are in there. - Try to combine the
lsandgrepcommands to find where the binary for the Chromium browser is. Note that almost all the binaries are all lowercase letters, and remember that filenames are case-sensitive on Linux.
Configuration files
Depending on the type of software you're talking about: there may be user-specific configuration files, system-wide configuration files, or both.
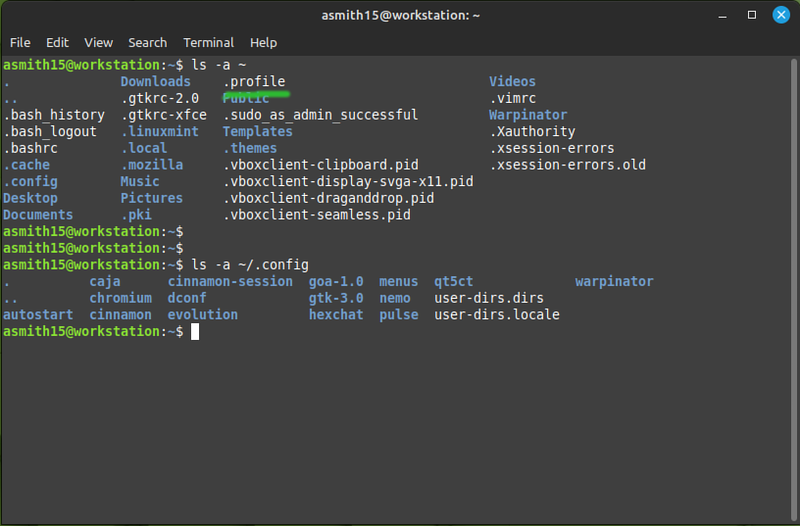
- Use
ls -ato see the hidden files in your home directory, and the.configsubdirectory. These are configuration files for your user, for various software.
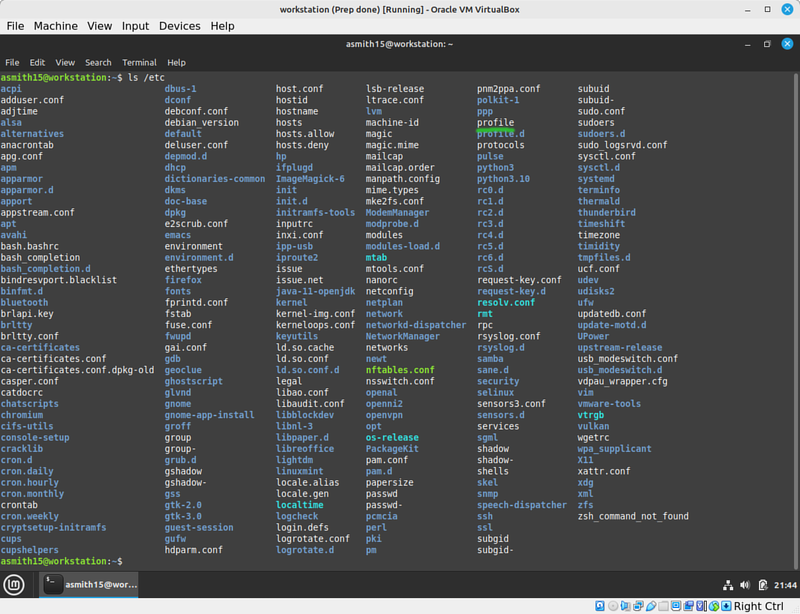
- Now look at the
/etcdirectory. These are system-wide configuration files.
Notice that some files are in both places, for example /etc/profile and ~/.profle. For some software the user's config file adds settings to the global config file; for other software the user's config file is the only one that's used if it exists.
Temporary files
/tmp is a system directory that's unusual in that any user can write to it. Software sometimes needs to write a file to disk while it's running, but it doesn't need that file to be saved. People also sometimes need to create a file (perhaps for testing something) which they don't need to stick around after they're done using it. The /tmp directory is the typical place to create such files.
Service data files
This is by no means universally true, but most often when a system service needs to save or read data: it uses the /var directory. Such data would normally go into a home directory, but services rarely have a directory under /home.
One place you'll often look when you're running into a problem is the /var/log directory, and on Linux Mint specifically: the /var/log/syslog file.
Later in the course we'll look at some othe files in /var.
Other directories
When it comes to directories there is some vague consistency between various applications/services but often you'll find that the directory or file you're looking for is not where you'd expect it to be. So you have to be ready to figure out and remember where the software you're working with keeps its files.
apt
Debian and Debian-based Linux distributions use the Apt package management system. Other distributions have different systems which use different commands, but at the end of the day they all do the same thing. Once you understand any one of these systems: you can easily figure out how to use all the other ones.
Traditionally the most common command used in Debian to download and install packages was apt-get. You will still find lots of documentation about how to use it, but it seems that the Debian leaders have been pushing the apt command, which combines the features of apt-get and some other apt-* applications. We'll use the apt command in this course.
Firefox on server1
- Make sure you have a snapshot of server1 in VirtualBox before you do the following step. We'll install Firefox but then we'll revert server1 back to the state it was at the end of Lab 1.
- Run
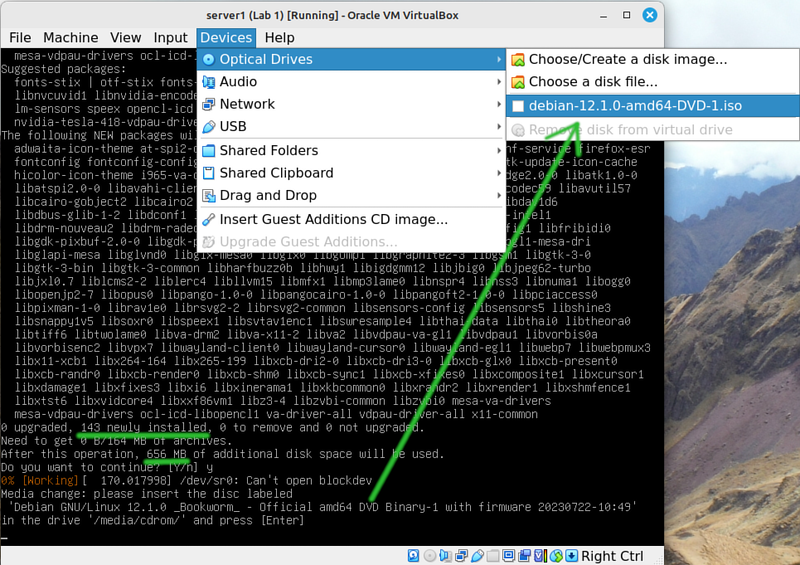
apt install firefox-esr. The name of the package is not always what you'd expect (I had to do a search to find the name of the Firefox package). - It will ask you to insert the Debian DVD1. You might recall that we didn't configure any online package repositories for server1 during installation.
Notice the number of packages that Apt will install. That's because most of the dependencies that Firefox requires are not already installed on server1 - it doesn't currently have a graphical interface at all, and Firefox is a graphical application, so all those graphical prerequisites need to be installed.
- Try to run
firefoxfrom the command-line. It will complain that theDISPLAYenvironment variable is not set. That's its way of saying that it wants to run a graphical application but it doesn't have a graphical display to show it on. - Use
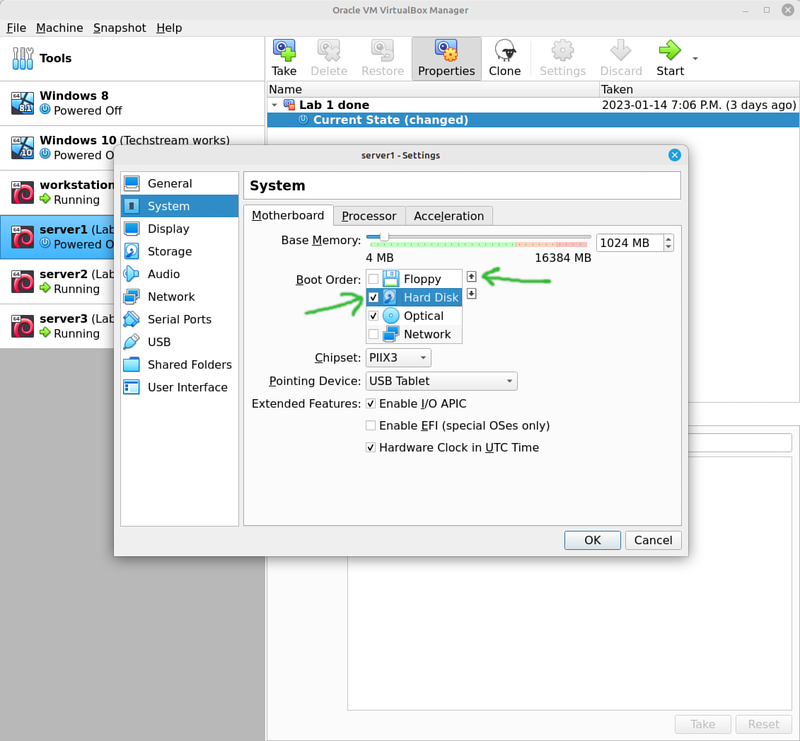
aptto installcinnamonto get a graphical interface. Despite the number and size of packages that needs to be installed: the "download" time is very quick, since all the required packages are on the DVD you already downloaded. Only a handful of packages are downloaded from the internet - and only because they have security updates. - Shut down server1, and change the boot order so that the VM will try to boot from the hard drive first. Otherwise it will boot from the installation DVD.
- Start server1 back up. It will give you a graphical interface to log in. Avoid the temptation to log in as root - running a graphical interface as root is so heavily discouraged that some software doesn't work at all if you do. Log in as your regular user.
- Look through the menu. Notice that much of the software you have on your workstation isn't in the menu on server1. That's because the only application we installed was Firefox, and any other graphical apps that are there were things that Cinnamon required for installation.
- Run Firefox to satisfy yourself that it works.
- Make a screenshot of it running for later when you submit the lab.
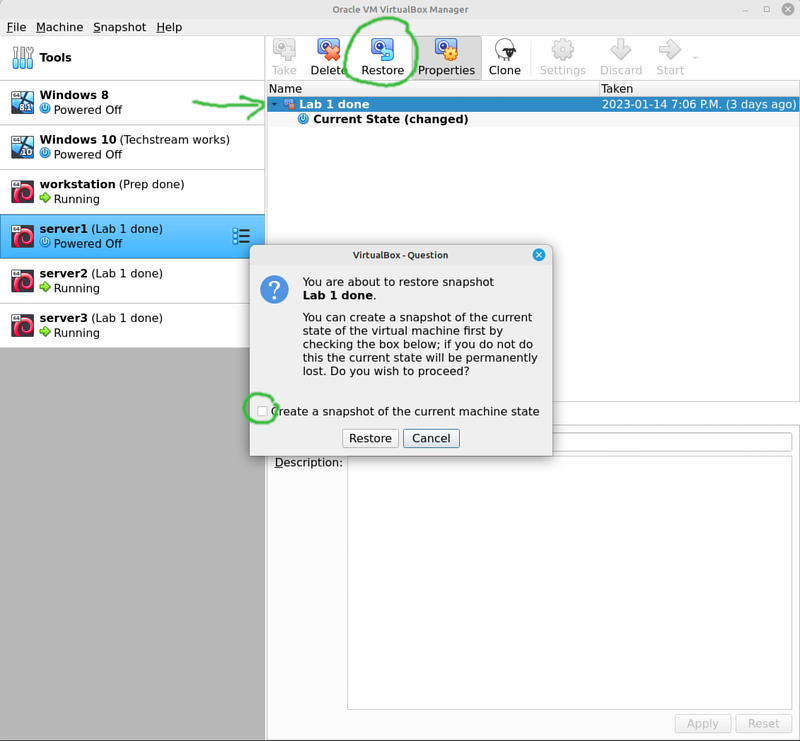
- All that was just an exploration exercise. Shut down server1, and restore from your latest snapshot. Do not create a new snapshot from the current state.
- Start server1 again, you should be back to where you started before this section of the lab.
nmap everywhere
nmap is a handy network troubleshooting tool. It's a port scanner - an application which will find what ports are open on a remote system. It's not installed by default, so let's install it on every one of our VMs.
- Run
apt install nmapon all four of your VMs. Note that on the workstation, server2, and server3: nmap and its dependencies are downloaded from the internet. - Just in case you've never used it before: run
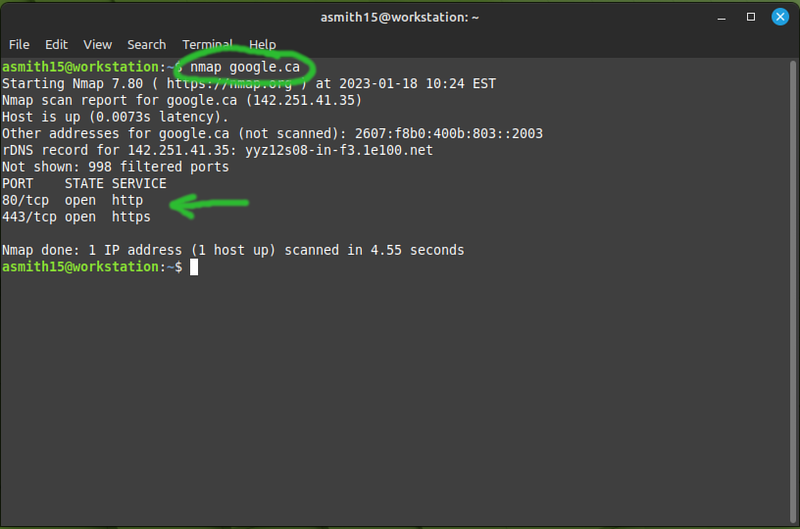
nmap google.ca
That shows you that the only ports open on google.ca are 80 and 443. These are the ports used by web browsers.
This you remember anything from this lab: let it be that apt install is the most straightfoward way to install software in Debian.
Extra repositories
Sometimes the software you want to install just isn't available in the repositories of the distribution you're using. There are several ways to install such software, ranging from downloading and building the source code (the most complex option) to adding an extra repository to your package manager (the simplest, but not always available option).
Let's say you wanted to install Codium (an unbranded Visual Studio Code). On Linux Mint it's only available as a Flatpak, which would require several gigabytes to download and install.
There are instructions on the VSCodium website for how to add their repository to a Debian-based system. The commands are a little complex, so you might want to open this webpage inside your workstation so you can copy-paste the commands.
- In your workstation, run the following commands as root:
# Download the signature to verify any packages you install from this repository later:
wget -qO - https://gitlab.com/paulcarroty/vscodium-deb-rpm-repo/raw/master/pub.gpg \
    | gpg --dearmor \
    | dd of=/usr/share/keyrings/vscodium-archive-keyring.gpg

# Create vscodium.list with the contents of what's between the single quotes here:
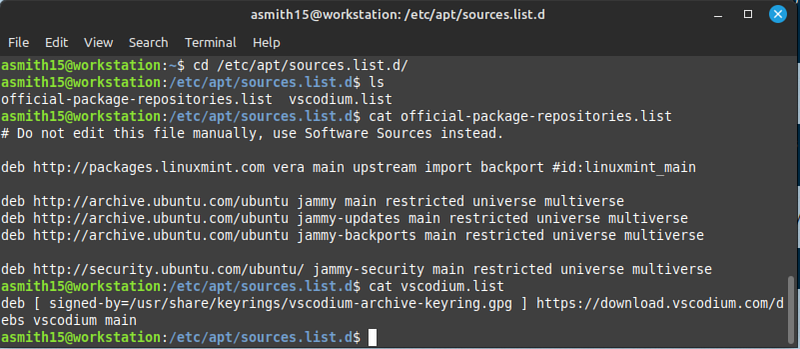
echo 'deb [ signed-by=/usr/share/keyrings/vscodium-archive-keyring.gpg ] https://download.vscodium.com/debs vscodium main' \
    | tee /etc/apt/sources.list.d/vscodium.list

# Get the list of packages from all the repositories configured on your machine:
apt update

# Install codium
apt install codium
- Run VSCodium from the Mint menu, or
codiumfrom the command-line (don't run it as root though). If you're into writing code: many people are convinced that this is the best editor. I've never used it myself.
The first two commands (technically the first 5 commands) are not always the same for different repositories. But if you understand the concept of what they do: the details usually don't matter, as you'll typically copy-paste a short script like that to get a new repository installed.
The list of servers which apt uses to look for packages is in files in the /etc/apt/sources.list.d directory.
Unless you have to maintain your own mirror of such packages: you don't need to understand the details of how those few lines of text translate into apt working.
wget, tar
There is an infinite number of other ways to install software on Linux. We can't go through much more than we've done already. But you should know a couple of basic tools you'll certainly use as a Linux administrator: wget and tar.
wget is used to download files from web servers. Basically the equivalent of clicking on a file to download in your graphical web browser. It's very useful for servers which don't have a graphical user iterface.
We'll use Roundcube (a webmail application) for learning to use wget and tar. We won't install it.
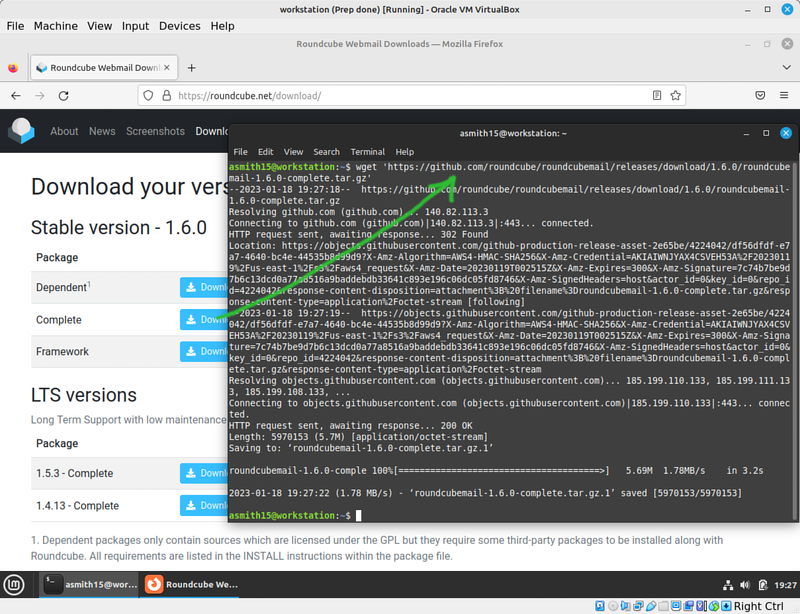
- In Firefox on your workstation go to the download page for Roundcube Webmail.
- Copy the URL for the "Complete" download tarball.
- In a terminal use the wget command to download that file:
Putting the URL in single quotes isn't always required but it doesn't hurt, and it is necessary sometimes if the URL has unusual characters in it.
The file you downloaded is what you might call a "zip file" in Windows. It's unfortunately more complicated on Linux. The .tar.gz extension (sometimes abbreviated tgz is an archive compressed using the gzip algorithm. The other common compressed archive formats are:
- .tar.bz2 which uses the bzip2 algorithm for compression,
- .tar.xz which uses Xz for compression, and
- Plain .tar which is not compressed at all.
Thankfully these days you don't need a different command to extract all these different types of compressed archives.
- Run the following tar command to extract your roundcube.tar.gz file. The same command would work for the other formats listed above as well:
tar -xvf roundcubemail-1.6.0-complete.tar.gz
- Learn to use tab completion to make it easier to deal with long filenames: type in the first letter of the file and then press the tab key.
The arguments for that tar command are:
- x for extract,
- v for verbose, meaning it will print the name of each file it's extracting from the archive,
- f for "file": that may seem strange but it's needed because the tar command can extract input from STDIN, which is not what we want in this case.
Now you should have the roundcube tarball (one file) and over 3000 files in the roundcube directory - which were all extracted from the tarball.
Submit evidence of your work
Submit the following screenshots to show that you've completed the work:
- Chromium installed on your workstation.
- Firefox running on server1.
- nmap installed on all your VMs.
- Codium installed on your workstation.
- The downloaded roundcube tarball and the contents of the roundcube directory you extraced.
