OPS245 Lab 7
No security without hardware security
Depending on your experience you may already know that no bike lock can guarantee your bike won't get stolen, a good locksmith can open any door without a key in seconds (or at most in minutes), and noone has yet come up with a way to prevent stealing a car.
In fact with very few exceptions anything can be broken into no matter how well the protection was designed, and how much it cost. The biggest strongest safe you can imagine can be cut into given the right tools and the time to do it.
Roughly the same applies to computers. You can implement any sort of security you like, but ultimately a determined attacker can break it if they can take your hardware apart. The only exception is a properly implemented encryption system using good keys, but even that can often be bypassed.
We'll use our server2 machine as an example to practice this.
- Boot up server2 normally, and log in as root.
- Create some secret files in root's home directory (/root), and set their permissions so that only root can read them.
- You can set a very long and complicated password for root if you like, later you will see that it doesn't actually matter how good it is.
- Shut down server2 and make a snapshot of it just in case you make a mistake and damage something.
The trick we'll use in this case is to boot another operating system kernel on server2's hardware, and access server2's filesystem using that other operating system. That way we will bypassing any security that would have been enforced by server2's operating system kernel.
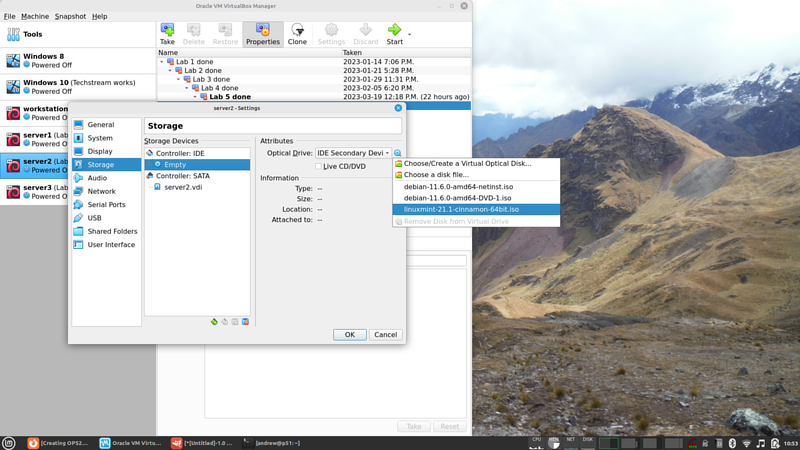
- In the VM's settings double-check that it will attempt to boot from a DVD before booting from the harddrive, then insert your Linux Mint ISO you used in the beginning of the course into server2's virtual optical drive:
- Boot up server2. Notice that the Linux Mint installation will come up. The original debian system is still on the harddrive, it's just not being used in this boot sequence.
- Don't install Linux Mint, we're not trying to overwrite the old operating system. We're just going to bypass it in order to access some files.
- Open a terminal and become root in that terminal.
- Stop and think. Try to really understand the situation your system is in now.
- You booted a machine you have physical access to (server2) using a live DVD.
- The Live DVD does not require any sort of authentication, being an operating system installer.
- The machine your booted has attached to it the storage devices used by the server2 operating system.
- But the server2 operating system isn't even running now, so it can't possibly enforce any access limitations.
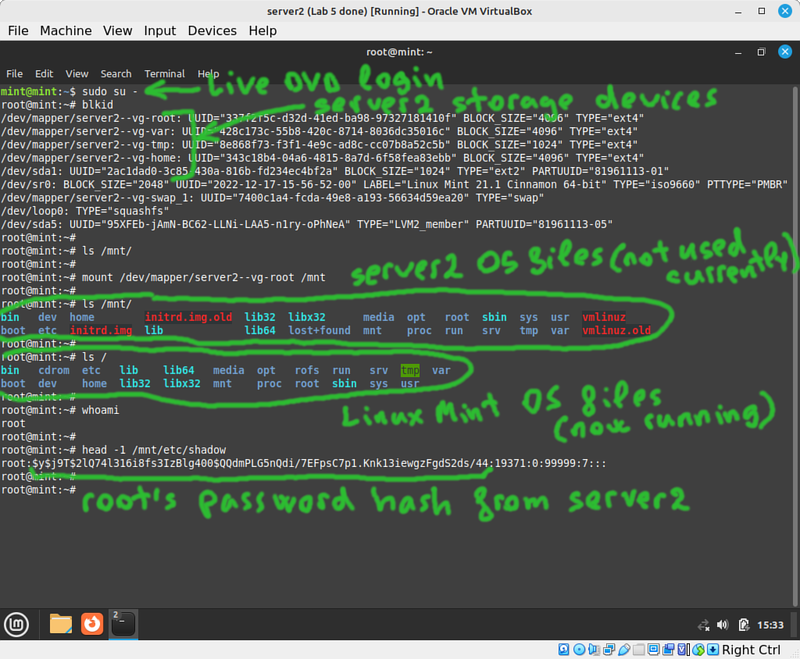
- Use
blkidto see what block storage devices are currently available. - Since you're using LVM on server2 it's obvious which storage device is used for the root filesystem. Otherwise you might have had to try more than one filesystem to find which one was used for root.
- Verify that /mnt is empty, and mount the root filesystem from server2 into the current /mnt directory.
- Try to read the secret files you created earlier in /root. Note that the complexity of root's password from server2 is irrelevant.
- Edit server2's shadow file in
/mnt/etc/shadowand delete root's password hash. Leave the colons before and after it. - Unmount /mnt, and reboot.
- Double-check that your Linux Mint ISO file has been ejected, and you're booting from server2's hard drive again.
- You should be able to log in as root, with no password.
- Use the
passwdcommand to set the root password again.
Password Policies
Assuming your hardware is secure (noone can just yank the harddrive out of it): there are many tools and techniques available to you to secure your system. One such technique is setting a password policy.
As you've seen in the assignment: a simple password is very easy to break using a brute force attack. The one you've done required access to the shadow file, but there are other attack vectors available for brute force attacks. One such attack vector is login via ssh.
Unfortunately a significant percentage of users won't set a complicated password if they're not forced to do it. If your organisation decides that passwords need to have some specific minimal complexity: it's your job to enforce that.
What makes a good password policy is out of scope for this course, we just need to learn the tools to enforce existing policies.
Password length
The default minimum password length in Debian is 6 characters. Let's change it to a more reasonable 8:
- Open the config file /etc/pam.d/common-password and look for the line which includes pam_unix.so:
password [success=1 default=ignore] pam_unix.so obscure yescrypt
- Add
minlen=8to the end of that line. - In another console (or ssh session) log in as alpha.
- Use the
passwdcommand to try and set the password to "123456". It will not allow you to do so, with a message saying you need a longer password. - Set the password to 123455678.
Character requirements
The idea here is that a password which only includes some of 25 lowercase english letters is much easier to brute force than a password which includes uppercase letters (that's a pool of 50 characters) numbers (an extra 10 characters) and special characters.
By forcing the user to use at least one of those other types of characters: an attacker would have to try all of the special characters in order to perform a brute-force attack. That would make the attack take longer.
- Install the libpam-pwquality package using apt. As soon as you install it: there are new requirements on passwords.
- In the console where you're logged in as alpha: try to set the password to "password". It should refuse because the password fails a dictionary check.
- Set the password to "notthathard".
- Try to set the password to "thathard". It should refuse because it's too similar to the old one.
- You can see what other default restrictions come with pam_pwquality in the pam_pwquality man page.
- Open the same config file /etc/pam.d/common-password and look for the line which includes pam_pwquality.so.
- Add ucredit=-1 to the end of that line.
- In the console where you're logged in as alpha: try to set the password to "longlong". It should refuse because the password doesn't have at least one uppercase character.
- Set the password to "Longlong".
Using the same mechanism you can change other minimum requirements for password complexity.
Password age
Once upon a time all the password policies were set in /etc/login.defs. Most such settings were moved into PAM modules (which you've configured above).
If you wanted to set a maximum password age: you would modify PASS_MAX_DAYS in that file.
Root override
- In a console where you're logged in as root: set the password for the alpha user to "123".
passwd alpha
Note that the password complexity rules were not enforced. That's because root is the administrator, there's little point in preventing the administrator of the password rules from setting whatever password they like.
Note also that despite all these techniques for setting password complexity it is still possible to set a bad password.
SSH keys
You can use keys instead of passwords to authenticate. Let's look at some concepts necessary to understand how they work and then we'll set it up.
Encryption concepts
Encryption means converting plain text (something you can read/use, it doesn't need to be text) into cyphertext. The cyphertext created by a good encryption algorithm is impossible (or, for weak algorithms: at least impractical) to decrypt (covert back into plain text) without a key.
You've been using public key cryptography for your entire life (unless you were born before the 1990s). If you actually understand how this stuff works: you'll be far ahead of the average sysadmin.
We don't have the time to do a comprehensive overview of cryptography, so I strongly encourage you to put the book Crypto by Steven Levy on your "must-read" list. Unfortunately they no longer have copies for check-out at the library, but I'm sure you can still find a way to read it. I have yet to see a better introduction to encryption. It's not a course reqirement - but if you don't want to be clueless about security fundamentals online - read that book and understand it. It reads like a novel, and it's perfectly readable even if you have no interest in math:
In a nutshell, here are the most important points, the absolute minimum you need to be comfortable with this:
- Public key encryption (also called assymetric encryption) uses two keys: a public key and a private key.
- The two keys are permanently tied to each other by complex mathematics (read the book to get a feel for the fundamentals). You can't mix one public key with an unrelated private key.
- The private key is like your password, you never give it to anyone. The public key is of no value to attackers, so there's no point in trying to protect it.
- Anyone can encrypt something with the public key, but only the private key can be used to decrypt that.
- Anyone can verify that a file signed using the private key has not been modified except by the owner of the private key.
- Symmetric encryption only has one private key, no public key. That makes it very hard to use with strangers on the internet.
- Hashing is used a lot in cryptography, but it's not an encryption tool.
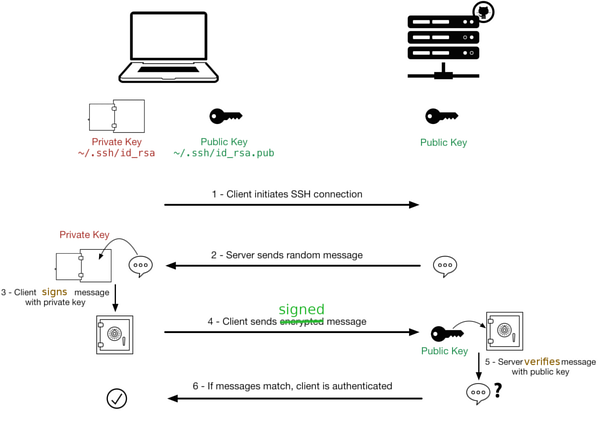
With those fundamentals you should be able to follow this diagram which describes how SSH key authentication works. The diagram is from Sébastien Saunier's blog (which is no longer online):
Setup
We're going to set it up so that we can SSH from the workstation to either of the servers without using a password. And even though that might sound like a terribly insecure idea: in most cases it's actually much more secure than passwords, because the keys we'll generate are much, much more complex than any password you're capable of remembering.
- Open a terminal on your workstation, don't switch to root.
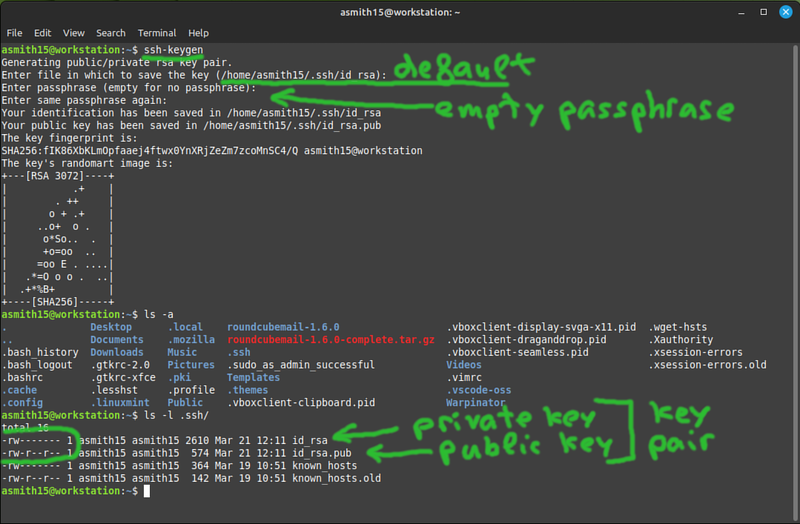
- Run ssh-keygen and press enter to accept all the defaults.
The private key is like your password. The public key you can freely share with anyone, it can be used for example to prove that you have its pair private key.
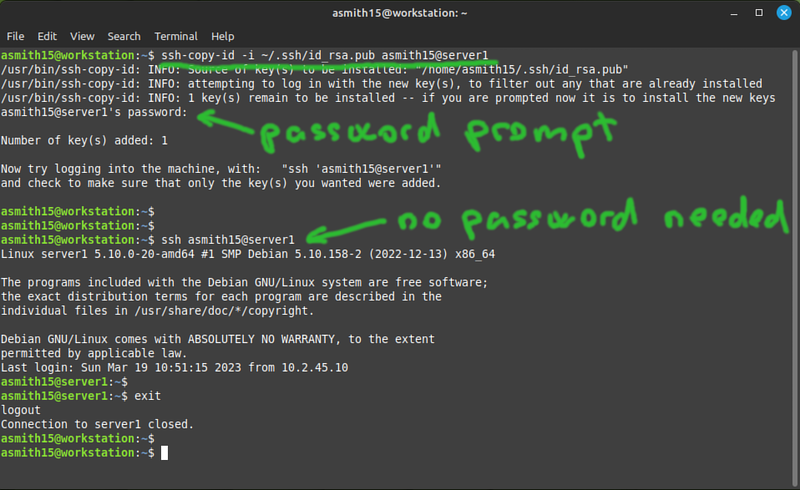
- In order to set up ssh key authentication to server1: you need to put your public key into ~/.ssh/authorized_keys on server1. You could do this manually or you can use the ssh-copy-id command to do it for you.
- Note that you had to use your password in order to copy the key over, but after that was done: you no longer need your password to log in.
- Check that the ~/.ssh/authorized_keys file on server1 contains your public key from ~/.ssh/id_rsa.pub on the workstation.
- Note also that this setup is user-specific. In my example the user asmith15 from the workstation can long in without a password as asmith15 on server1. Not the other way around, and no other user has permissions to use my key.
- Use your existing keypair to setup passwordless authentication from your workstation to server2 and server3 also.
- As an extra exercise to learn that the keys are not permanently tied to a specific user: use your existing keypair to set up authentication from your user on the workstation to the alpha user on server1.
Inspecting logs
Most services on Linux will log some configurable amount of activity information to files in /var/log.
There is some consistency across distributions about default the names of the log files but there are also some common differences. For example the "default" log file on Debian is /var/log/messages, but on Linux Mint it's /var/log/syslog.
These files are rarely easy to read, and almost always it takes experince to know what to look for, and how to interpret what you find.
In newere Linux distributions the logs are only accessible via journalctl, for example like this:
journalctl -t sshd
Let's look for a simple example: login via ssh.
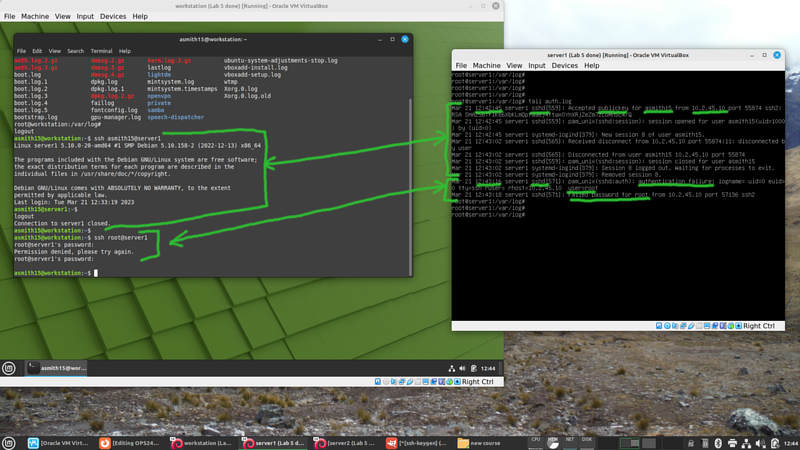
- First ssh from your workstation to server1 using your key setup.
- Then attempt (unsuccessfully) to ssh from your workstation to server1 as root.
- Read through the lines in the auth log and try to find as much useful information as you can.
There is no consistency in terms of what each service logs and in what format. There can't be any because services all do different things.
Submit evidence of your work
Submit the following screenshots to show that you've completed the work:
- On your workstation and each server: contents of ~/.ssh/
- On your workstation: ssh to each server VM as a regular user without using a password.
