OPS345 Lab 7
THIS PAGE IS A DRAFT, NOT READY FOR USE YET
SMTP Encryption
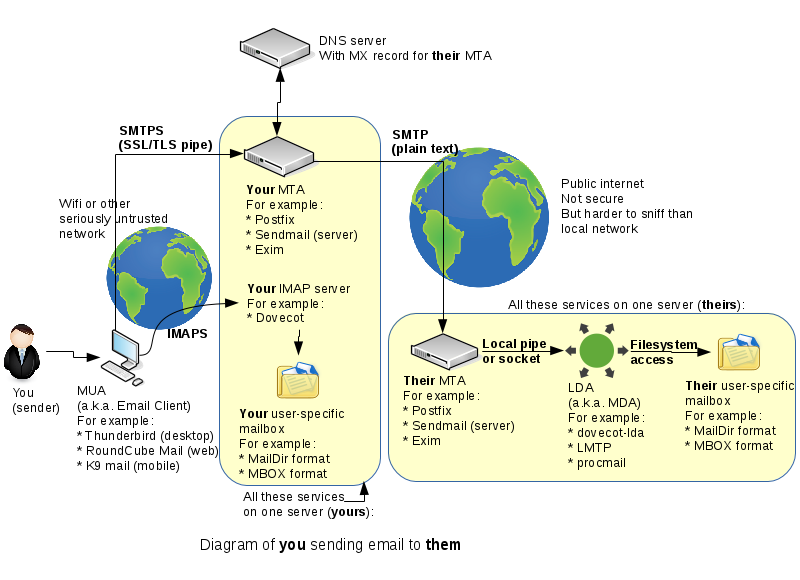
One thing we haven't spent time on last week is the connection from your email client to your email server. This will very often be on a very untrusted network, such as a free wifi network you found in some random place.
In this lab we'll set up your MTA to accept encrypted incomming connections, so that it won't matter what sort of network your workstation computer or phone is connected to.
Sadly today there is still no widespread means to encrypt MTA->MTA SMTP connections, which means that fundamentally you cannot trust that your email hasn't been read or modified in transit. This is a problem we can't solve in this course, but we don't need to because it's a very large, global problem. A fix would require every single email server out there to comply with a brand new specfication which hasn't even been developed yet.
Generate encryption keys
You can't use the keys you've generated in lab 5 because they were tied to the hostname youruserid.ops345.ca, and the email server has a different FQDN: email.youruserid.ops345.ca.
- Use certbot again on your workstation to generate a key pair for email.youruserid.ops345.ca. Look at the lab 5 notes if you need a reminder for how to do it. But don't overwrite your web server's keys by mistake.
- Copy your new private key to ~yourusername/ops345/keys/certbot/email.yourusername.ops345.ca.key.pem on the workstation, for safekeeping.
- Copy your new certificate to ~yourusername/ops345/keys/certbot/email.yourusername.ops345.ca.cert.pem on the workstation, for safekeeping.
- Make sure the keys are owned by your regular user, not root.
- Copy the two keys into the appropriate directories (/etc/pki/tls/certs/ and /etc/pki/tls/private/) on your email server.
Configure Postfix
As you did with Apache: you need to tell the email server (Postfix) to use your keys for encryption. There are also some other options you need to specify. None of these are in main.cf by default, so you can copy-paste them from here:
# Settings to enable secure SMTP using my key and certificate:
smtpd_tls_auth_only = no
smtpd_use_tls = yes
smtp_use_tls = yes
smtpd_tls_key_file = /etc/pki/tls/private/email.asmith15.ops345.ca.key.pem
smtpd_tls_cert_file = /etc/pki/tls/certs/email.asmith15.ops345.ca.cert.pem
tls_random_source = dev:/dev/urandom
smtpd_tls_loglevel = 1
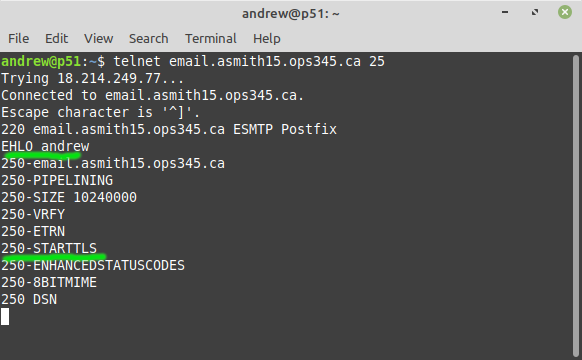
- After you restart Postfix and make sure it hasn't crashed due to a typo in the config file: test it. Use telnet to connect to it and look for 250-STARTTLS in its reply to your EHLO:
That implies that your Postfix server is capable of setting up encrypted connections. We will test this later in the lab using Thunderbird.
IMAP server: Dovecot
SMTP is used for sending and receiving email. But eventually you want to read your emails, move them to another folder, delete them, etc. To do that you need to use another protocol, and the most common one for that purpose is IMAP.
We'll use Dovecot as an IMAP server. You already installed it on your email server in the previous lab, now you'll configure it. It doesn't take much, you need to edit just a couple of files:
- /etc/dovecot/dovecot.conf:
- Set protocols so that Dovecot provides IMAP service only.
- /etc/dovecot/conf.d/10-ssl.conf:
- Set ssl_cert to point to your certificate
- Set ssl_key to point to your pricate key
Note that these are the same keys you used for Postfix. Sharing keys beteween services is not a problem - they are tied to each other and the FQDN, not the service that uses them.
- Start the Dovecot service and make sure it starts automatically on boot.
- Use ss to confirm that Dovecot listens on ports 143 and 993, not 110 or 995 (those are POP3 ports).
- Fix the appropriate firewall to allow your IMAP service to be accessed from anywhere on the internet via port 993 only. Port 143 is for plain-text IMAP.
- Confirm with telnet on your workstation that you are able to connect to port 993. No need to type in any commands into that test connection.
Email client: Thunderbird
Now that you have both an SMTP and an IMAP server running: it's time to set up an email client, we're going to use Thunderbird.
- Install Thunderbird on your workstation.
- Set a password for your regular user on the email VM. Remember that this is a live system on the internet, and that you're responsible for keeping it secure. So don't use P@ssword1! or any other weak password.
Reading email
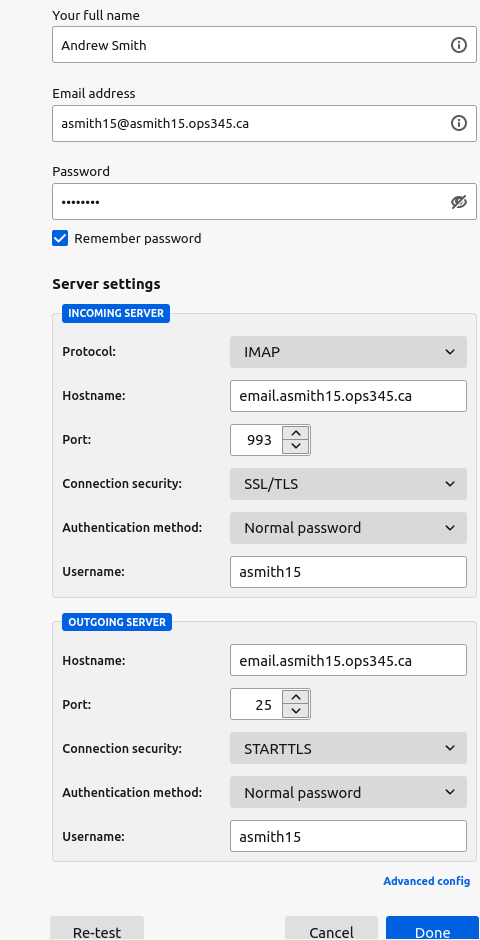
- Create a new account in Thunderbird. You'll need to do a manual/advanced setup. Note that:
- Your email address is @youruserid.ops345.ca but the email servers are email.youruserid.ops345.ca
- TLS over port 993, with normal password authentication is used for IMAP
- STARTTLS over port 25, with normal password authentication is used for SMTP
- Your username does not include the @youruserid.ops345.ca part
- Don't accept any security exceptions. Your certificates are supposed to be signed by Let's Encrypt, whose public key comes with Thunderbird.
- If you make a mistake: you can always remove the account you created (and the SMTP server) from Thunderbird and start over again.
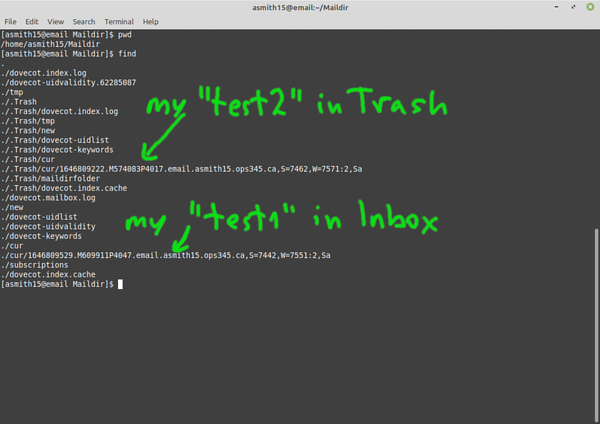
- There should be an email or two in your inbox from the previous email lab. You can delete it and see that it goes in the Trash folder. Try to find this message in your Maildir. It's in a hiden directory.
- For example in this screenshot I looked at my Maildir after I deleted the email with the subejct "test2" but left "test1" in the inbox:
Sending email
- tail -f /var/log/maillog and send a message from thunderbird
- The message is not sent, because postfix is not configured to authenticate users. encryption alone is not enough.
- https://www.xmodulo.com/enable-user-authentication-postfix-smtp-server-sasl.html
- except the SSL/TLS parameters part.
- Send email again. Note the messages about connection timed out. We can't do anything about that in AWS Academy:
- There's more to do anyway to set up a real sending server, as a minimum DKIM/SPF but reverse DNS for the domain also helps.
- https://aws.amazon.com/premiumsupport/knowledge-center/route-53-reverse-dns/
- http://littlesvr.ca/grumble/2014/01/26/setting-up-sendmail-on-a-dynamic-ip-part2-spf/
- Eventually the email you tried to send will bounce because that's a temporary error
- webmail


