OPS245 Lab 5: Difference between revisions
| Line 115: | Line 115: | ||
* Resize the logical volume for '''/var/www''' to '''2GB''' | * Resize the logical volume for '''/var/www''' to '''2GB''' | ||
* Resize the logical volume for '''/var/lib/mysql''' to '''5GB''' | * Resize the logical volume for '''/var/lib/mysql''' to '''5GB''' | ||
= Submit evidence of your work = | |||
Submit the following screenshots to show that you've completed the work: | |||
* On '''server2''': <code>vgs && echo && pvs && echo && lvs && echo && mount | grep mapper</code> | |||
* On '''server3''': <code>vgs && echo && pvs && echo && lvs && echo && mount | grep mapper</code> | |||
[[Category:OPS245]] | |||
Latest revision as of 23:19, 3 March 2023
LVM Overview
A fixed partitioning setup works fine in many scenarios, but it lacks a lot of flexibility. Using LVM we can avoid the slow and complicated process you've seen in the previous lab, when we tried to extend the size of a partition.
Here's a comparison of how a physical storage device is used in the traditional setup (the one we've worked with in lab 4) and in LVM:
| Traditional partitioning | LVM |
|---|---|
|
|
Effectively a logical volume is equivalent to a partition, but it is not expected to be fixed in size, and it is not stuck on any specific hardware storage device.
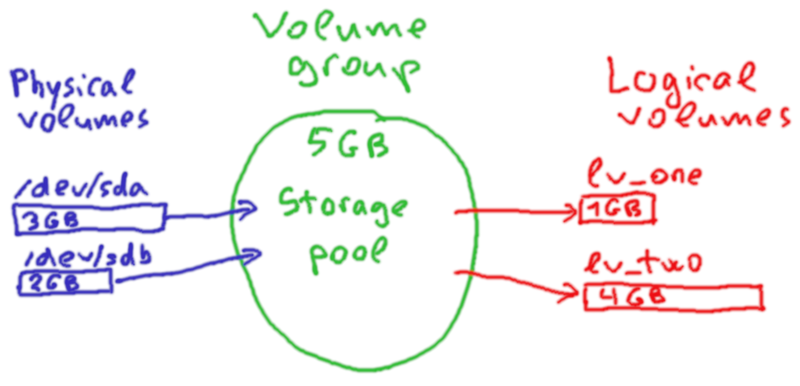
Here's a graphical overview of how storage is managed in an LVM system:
In this example there are two drives (one 3GB and the other 1GB in size). They are both added to the LVM storage pool (called a volume group). Then two logical volumes are created using the space available in the volume group (one 1GB and the other 4GB in size).
Note that this kind of setup would be impossible to create with traditional partitioning. Since a partition must fit on one drive: you couldn't have a 4GB partition in this case.
Basic commands
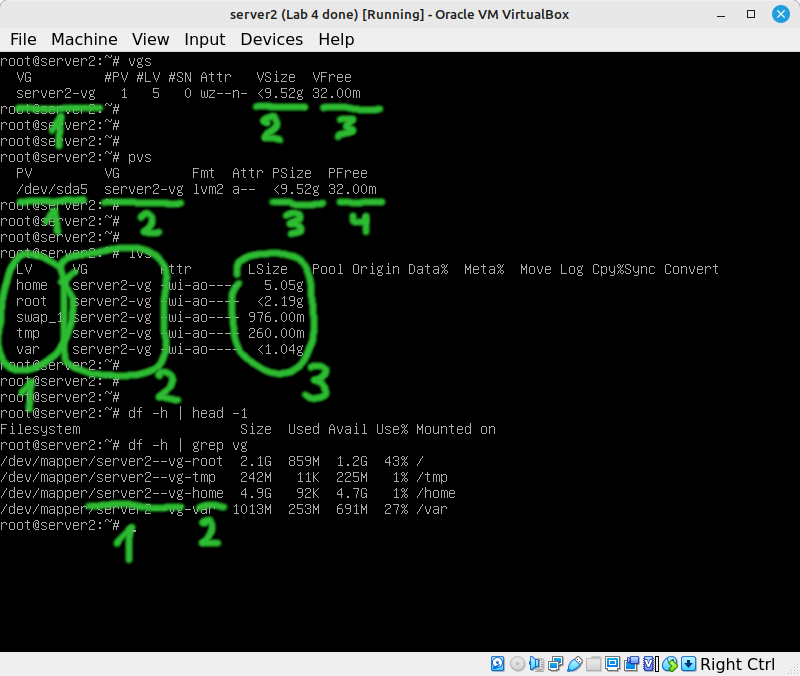
If you followed the installation instructions from Lab 1: your server2 will be using LVM. Run the following commands on server2:
vgslists the volume groups on your system. You will likely never see more than one volume group on one machine. It shows you:- The volume group name (you'll need it for some commands).
- The volume group size (the sum of the sizes of the physical volumes in this volume group).
- The amount of space in the volume group which has not been allocated to any logical volumes.
pvslists the physical volumes on your system. It shows:- The device name of the physical volume. Note that it doesn't have to be an entire drive, it can be a partition. On server2 most of your 10GB drive is allocated to a partition (sda5) which is used as a physical volume.
- The volume group this physical volume is part of.
- The size of the physical volume.
- The amount of the space on this physical volume which is not allocated to any logical volumes.
lvslists the logical volumes on your system. It shows:- The name of the logical volume.
- The volume group this logical volume is on.
- The size of this logical volume.
- It does not show how much space is used on this logical volume, you'll need to run the
df -hcommand to see that.
df -hdoes the same thing in an LVM system as in any other system, it shows you which devices you have mounted where and how much space is used on those devices. The device filenames for your logical volumes are in /dev/mapper and their names are a combination of:- The name of the volume group, and
- The name of the logical volume.
- You can also use other familiar commands like
blkidandlsblk.
Shrink home and create www
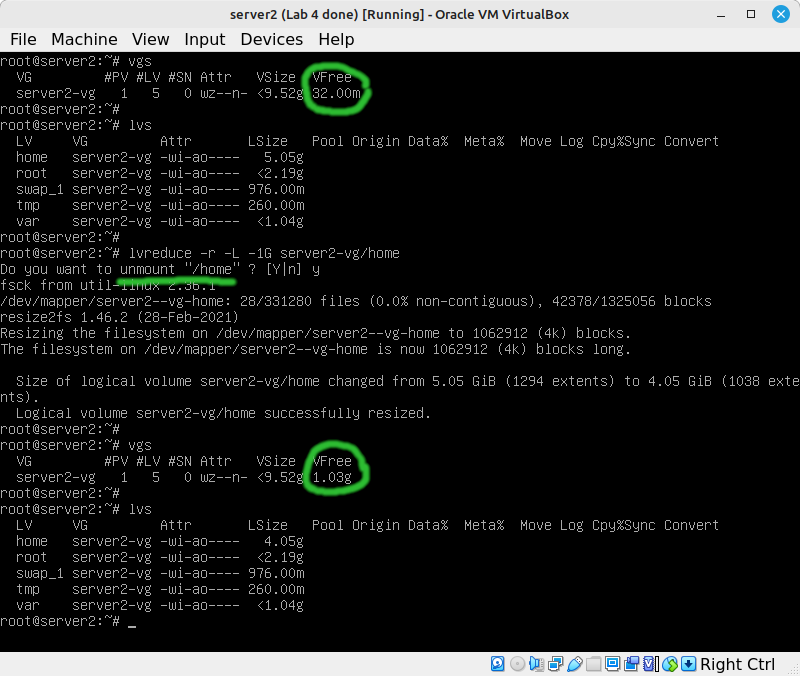
Most of the time what happens is you run out of space on a logical volume and you need to expand it. But since we only have one lab for LVM: we'll add a less common operation: shrinking a logical volume.
- Assuming you already confirmed that your server2 is using LVM, run the following on server2:
The arguments for lvreduce are:
- -r shrinks the size of the filesystem first, then reduces the size of the logical volume.
- -L -1G instructs lvreduce to shrink the size by 1GB. You can also use a specific final size if you prefer.
- server2-vg/home is the name of the volume group, then a slash, then the name of the logical volume.
Note that it is not possible to shrink an ext4 filesystem (nor most other filesystem types) while it's mounted. So for example if you were logged in as a regular user (therefore using the /home filesystem) you would not be able to run this command successfully.
- Now you have 1GB of unused space in your volume group. Use all the available space from server2-vg to create a logical volume named lv_www:
lvcreate -l 100%FREE server2-vg -n lv_www
The arguments used here for lvcreate are:
- -l 100%FREE instruts lvcreate to use all of the unused space in the volume group for the new logical volume.
- server2-vg is the name of the volume group from which you'll create your logical volume.
- -n lv_www specifies the name of the newly created logical volume.
Continue with creating your logical volume:
- Use
lvsto confirm that lv_www was created (it should be just over 1GB in size). - Run
blkidto see that lv_www is not there. That's because you haven't yet created a filesystem on this logical volume. - Format your new logical volume with an ext4 filesystem:
mkfs.ext4 -L www /dev/mapper/server2--vg-lv_www
- Confirm that the new filesystem was created using
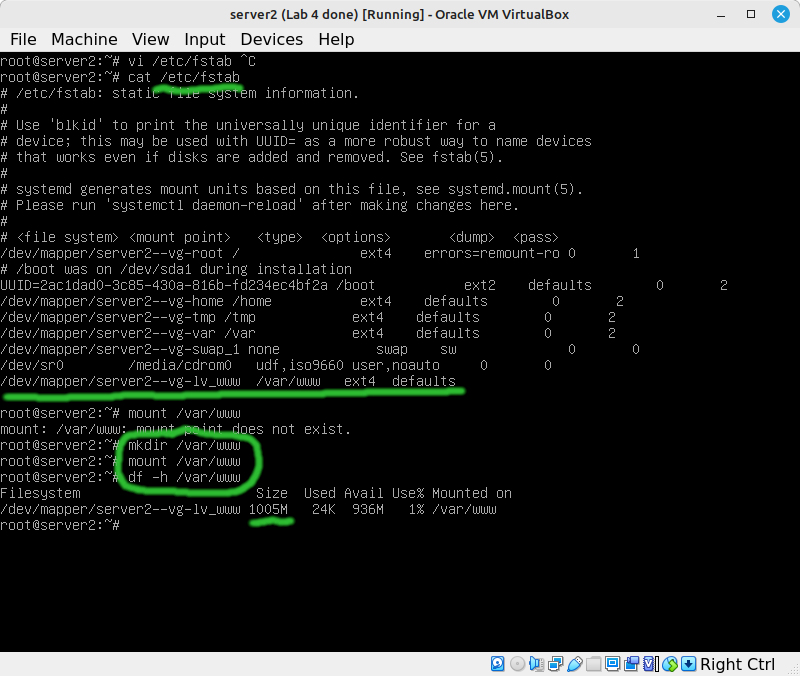
blkid - Modify the fstab to instruct the machine to mount lv_www onto /var/www when it boots, and create that directory:
- The double-dash is an LVM quirk combined with the shortsightedness of a Debian team member. Since LVM uses the dash to separate the volume group name from the logical volume name: it needs to do something to differentiate that dash from the dash in the volume group name. Unfortunately the Debian installer put a dash into the name of the default volume group (server2-vg).
- Remember that mistakes in /etc/fstab are critical. Confirm that you can mount /var/www before you reboot your system.
Expand lv_www
This is the one of the most common and valuable use cases in LVM.
- Simulate running out of disk space on /var/www by creating a file filled with zeroes:
dd if=/dev/zero of=/var/www/large.file
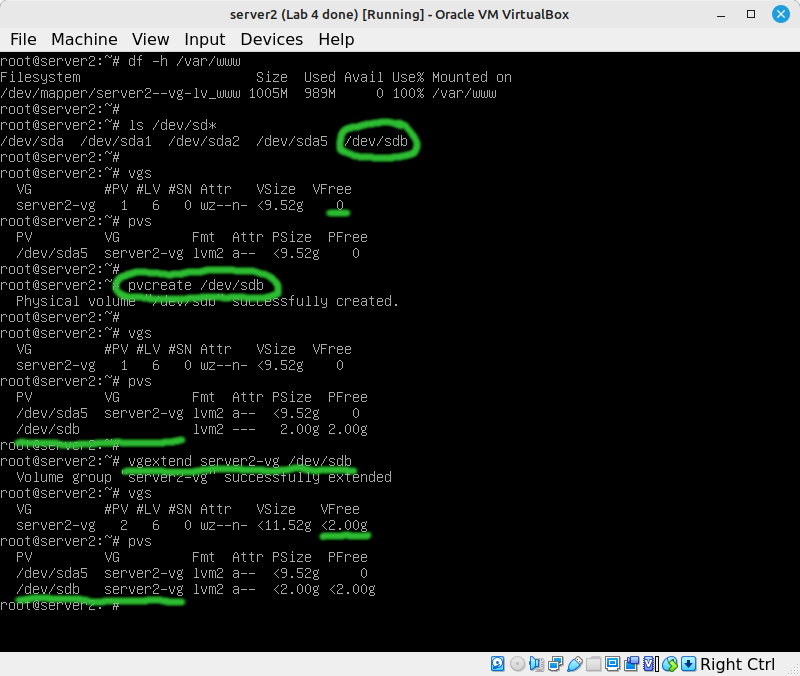
- Shut down server2, and add a 2GB hard drive to your SATA controller. Having to shut the machine down is a VirtualBox limitation. On some other virtualization platforms, and even with real hardware you can plug in new harddrives while the system is running.
- Look for a new device file in /dev which represents your new hard drive. For me it's /dev/sdb.
- Note that the new drive isn't yet being used in any way.
- Use
pvcreate /dev/sdbto mark /dev/sdb as a physical volume usable by LVM. - Add it to your volume group, expanding its size.
- Now that you have space available in your volume group: make the lv_www logical volume bigger.
lvextend -r server2-vg/lv_www -l +100%FREE
- Note that lvextend with the -r option will make a logical volume and the filesystem on it bigger.
- Also note that unlike lvreduce: lvextend does not require unmounting the ext4 filesystem before the operation. Which means this can be done with zero downtime.
More practice on server3
Now that you have the basics: apply what you learned in server3.
- Add a 10GB drive to server3.
- Add the whole thing to the server2_vg volume group on server3 (remember it was cloned from server2, that's why the volume group has server2 in the name).
- Allocate one 1GB logical volume, format it and mount it permanently on /var/www
- Allocate one 3GB logical volume, format it and mount it permanently on /var/lib/mysql
- Resize the logical volume for /var/www to 2GB
- Resize the logical volume for /var/lib/mysql to 5GB
Submit evidence of your work
Submit the following screenshots to show that you've completed the work:
- On server2:
vgs && echo && pvs && echo && lvs && echo && mount | grep mapper - On server3:
vgs && echo && pvs && echo && lvs && echo && mount | grep mapper
