OPS345 Lab 6: Difference between revisions
| Line 11: | Line 11: | ||
We'll set up an SMTP server in this lab and an IMAP server in the next lab. | We'll set up an SMTP server in this lab and an IMAP server in the next lab. | ||
= email | = New VM: email = | ||
* Create a new VM, similar to the www VM you created earlier. Make sure that it: | * Create a new VM, similar to the www VM you created earlier. Make sure that it: | ||
Revision as of 12:47, 8 March 2022
THIS PAGE IS A DRAFT, NOT READY FOR USE YET
In this lab we'll start working with email. It's an ancient concept, but it's still relied on for most business communication. New and exciting messaging platforms come and go, but email has been around for decades and isn't going anywhere soon.
Email services components
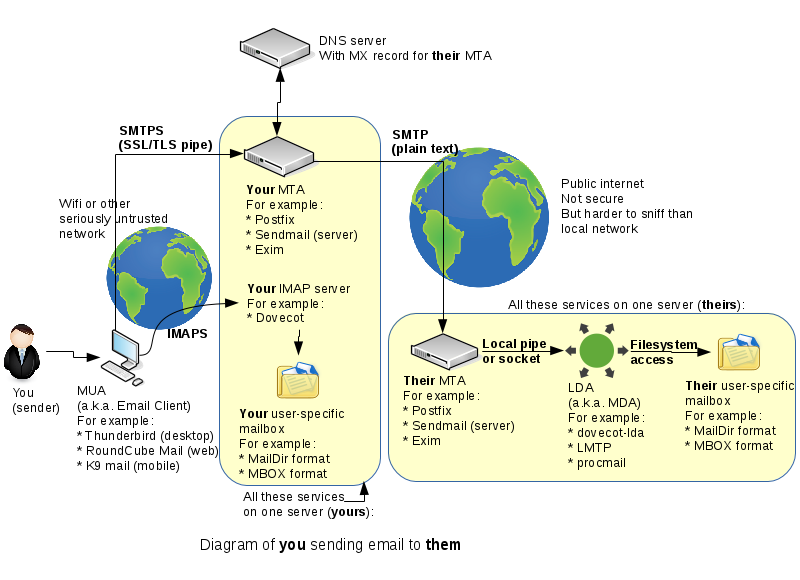
Originally there was only one "email" protocol: SMTP. It was designed to address, route, and receive messages for a destination user on a destination server. Later an extra couple of protocols (POP3 and IMAP) were developed so that people wouldn't have to read their email on the command-line on the SMTP server. Now there are many components, making a powerful, reliable, but complex system. Here's a simplified diagram of what typically happens when you send an email to someone else:
By the end of this course you should be familiar enough with all these components to be able to speak about them comfortably.
We'll set up an SMTP server in this lab and an IMAP server in the next lab.
New VM: email
- Create a new VM, similar to the www VM you created earlier. Make sure that it:
- Is in vpc-ops345 (where no public IP address should be assigned by default).
- Has the IP address 10.3.45.12
- Gets an extra 4GB EBS volume, not to be deleted automatically if the VM is deleted.
- Is in a new security group named ops345emailsg, which will allow SSH acccess from the router only and SMTP access from anywhere.
- Name the new instance: email
- After it starts: do some configuration you should be very comfortable with by now:
- Set up port forwarding on the router so you can SSH to email via port 2212 on the router. The email server is going to have its own public IP, but remember we're pretending that we're monitoring all SSH traffic using special software on the router machine.
- Create a new user and delete ec2-user.
- Set the hostname to email.yoursenecaid.ops345.ca
- Allocate a new, permanent static IP named email_public_ip and associate it with your email server.
DNS records
Email used as you're used to it requires a couple of DNS entries. One A record for the server, and on MX record for your domain.
- Log in to your Bindistrar.
- Create an A record for email.yoursenecaid.ops345.ca with the static IP you assigned to your email server. This is just a typical A record.
- Create an MX record with the value email.yoursenecaid.ops345.ca.
- This record is for other people's email servers who want to send email to anyone@yoursenecaid.ops345.ca
- It specifies that the receiving SMTP server for yoursenecaid.ops345.ca is email.yoursenecaid.ops345.ca
- The priority is there for when you have one or more backup email servers. You would if this email server were important, but in this course you don't so you can pick any number for the priority.
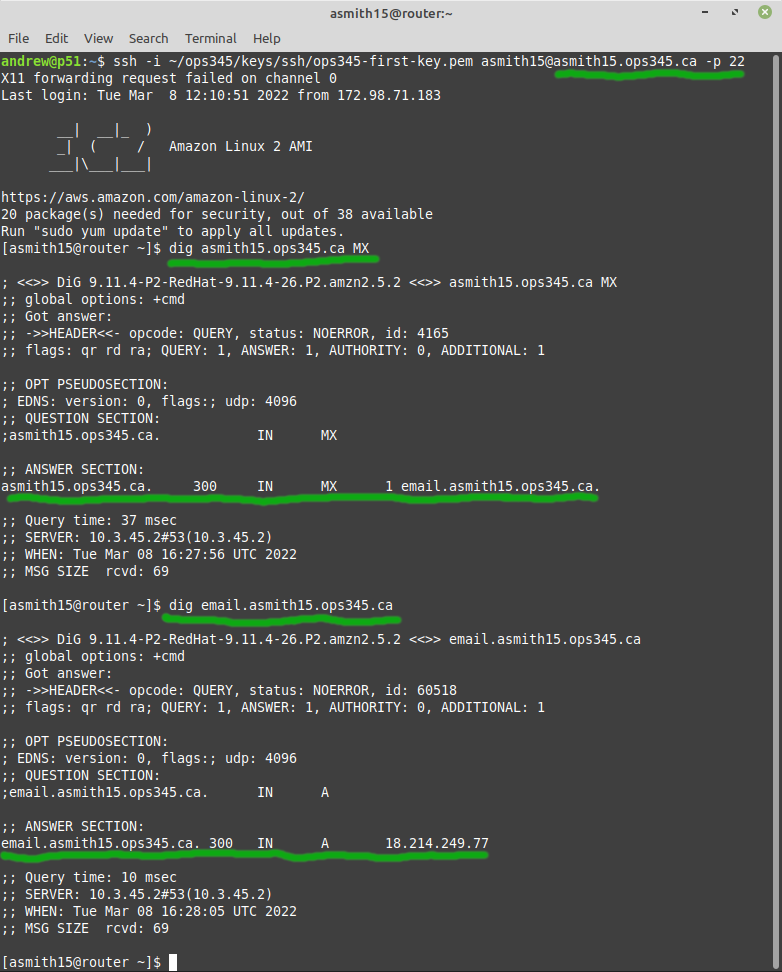
Remember that DNS records are cached, so if you make a mistake: you'll need for the TTL to expire before you can test your updated records. One way too give yourself two chances to get it right is to first test your MX record on the router. Then if it's wrong: you can test your second attempt on your workstation before the TTL expires on the router's caching DNS server.
- Test your MX record on the router:
Storage
For the www VM we set up an external storage device so that we wouldn't lose our website if the server was damaged or deleted. We'll do the same for the email VM. You can look back at lab 3 if you need a reminder for how to do the following steps.
- Create a volume group vg_email with the second drive as the only physical volume.
- Create a logical volume lv_email
- Create a temporary directory /tmp/home and mount lv_email there.
- Move all the contents of /home to /tmp/home
- Edit your fstab to make sure lv_email gets mounted automatically on /home when your system boots.
- Hold your breath and reboot. If you did it right: you should be able to ssh back in and everything will look the same, except now there's a lost+found directory in /home, which tells you that there's a filesystem mounted on there.
[root@email ~]# vi /etc/fstab
[root@email ~]# mount /home/
[root@email ~]# ls /home/
lost+found
# try to ssh now, it won't work
[root@email ~]# umount /home/
[root@email ~]# mkdir /tmp/home
[root@email ~]# mount /dev/mapper/vg_email-lv_email /tmp/home/
[root@email ~]# cd /home/
[root@email home]# ls -a
.  ..  andrew
[root@email home]# mv andrew/ /tmp/home/
[root@email home]# cd /
[root@email /]# ls /home/
[root@email /]# ls /tmp/home/
andrew  lost+found
[root@email /]# umount /tmp/home/
[root@email /]# ls /tmp/home/
[root@email /]# ls /home/
[root@email /]# mount /home/
[root@email /]# ls -a /home/andrew/
.  ..  .bash_history  .bash_logout  .bash_profile  .bashrc  .ssh
[root@email /]# reboot
- Confirm confirm can still log in. if not: have to rebuild email vm
- The LV on a separate storage device is as valuable as the www LV. If the Vm is lost or damaged: EBS device is still there, and it's also easier to back up.
- connect to myseneca email using thunderbird on linux mint
- postfix is installed by default, but only used for localhost
- instal dovecot to get dovecot-lda
- /etc/postfix/main.cf:
- mydomain = asmith15.ops345.ca
- myorigin = $mydomain
- inet_interfaces = all
- mydestination include mydomain
- restart postfix
- ss -atnp
- add access to port 25 from anywhere in ops345sgemail
- test using telnet from workstation
- send email from myseneca to asmith15@asmith15.ops345.ca
- check /var/log/maillog
- check ~/
- check /var/mail
- /etc/postfix/main.cf: mailbox_command = /usr/libexec/dovecot/dovecot-lda -f "$SENDER" -a "$RECIPIENT"
- /etc/dovecot/conf.d/10-mail.conf: mail_location = maildir:~/Maildir
- check /var/mail
- check ~/
- server can now receive email. cannot send reliably yet, and need to set up dovecot for imap (next lab)
- create an alias for root: andrew, run newaliases

